Replaces
This part doesn’t fit a . Select from parts that fit.
Frequently bought together
Part Details
Product Features
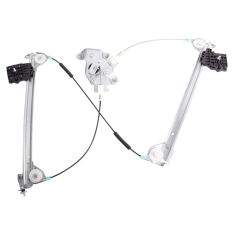
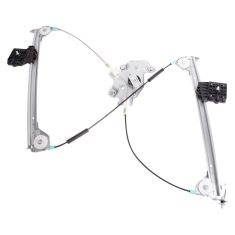
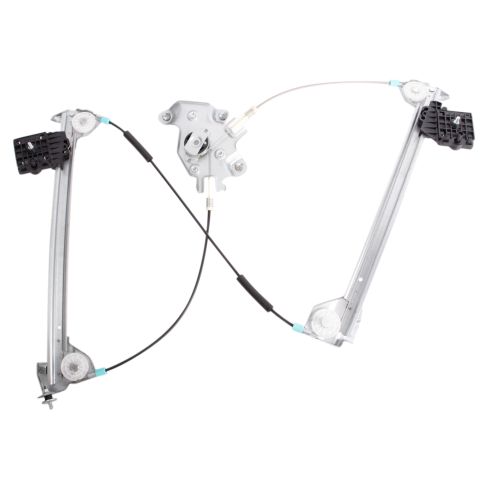
Note: This window regulator is designed to work with factory style motors only. Due to variations in aftermarket designs, replacement motors may not have the correct gear style.
Item Condition:
New
Attention California Customers:
 WARNING: This product can expose you to chemicals including Lead and Lead Compounds, which are known to the State of California to cause cancer, and birth defects or other reproductive harm. For more information, go to www.P65Warnings.ca.gov.
Lifetime Warranty
This item is backed by our limited lifetime warranty. In the event that this item should fail due to manufacturing defects during intended use, we will replace the part free of charge. This warranty covers the cost of the part only.
FREE Shipping is standard on Orders shipped to the lower 48 States (Contiguous United States). Standard shipping charges apply to Hawaii, Alaska and US Territories. Shipping is not available to Canada.
Expedited is available on checkout to the United States, excluding Alaska, Hawaii and US Territories as well as P.O. Boxes and APO/FPO/DPO addresses. Final shipping costs are available at checkout.

Created on:
Tools used
Okay, friends, one of the first things we need to do here is get off the door panel. And to do that, you're going to start up here. I'm going to use a nice plastic trim tool, as opposed to metal, like this. Disconnect the electrical, a little squeeze tab, pull that off and set that aside. Next, we're going to move along to taking this off right here. You can come under it with your plastic trim tool. Should want to lift up. Ours is a little messed up because the inner door panel is kind of wonky here. But it should want to come right up. Take off that clip as well. In there. Use your plastic trim tool. I'm just going to pry this out right here. Set that aside. And if you look, you're going to find another mounting bolt hidden right here. Go ahead and grab underneath this little panel here. Draw this plate off. If you were to look, you'd see it has these little clips on the top and the bottom there. That's kind of what's holding it in. If you look inside here, you're going to see a T30 bolt. We're going to remove that.
Next, we're going to move along to doing the sides and the bottom. You're going to notice that there's 7-millimeter mounting bolts going all the way around. Take those out of there. And carefully come in between here and grab onto this panel. Pull that off of there. There's another T30 bolt. Let's get that out of there. Now, we'll grab that panel. Carefully try to lift. Okay, this is looking good. You've got a little hook. Two little hooks down along the bottom here. If you look, there's one underneath this black area right there. And then there's one right here. Those just kind of sit down into those door panels. You want to lift up, draw them up and out of there. Now, we need to disconnect all the electrical. Right there. This is done. We've got the cable right here. We're going to want to get this out of there as well. Just grab your cable, give it a little twist, so you can see both those ears. Go ahead and grab on to those with some needle-nose pliers. And then carefully draw this out. Can sometimes have to twist it. Now, we're going to take off this vapor barrier. Just be careful not to get it on yourself. It's super sticky. Got all that goo. There we go. That exposes everything we need to see.
The next thing we need to do is bring the window up to a working point where we can get to the mounting bolts in here. And we can also have an area to grab onto the window up here. So, let's reconnect in that switch.
We're going to put the key in the on position. And we're just going to put up the window to right about there. That looks pretty decent. Next thing we're going to do is we're going to use a 10-millimeter to loosen up these bolts, so we can get the glass out of here. I'm going to leave this in just a few good threads. Now, we'll do the same to the other side. All right, I'm holding up the window down here. Of course, I have my safety protection on. Carefully grab that window, and pull it up and out of here. The next thing we're going to do is remove the electrical connector from the motor. Squeeze that tab. Draw this out. The next thing we want to do is start removing the mounting nuts that hold on the window regulator. And then, of course, the nuts that are holding on the motor as well. At this point everything can move around fairly easily. This off of here. Give this a twist. There it is, friends.
Next, we're going to remove the mounting bolts for the motor to the regulator using a T30 Torx bit. This off from here. Before we go any further, let's take a quick look at these window regulators. We want to pay a special attention to right along here. This is an adjustment, and what it does is it actually makes sure that you don't go too far up or too far down with your window when it's in the all the way up position. So, when you put your window up, this is going to come all the way up bringing the glass up, up, up, and then it's going to bottom out here. You want to make sure that the top of the window is bottomed out with the top of the door jamb. And this is, of course, on both sides of the regulator.
The next tool that you're going to need to have is a micrometer. You can also do this with a ruler, or tape measure, or whatever you want, really. But basically, we want to measure from the bottom portion of this to the top portion right there. And for my particular vehicle, it measures out to 1.83 inches. So, then I would go over to the corresponding side, on my new regulator, I'll go right to the bottom there. And then I would have to adjust this till it comes up to the point that it's at that 1.86. Want to grab this with my Phillips-head, and I'm going to break free this nut. That's the jam nut. We'll do the same on both sides. And then once we have, we can go ahead and move ahead to putting this into the vehicle. Let's get both of these out of here. Make sure you keep these little sleeves on the bolts. That's important for the glass. Don't forget to go ahead and put that window and motor back on here. Just going to turn it until it wants to line up. Should slide right in. Get your three mounting bolts, start in all your bolts before you tighten any of them up.
Now, getting all this back into the door might seem like it's a little bit of a mess and it's a little difficult, but you can do it. But the key to it is to make sure you have this facing in the right direction. You want to make sure that you have the cable that goes from the top of the right hand down to the bottom is behind the other cable. If you have it the opposite way, like this, you're going to have issues. Okay? Obviously, it doesn't go that way. Just flip it. Boom. Let's get this in here. Feeling like if I can keep it all together and down like this. All right, this is looking pretty good so far. Let's line up that top bolt, and line up the bottom one. There we are. Start those nuts on there. Do the same to the other side.
Okay, I have all the mounting nuts started on there. Let's go ahead and snug them up. Let's move along to doing the electrical connector. Push it in until you hear a click. Give it a tug. Beautiful. Let's reconnect that switch, put the key in the on position, and get the window regulator down to where it needs to be. Keep your fingers clear. Here we go. We've got our glass. Let's be very careful at this point. I'm just going to see if we can get it worked into the channel here. Obviously, you don't want to mess up your window sweeps. You definitely don't want to drop the glass. And put my hand under here, being very careful guiding it down. This should want to set right into its resting points.
All right. So, that looks good. I can see right through the hole in the window regulator mounting area. The hole in the window and then, of course, the other side with the nut. If you can't, you might just be out of your track, in which case I would just lift the glass back up carefully, slide it back down, and pay special attention to this area over here. If you're not lined up in this area, it's going to put the whole glass off out of kilter, and it won't be lined up. Putting in our bolts that have our nice bushing on there. You need to make sure you have that bushing like I said before. I'm just going to go ahead and snug that a little bit. Do this one. Carefully tighten these with your ratchet. Bring it so it bottoms out. Then just a teeny bit more and that's good. Okay, bottomed out, teeny bit more, and that's good.
Let's get this plugged in. Give it a little test. Looks to me like it's stopping just before it's getting to the top area. But I don't want to go by this rubber piece. I'm going to take a special look, shut the door, and see where it seats up against here. So, it looks like we're pretty close. If I was to bring this up, it would, of course, seat much better, and we wouldn't have any chance of moisture getting in. So, what we need to do is adjust those stop points on the regulator. So, to do that, I'm going to bring the window down, so I can see the adjustment points. I've got one right here, then I've got the other one right here. Like I said, we need to bring the window so it comes up a little higher. So, what I'm going to do is I'm going to unscrew these a little bit and bring these a little bit further down. To do that, you're going to use your 10-millimeter. Loosen your jam nut. Just going go probably about that much space for my application. You might need to do this a couple times to get the proper adjustment. Going to bring this down. As I unscrew this, you can tell that it's coming down. Okay, I'm not going to do anything with the jam nut yet, because I'm sure I'm probably going to have to readjust it a little bit more. All right. So, it looks like I still need to come up a little bit more on this side. I'm going to do that again real quick. Once I feel like this is good, we'll try it on the regular door area.
So, now we're at the step where we're going to be putting this back on here. You just want to make sure that you get your cable going back through in the area where it's supposed to. You've got your little hole. It's going to go through just like that. Everything else should be fine. Now, you're just going to stick that butyl tape back on. If it's not very sticky, you can go ahead and tape it back on with something else. You definitely want to have this vapor barrier on here. So, let's get this cable with the door handle on. Slide it in and then back. And then it should come like that, and then you push it through the hole. Double-check to make sure it's completely latched in. If that's not latched, or the latch is broke, you're going to need to fix that. You don't want this falling off. Grab that electrical connector. Get it ready to go through there. This one is going to come up here. The smaller one connects right in there. At this point, you're going to want to pay special attention to your lock. And of course, the hooks that run down along the bottom of the door here that go into the actual door. So, let's line everything up to approximately where it needs to go. Push that door into the lock position for a second. Let's see. Okay, that's coming through there. I'm going to push in along the bottom. And then hopefully, this should want to slide down once I have it all lined up. There it is. Okay. I'm going to take a peek. Looks like I can see my bolt holes coming through here. I can see my bolt hole there. I've got my wiring. I've got my other wiring. This looks great. Now, we're going to remount this door panel. We're going to start off with the Torx head bolts. Now, we're going to grab our door panel mounting bolts that come around the edge. We'll get all those in. Let's get this piece back on here. It's going to come up and through there just like this. Line up those tabs with the holes. Loving bonk. That looks pretty great. Got our switch. Give that a nice wiggle. This back in here. Awesome. Let's get this piece in. And of course, this piece. Attach it in. Give it a nice tug. Line these up. Push it in.