Hi. I'm Mike from 1AAuto. We've been selling auto parts for over 30 years!
In this video we will be removing and replacing a wiper transmission in a 2008 Subaru Outback. If you need this part or other parts for your vehicle, click the link in the description and head over to 1AAuto.com.
Before we take the wiper arms off, we're going to want to mark where the old blades are. You can use a dry-eraser marker, or a piece of chalk, or a crayon would work, just something you can mark and then wipe off. I'll do the same with this one. Just put a little mark there, so, when you put it back, you know that's where the blades should be on the windshield.
I'm going to pull this cover off, right here. I'm going to use a 90 pick, and pry up, underneath. It'll release. I'll do the same for this one. You can use a flat-blade screwdriver as well. Pull those covers off.
I'm going to take this nut off. I'm going to use a 14 millimeter socket, an extension, and a ratchet. Break it free, and then you can use just the socket and the extension. Pull that nut out. To pull this arm up, I'm just going to wiggle it back and forth, push down, and pull up, and the whole arm should come out. Now, I'm going to take this one off with the same 14 millimeter socket, an extension, and a ratchet. Break it free, and then twist it off. Pull the arm up, and do the same. Grab it, and push, and pull. There's the wiper arm.
Next, we're going to take these push clips up. There's one right there. There's these three right there. For this one, right here, we're going to use a trim tool. We sell these at 1AAuto.com. I'm just going to pry it underneath the panel, pry up, just to pop that out. For these little ones, I'm going to use a right-angle pick, just to get it underneath. You release the top part, and the rest of it pulls up. We're doing the same for the other side. Lift that up.
Next, we're going to take our trim tool and come under here, and we're going to pop this up. There's some clips that hold it on. Underneath, just like this. There's a clip under here. I'm going to pull that up and out of the way. Same with this side. There's a clip that pops this up, and then this slides out from under the fender. I'm going to pull the cowl cover off.
All right, before we pull this off, you want to make sure the key is not in the car and nothing is on because you could hurt yourself if this motor starts turning or anything. There is potential to get fingers caught and stuff, so make sure that's all set, then we're going to disconnect the electrical connector. Under here, there’s a little push to release the connector. Push up and then pull it out, just like that.
Since that is out, we can take our trim tool and disconnect this right here, this push retainer. There we go.
Next, we're going to use a 10mm socket, an extension, and a ratchet. We'll take these four bolts out. Once all the bolts are out, we can grab the transmission and pull it up. Twist it a little bit and pull it out.
All right, so before we take the wiper motor off of this transmission, we have to index where the motor is going to go in relation to these bars. We'll have to take that nut off but I just want to make sure, with a felt tipped pen. There's a little arrow right here on this arm and what I'm going to do is make a mark on the shaft of the motor, going like that so that I can know where the mark is. Then down on the motor, I know it's almost on this little area, but it's not quite, so I'm going to make another mark right there. That's where we'll index the motor when we go to put the new one on.
So I'm going to take this nut off but I don't want this arm to spin, so I'm going to use a large adjustable. Stick that on the arm and then I'm going to use a 17mm wrench. I'm going to take this off while I'm holding the arm.
Take a screwdriver and get up under this washer, pull that up. Now to get this up I can try to wiggle it up. It's not coming out, so I'm going to try prying it up this way. I'm going to use a pry bar and just pry it up under here, just like that. I can go back and forth and that will come up.
Next thing I take these two 10 millimeter bolts off. I'm going to use a 10 millimeter socket and a ratchet. Pull that bolt out. Pull that bolt out. Just wiggle this off. There's a little bit of corrosion on ours so it was a little tricky getting it off, but it's how it comes off.
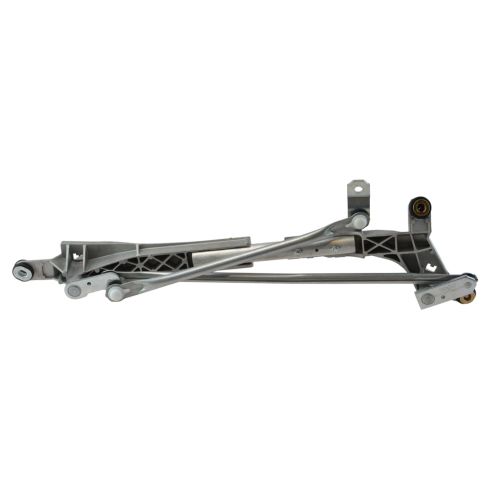
As you can see this is our old wiper transmission. This is our new wiper transmission from 1AAuto.com. As you can see the mounting holes are in the same location. These arms are in the same spots. All this is the same. Flip it over. These little safety things come off so that they don't damage the threads. This is where the wiper arms mount. These are the same. You will need to tighten these up. Your motor is going to go right here. One thing to keep in mind when you get your wiper transmission: these arms, when you're holding it like this, you want to move this arm so that it goes down. Otherwise the wipers will not work properly. Get yours at 1AAuto.com and you'll be ready to rock and roll.
All right, so we're going to install our motor. What we want to do is take these nuts off these bolts. I'm going to use a 10 millimeter wrench and a 10 millimeter socket and ratchet. Take these off. I'm just going to pull the nuts off. I'm not going to pull the bolts out. Pull this one off.
So we're going to slide this wiper motor over here. Then I'm going to start tightening these bolts up underneath here. We'll use the ratchet, the 10mm, snug these up. I can also snug these other ones up over here. Snug this one up as well.
So when I go to put this down, I'm going to twist it this way. Install it there and that will make sure that the motor is in the correct location. I will take my nut and put that on. I'll take my adjustable pliers so that I can hold the arm, and then use my 17mm wrench. I'll tighten this down. Tighten that snug and it should be indexed properly.
To reinstall this, we're going to slide it in like this. Slide the motor down a little bit. Put it like that. Now, we'll take our bolts, and we're going to get them all started before we tighten them down. Start tightening these down one at a time. Because these are in rubber grommets, these really don't tighten down. You just want to snug them up a little bit, just like that.
Next, we're going to connect our electrical connector. Remember to keep clear of the mechanical mechanism, because you don't want to hurt your fingers. It's going to go in with the skinny side to the top, the clip on the bottom, just like that.
Push our push clip back in there. It holds the wire there. Some of these clips may have fell off. You're going to reinstall these clips on the cowl, up here. Twist this around, and go over. You're going to want to go over the wiper transmission, line all this stuff up, start pushing it down. Line this up and push this push pin down there. Do the same on this side. Line this up and push this push pin down here.
We can take these. I'm going to insert them over here. Go under the fender first, and push that down. Do the same on this side. Go under the fender, push that down. Next, we're going to install these push pins. You want this top part to be up a little bit. Install the bottom part, and then you can push it down, just like that. Same with this one.
Sometimes, you can push the lower part of the clip in first, and then push the upper part in like that. Install them on this side as well. Push it down. Now, we're going to push these in, that are on the weather strip. Get these locked down in.
Next, we're going to install our wiper arm. Put that on. We're going to line it up with our marks that we made earlier, right there, install our nut for the wiper arm. This is our 14 millimeter socket and extension. Tighten this down. We're going to torque these to 14 foot-pounds. We'll take this one. We're going to install this one over here. Make sure that lines up with our marks over there. Snug this down with the ratchet, and then we'll torque it to 14 foot-pounds. I'm going to hold the arm while I'm torquing it.
You can put the covers back on. I'm going to slide this down into the groove, press it down. Same with this one. Slide it in abd push it down. Now, we'll close the hood. I'll turn the key on and test them. We want to make sure that it's not coming off the edge of the windshield, and that they're not hitting each other. We'll test them on high. It works on high. It goes back to park.
Thanks for watching. Visit us at 1AAuto.com for quality auto parts, fast and free shipping, and the best customer service in the industry.