Replaces
This part doesn’t fit a . Select from parts that fit.
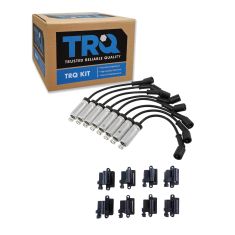
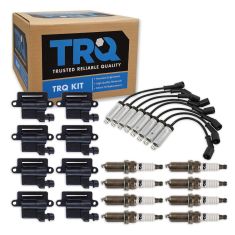
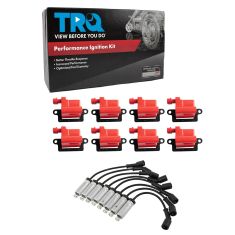
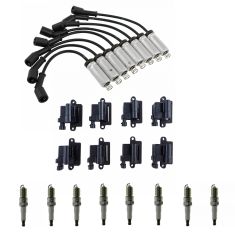
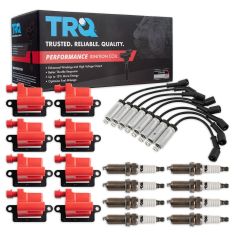
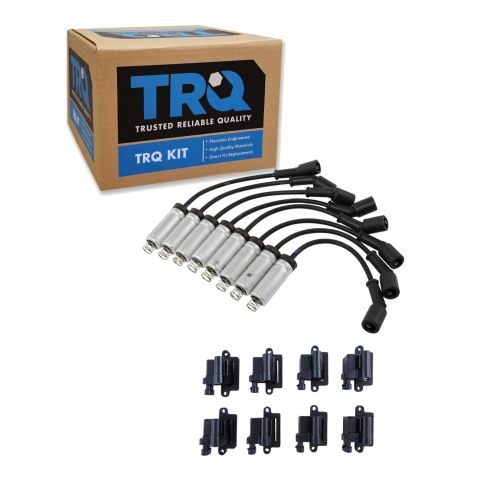
Frequently bought together
Part Details
Product Features
Item Condition:
New
Attention California Customers:
 WARNING: This product can expose you to chemicals including Lead and Lead Compounds, which are known to the State of California to cause cancer, and birth defects or other reproductive harm. For more information, go to www.P65Warnings.ca.gov.
Lifetime Warranty
This item is backed by our limited lifetime warranty. In the event that this item should fail due to manufacturing defects during intended use, we will replace the part free of charge. This warranty covers the cost of the part only.
Returns: Parts with electrical components cannot be returned once installed.
FREE Shipping is standard on orders shipped to the lower 48 States (Contiguous United States). Standard shipping charges apply to Hawaii and Alaska.
Shipping is not available to a P.O. Box, APO/FPO/DPO addresses, US Territories, or Canada for this item.
Expedited is available on checkout to the United States, excluding Alaska, Hawaii.
Final shipping costs are available at checkout.


Created on:
Tools used
Okay, we want to disconnect the battery, disconnect the negative cable using an 18-millimeter ratchet wrench or a wrench. And slide that out of the way. Now on this coil, there's a bracket in the way. So, you can take these hoses. Just slide them out of the way, the heater hoses. You can take this bracket off. Just use a 10-millimeter socket. Take that pin off. Don't drop it, and slide that out of the way. You don't necessarily have to take it out of the way if you can gain access to it, but it makes it a little bit easier.
Now, you can disconnect the spark plug wire. Just slide that off, and there's two bolts. One bolt here, and one bolt up top. Take that bolt off. Take that one off. And then slide this coil out. You can disconnect the connector right there, and slide it off. Take the coil, and line it up, and take the bolts, get the bolts started. Just snug these up. Now, I can take a torque wrench and torque those bolts to 71 inch-pounds. Make sure you're on inch-pounds, not foot-pounds. It's good.
Now, you can hook up the plug wire. Make sure it clicks in place, and hook up the connector. Now for this one, you can put the bracket on. Just line it up. Put that nut on, and tighten this up, and snug it up. You're going to take the heater hoses, put them back in the bracket. And for the other coils, it'll be the same procedure. Now, we can hook up the battery. Line it up, and get it started, and snug it up. Just make sure it's not loose. Looks good.
Tools used
All right, friends. So, it's time to get started on doing your spark plug wires. Before you get started on that though, we always like to make sure that you have safety as your number one concern. Eye protection and hand protection at all times. Aside from that, let's get into it.
We're gonna start right over here on the passenger side front of the engine. We're gonna show you how to do one spark plug wire. They're all the exact same procedure. So, I don't necessarily need to make you stay here very long and watch. Grab this right down here. You definitely wanna make sure that your engine is not hot in any way. This area right along here is called your exhaust manifold, and if your engine has been running, it's gonna be very hot. Assuming your engine's cold, we'll come right here. Give this a nice twist. If it doesn't break free, you can use something like pliers or pretty much whatever you want because, well, the wire's garbage anyway. Grab onto it, twist, and pull. It should pretty much come right off of there. Now we'll come right up here. We're gonna do the same thing. Twist it to break it free. Pull it down. There it is.
Okay. So, we've got our new spark plug wire here. Something to pay attention to is our old wire had a nice shield on here for the exhaust. Our new wire does as well. Before we go ahead and start this, we wanna take a little bit of dielectric grease, it doesn't have to be very much, go right along inside this area here where it connects under the spark plug. Take some more, go right along this area right here. The reason for doing this, it's gonna make it so it's much easier to take off down the line, and it's also gonna prevent moisture from getting inside there. At this point, we're gonna let the bottom side dangle and we'll put the top side onto the coil. Press it up on there. Listen for a click. There it is. Give it a nice twist. Give it a little tug. Make sure it doesn't just fall right off of there. We're gonna grab the bottom side, slide it carefully onto that spark plug. Make sure you're going straight on and you're not trying to force the spark plug in any direction it doesn't want to go, because it is made of porcelain and it can break. Force this on. Listen for the click. Give it a wiggle. Give it a tug. Do the same down the line to all the rest.
Tools used
Brought to you by 1AAuto.com, your source for quality replacement parts and the best service on the Internet.
Hi, I'm Don from 1A Auto. I hope this how-to video helps you out, and next time you need parts for your vehicle, think of 1AAuto.com. Thanks.
In this video, we're going to show you how to replace an ignition coil on this 2002 Chevy Suburban with the 5.3 liter, V8 engine. It's the same part and similar process on these Suburbans from 2000 to 2006. The items you'll need for this are a new ignition coil from 1AAuto.com and a 10mm socket and ratchet with an extension.
Your ignition coils are located right here. There are four on each side since this is a V8 engine. To remove these ignition coils, it's the same process for each of them; they're held in with two 10mm bolts. The only difference is this one right here that has a bracket for these hoses over it and that bracket also just held in with a 10mm bolt. We'll show you on this one since it's a slightly different procedure. Just lift up on the tab and disconnect that harness, and then, using a 10mm socket and ratchet, just remove that 10mm bolt, right there. Now you can just pull that bracket aside, and then, pull your spark plug wire from the ignition coil. Then remove the 10mm bolt at the top and the bottom of the coil. The coil will pull right off.
On the left, is the old ignition coil; on the right, is the new one from 1A Auto. You can see they're identical and they're going to fit exactly the same. Take your new ignition coil and push it down into place and then replace those two 10mm bolts. We'll fast forward as Don does this. Now reconnect your spark plug wire and then push this bracket back into place and replace that 10mm bolt. If you're replacing multiple ignition coils, obviousl,y you just repeat the process for each one and finally just reconnect the harness and you're all set.
We hope this video helps you out. Brought to you by www.1AAuto.com, your source for quality replacement parts and the best service on the Internet. Please feel free to call us toll-free, 888-844-3393. We're the company that's here for you on the Internet and in person.
Tools used
You can move these heater hoses out of the way, just pull them out of the bracket and slide them to the side. Disconnect the wire at the plug. You can give it a twist and pull it off. Disconnect the wire at the coil, do the same. Twist it. Slide it right off.
Take the new one. This new one has a little bit of dielectric grease in it. But if it doesn't, you can always add some. Slide the part on into the coil, lock it in place. And then put the other part for the spark plug and lock it down. And you can do the same with the other ones. And move these heater hoses, put them back in the bracket.
Tools used
All right. We want to disconnect the battery. Disconnect the negative cable, use an 8-millimeter ratchet wrench or a wrench, and slide that out of the way. All right. Now, replace the plug wire. Just grab the top of the wire, pull it down. And then, at the spark plug, you can try twisting this first. See if you can loosen it up. Try to pull it. Try not to bend the aluminum too much, but if you're struggling to get it off, you might have to a little bit. There you go. Pulled that one out.
You can take a little dielectric grease or some silicone lubricant. Just put this in the end right here. Then, you want to take the heat shield off the old wire and reuse this. Now, we can line this up, up top on the coil. And then line it up with the plug. Slide it in position. Make sure it clicks in place, just like that. Then you're going to do the same procedure for the other wires.
Now, we can hook up the battery. Line it up, get it started, and snug it up. Just make sure it's not loose. That's good.
Tools used
You can move these heater hoses out of the way. Just pull them out of the bracket and slide them to the side. Then you can access the coils.
You can take this wire off right here. Just twist it back and forth. You should be able to do it with your hand, and just slide it off like that. Disconnect the connector. There's a little tab. Just pull up on the tab, slide it out. Now just take a ten millimeter socket, take this bolt out here and the one right there. Get those bolts out. Grab the coil, just slide it up.
Take the new coil. Set it in position. Put the bolts in. Get those started. Right there and right there. Then I can torque these bolts to 71 inch-pounds. Plug in the coil. Lock it in place. Take the coil wire and slide it on. Then we're gonna do the same procedure for the rest of them.
And move these heater hoses, put them back in the bracket.