Replaces
This part doesn’t fit a . Select from parts that fit.
Frequently bought together
Part Details
Item Condition:
New
Attention California Customers:
 WARNING: This product can expose you to chemicals including Styrene and Bisphenol A (BPA), which are known to the State of California to cause cancer, and birth defects or other reproductive harm. For more information, go to www.P65Warnings.ca.gov.
Lifetime Warranty
This item is backed by our limited lifetime warranty. In the event that this item should fail due to manufacturing defects during intended use, we will replace the part free of charge. This warranty covers the cost of the part only.
FREE Shipping is standard on Orders shipped to the lower 48 States (Contiguous United States). Standard shipping charges apply to Hawaii, Alaska and US Territories. Shipping is not available to Canada.
Expedited is available on checkout to the United States, excluding Alaska, Hawaii and US Territories as well as P.O. Boxes and APO/FPO/DPO addresses. Final shipping costs are available at checkout.


Created on:
Tools used
What's up guys? I'm Andy from 1A Auto. In this video I'm going to show you how to replace the coolant level sensor on this 2001 BMW 325xi. If you need this part or other parts for your vehicle, click the link in the description and head over to 1aauto.com.
With the trunk, open over on the right side or the passenger side, there should be a cover that goes right here. This vehicle doesn't have one, but you're going to want to remove that cover. Battery is located right here. First thing I'm going to do is take a 10 millimeter socket and a ratchet. Loosen up this nut for the negative terminal. That's loose. Slide off the cable, slide it out of the way. I'm going to take these push pins out right here. I'm just going to use some side cutters. Get this center pin, pull that up, and then slide it out. Be careful not to cut it, get those out. Just grab this piece, slide it out.
We're going to disconnect this connector right here. Just push down on that. Slide that out. There's another connector right here. I'm going to slide the wiring out first just like that and then the connector will come out. Just slide that to the side like that. I'm going to take a T25 and a ratchet. Take this screw out right here. Just going to you use this trim tool from 1aauto.com, take this push clip out, in there, pull that out. Right, now that is loose, but what we need to do is we need to take the fan off because the fan has to come out with the shroud as one.
What we need to do to take the fan off is we need to disconnect the fan clutch from the engine side. This is attached to one of the pulleys right there. So sometimes these are somewhat difficult to get off. So what we're going to do is use this tool. We actually sell this at 1aauto.com with many different sizes. This happens to be 32 millimeter. That's going to slide on there. And then we slide this on and with a pneumatic air hammer, we're going to give it a couple of bumps and it's going to loosen up that nut and we should be able to get it off. All right, so now I'm going to take the tool. Now this fan clutch happens to be on their reverse thread, so it's going to seem like you're tightening it, but you're actually loosening it. So we'll go like that. Put our air hammer on there. Make sure you wear hearing protection and eye protection.
All right, so that's loose. Took a little bit of effort, but I got it. Now you can slide the tool off. Just move it a little bit. There we go. You should be able to just spin it off like that. Might need the tool once in awhile. Or you could use a wrench that fits, 32 millimeter wrench. All right, now I'm just going to keep loosening this up. Be careful. You don't want the fan to fall. You don't want it to smash into the radiator. Especially if you're going to reuse the radiator. If you're replacing it, it's not a big deal. As I get closer to the end, I'll just move the fan and just grab the blade and there we go. Now I can slide this right up. Just like that.
Just going to disconnect this connector to the mass airflow sensor. Push down on this tab, wiggle it out. Take a straight blade screwdriver, loosen up this clamp right here. Should be good. Push that snorkel off right there and there's all these clips holding the top of the airbox off. I'm just going to take the top off and this last one over here, it's kind of tricky to get to. Pull the dipstick out of the way. Let me just grab the airbox, get the air filter out. I'm going to take these two bolts out, I'm going to use a 10 millimeter socket extension and an electric ratchet. You can use a regular ratchet if you don't have an electric one or an air powered one, loosen them up. Take them out. Now we just grab the airbox. Slide it up. This wire is on this little grommet right here. Just try to slide that out. Just try to slide this off. Take that off. Just slide this out of the way.
I'm going to pull this fill cap off before we drain the coolant. Make sure the engine is cold. You don't want to take this off while the engine is hot or you're going to get splashed in the face with coolant. Pull that off and now we can raise the vehicle and drain the coolant.
Underneath the vehicle there may be a cover right here. You're going to have to remove it. There should be some fasteners there, there and there and there. And then also back there. This vehicle doesn't have it, so we're just going to start right here. I need to loosen up this drain right here. This radiator is not the original radiator so I believe you're going to have a different size socket to use if you have the OEM radiator. For this one, it's a 22 millimeter socket. I'm going to use an extension and a ratchet, loosen this up. Make sure you put a drain bucket underneath. I'm just going to remove this. There we go. That coolant looks nasty. To help the coolant drain out a little faster, I'm going to open this bleeder screw right here. Just use a straight blade screwdriver. Loosen this up.
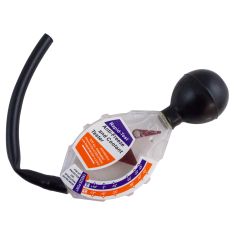
All right, I'm going to test this coolant. Let's see how it does. What we do is suck up some of this coolant. It's going to test the level of protection you have, so with the tool level, this is actually way out of spec. It should be right there around negative 35 degrees fahrenheit, negative 32 is ideal. So this is way out of spec, so it's a good thing we're going to drain and fill this coolant.
Now we want to remove this side from the radiator. I'm just going to take a straight blade screwdriver, slide up under this retaining clip right there and then there's also one right here. Just like that. I can just grab this hose and just wiggle it a little bit. All right, pry that off. That's good. Now I'll take the screwdriver and just take this hose off completely. And slide the clip out, just wiggle this back and forth, pull it up. There's a screw right here, I'm going to you use a T20 socket extension and a ratchet. Take that screw out. Now I can move the radiator out a little bit and we're going to take this screw up. Now if you weren't taking this section of the radiator off and you were just doing the reservoir, you can loosen up the bolts on the headlight, move the headlight forward. Then you might be able to gain access to that screw right there. We're going to use a T20 on this screw. Take this one up, pull that screw out.
So I'm going to pull this coolant hose off. Just use a straight blade screwdriver or a pick. Just pull up on the retainer clip and then just wiggle it off. There we go. Pried that out. A lot more coolant came out. Make sure you still have your drain bucket underneath there. Now from underneath the vehicle, you don't necessarily have to be from underneath the vehicle. I just wanted to show you how this worked. There's a little lever right here that you can actually grab from above the vehicle and you just pull it towards the center of the vehicle. Just like that and that releases the lock that holds that in.
So now that clip is released. Now we're just going to grab the tank and slide it up. The coolant sensor is still down there. We'll have to disconnect that, but I'm just going to grab the tank and just pry it straight up. Be careful you don't want to rock it back and forth too much because you could break other plastic. Just pull it up just like that. You're going to have some more coolant come out, slide it up. Slide it up, I can disconnect the connector right here. Push down on the tab, pull it out like that.
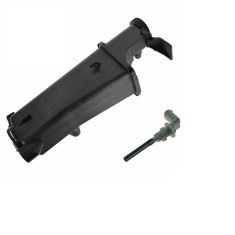
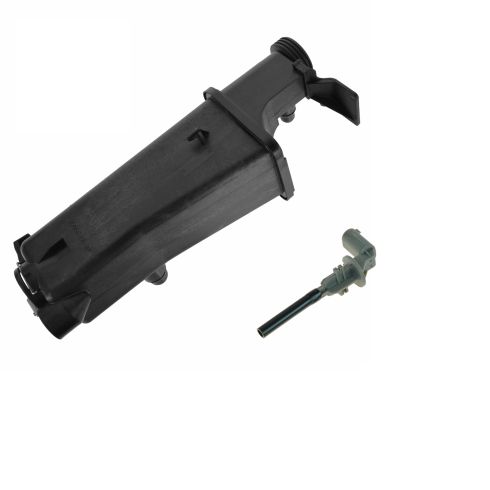
To get the old coolant level sensor out, you just take it and you twist it actually clockwise, not counter-clockwise, so it's almost like you're tightening it and then you slide it out just like that. Here's the old coolant level sensor. Here's the new coolant level sensor from 1aauto.com. As you can see, the shape is the same. The terminal is the same, the sensor itself is the same. Get yours at 1aauto.com and you'll be ready to rock and roll.
Now when you were replacing the sensor, you could probably do this in the car. It's easier to show on film if we have the reservoir out. But it would probably fight you if you were doing this in the car. So it's a lot easier just to pull the reservoir out. So slide the new sensor in like this and then twist it to the left, almost like you're loosening it, and there you go.
Now take the new reservoir, I'm going to plug this connector in right here, the level sensor. We're going to slide this in position and just push it down slightly and lock it in place. All right, that's good, and lock it down. Take this hose, line this up and lock it in place. Just like that. Take this screw right here. It's just easier to put this on before I put the hose on. Get that started. You take a T25 extension and a socket. Tighten this down. Just snug. It is in plastic. So be careful. Al right, take this pipe, this upper hose, just line that up right there. Lock it in place. And then over here, line this up over here and just wiggle it a little bit. Lock that in place, make sure this reservoir is locked in too and that's good. So these have to go on together. Just slide this in position. Once you get this close, I'm going to start to tighten up the fan.
Now these fan blades are ... The fan clutch is reverse thread, so it's almost like you're going to be loosening it. There's really no easy way to do this. Just do it carefully. Once you get it started, it's a little bit easier. Make sure the fan shroud is in properly. That's good. All right, if you have the ability to torque this nut for the fan, you're going to torque that between 22 and 29 foot pounds. I don't really have that ability, so I'm just going to put this tool on there and just give it a little tap. That should be good. Right here, there's a push pin that's going to go back in here, slide that in position and lock it down.
And on this side we're going to put this screw right here and I'm going to use a T25 and a electric ratchet. Tighten this down, just snug. I'll position this wiring harness right here and we'll plug the connector in right here, lock that in place. Now we're just going to slide this side of the lower airbox in here. Yours may have something that this connects to. This vehicle doesn't, just slides in position, and then this lower part slides there and makes sure these holes are lined up.
Take these two bolts. Get this started. Take a 10 millimeter socket and a ratchet and tighten these down. I'm using an electric racket. If you don't have an electric ratchet, just use a manual one. Take the air filter, reinstall it. Now take the top part of the airbox, I'm going to slide it onto the snorkel first, just like that, and then there's all these clips. Take these clips, lock this part down, connect the mass air flow sensor, air flow meter. I'm going to slide this clamp right here. Take a straight blade screwdriver and tighten it down. Just snug, not too tight. Give it a shake. Make sure it's good. Take this piece, slide this into the airbox, just like that, and there's retainers right here. Take those push pins, lock them down. Then we can take the negative side. Connect the negative side. Take the same 10 millimeter socket and ratchet, tighten it up. That's good. At this point, if you had that cover, you're going to want to put the cover back where it goes.
When adding the coolant, we're going to use a funnel and you want to make sure you add the appropriate type of coolant. You can check your owner's manual. There is BMW specific coolant. Generally it's blue coolant, so we're going to fill up the reservoir. We're going to take this bleeder screw out. Just use a straight blade screwdriver or Phillips head. Just move that funnel. You could probably just loosen this up a little bit or you can take it all the way out. Just like that. Set it aside. You want to fill this all the way up to the top and have coolant come bubbling out of the bleeder hole. Once it's coming out of there, we're going to reinstall the bleeder screw. It is plastic, so be careful, you don't want to strip this. Get this started again, then close that bleeder screw and then you're going to adjust the level in here. Now there is a little dipstick in here when this is full, it's going to be all the way at the top.
Now you can check it right here. It shows where the min and the max is, so you want to adjust that accordingly. You can add coolant or take out coolant. You can use like a turkey baster or some type of fluid pump to suck the fluid out and then you want to let it run. You want to leave the heat on. When you leave the heat on, if you don't have heat, you're going to want to crack this open a little bit and just make sure you get some of the coolant out. It's probably a good idea to shut the engine off, let it cool down and readjust your coolant.
When you're done, when the fluid level's at the appropriate level, take the cap, put it back on. Make sure you monitor your temp gauge while you're running the vehicle. If you run the vehicle for about 10 minutes, the temp gauge should go right in the middle of there. If it starts going to the red, shut the vehicle off and start over. Bleed the system again.
Thanks for watching. If you want the parts to do it yourself, check out 1aauto.com, the place for DIY auto repair.
Tools used
I wanna disconnect the battery. So, get to the battery in the back, just use a 10-millimeter socket. Remove the negative cable, loosen it up, just slide it off and out of the way. Make sure it doesn't arc out on there. I'm gonna take this cover off, I wanna take these four screws out. I'm gonna use a T30 socket. Grab the cover, slide it off. Then take these two screws out. Use a T30. And these two, same T30. And just grab right here, and just slide it out. You can grab this intake duct right here, try to pull it off. Just get that out of the way.
Disconnect this connector right here. Just push on that tab. All right. Just try to slide that off just like that. And it's held in right here, just slide that clip off and take this connector off. Push on those two tabs, slide it out. Set that aside. And there's a screw right here. Just use a T25. Remove that screw. Pull that out. Just pull this push pin out right here. Just grab this fan shroud and then just slide it up. Be careful of the radiator.
The coolant level sensor is located right at the base of this reservoir right here. Now, we have to take out the reservoir to get to the sensor because this power steering line is in the way. We could take that power steering line off just to get to the sensor, but that might be more of a pain. So, see if you twist this sensor, it hits the power steering line. So, we're gonna take the reservoir out to do this.
Disconnect this connector right here, just gonna use a pocket screwdriver, slide that clip out. Use a straight blade screwdriver, loosen up this worm clamp, and then slide this snorkel off. Just like that. And just grab the airbox right here and just pry up. Just like that. There's some rubber grommets right there, and I'm just gonna take this cap off the coolant reservoir so the coolant drains out a little faster.
We're gonna take the shield off. There's all these screws all along here. They're 8-millimeter. There should be one there, one there, and then the same on the other side. Use an 8-millimeter socket. Get all these out. There should be one right there as well. All right. And then hold this down, slide it back, and I'm gonna find the coolant drain right over here, and I'll just use a Phillips head screwdriver, make sure you have a drain bucket underneath. There we go. At the base of the reservoir, I need to pull this clip out. Just grab it, just slide it towards the passenger side of the vehicle, just to that location right there. Now, I'm gonna have to pull these coolant hoses off over this junction right here. I'm gonna use a pocket screwdriver. Get underneath these clips right here and just slide it up. And same with this one right here. Slide it up. I should be able to wiggle this just back and forth. Just be careful. You don't wanna break it. Just put a little bit of pressure, just pushing it towards the back of the vehicle. And there it goes. Just be careful. Don't force this too much, and that's good.
All right on this bottom clip right here, just use the pocket screwdriver, slide that up and do the same. Take this hose off. You could use a little...use a straight blade screwdriver or a pry bar. Just pry that one out a little bit. Just be careful again. All right. Now, we're just gonna rock this back and forth, pull a little bit of pressure upwards. Remember, don't pull too hard. There is a connector that's still connected, the electrical connector for the level sensor, so just a little bit of pressure, rocking back and forth. All right. And eventually, that'll pull up, and you can disconnect the connector right there, just push down on the tab and slide that out. Pull the whole thing out.
To get this level sensor out, you're just gonna grab it, you gonna twist it to the right or clockwise and then slide it out. Just like that. Take the new sensor, slide it in, twist it to the left, counter-clockwise, lock it in place. Just lubricate these O rings. Just gonna push this clamp down like that and make sure you connect the electrical connector right there. Plug that in first and just slide this in position. I'm just gonna support from underneath and just press down, and then I'll make sure that's locked in place. It looks good. Slide this on, lubricate that, and same with this hose. That's good.
Slide the fan in. There's some slots down below you need to get lined up. Just make sure you grab the fan and try to pull towards the back of the vehicle and make sure it's in there properly. And this bolt's gonna go right here. Connect the connector, lock it in place, lock push pin up in place, and connect that connector right there. Let me just push this little retainer tab right there. Take the airbox, just line these two grommets up with these two tabs right there. Make sure you pull the wire out of the way, and those are lined up. Just push down, lock it in place. Take the hose, line that up, connect the connector, lock that in place, and just tighten down this worm clamp.
And take this air intake, just slide it in position, just like that, reattach it over here on the airbox. That's good. And line those screws up. Get these all started and then you can snug them down. And slide this in position, put these screws in, and tighten those up. And put the drain plug back in, and just snug it, not too tight.
Now, reinstall this panel, just get it lined up. It's good. Take all the bolts, I'll get those all started first. Now, just go around and tighten them all down. Now, we're gonna reconnect the negative battery cable and tighten up the nut. Just make sure you wiggle it, make sure it's tight. That's good. And you wanna fill the system with the appropriate coolant. There is a bleeder screw right here. If you need to access it, you can take this piece off right here and then you can loosen that up, and when coolant comes out of there, then you can close it up, and make sure this is topped off right here. There's a little key here telling where the min and the max is.
At this point, I'm gonna start the vehicle up, let it run, let it idle for a little bit, let it stabilize, then I'm gonna put the coolant cap on before it gets to operating temp. So, the coolant level dropped a little bit, so I'm gonna top it off. Cap on. Let it run, let it heat up. Make sure you're constantly monitoring the temp gauge. It's always a good idea to turn the heat up while you're warming this up and just make sure you feel heat coming out, especially when the temperature gets up. If you see the temperature is already up there, just make sure the heat was coming through. You can always hold the RPMs up a little bit while you're doing this, just constantly monitor that. Just make sure the temp doesn't go in the red. After the vehicle's run for about 10 minutes, it's warmed up, and you actually feel heat in the dash, then you can shut the vehicle down and let it cool down. You don't wanna take this cap off while it's hot. Once that's cooled down, take the cap off and adjust accordingly.
Tools used
What's up guys? I'm Andy from 1AAuto. In this video I'm going to show you how to replace the coolant reservoir on this 2001 BMW 325 XI. If you need this part or other parts for your vehicle click the link in the description and head over to 1AAuto.com.
With the trunk open, over on the right side, or the passenger side, there should be a cover that goes right here. This vehicle doesn't have one, but you're going to want to remove that cover. Battery is located right here. First thing I'm going to do is take a 10 millimeter socket and ratchet, loosen up this nut for the negative terminal. And that's loose. Slide off the cable. Slide it out of the way.
I'm going to take these push pins out right here, just going to use some side cutters to get this center pin, pull that up, and then slide it out. Be careful not to cut that. Get those out. Just grab this piece, slide it out.
We're going to disconnect this connector right here, just push down on that, slide that out. There's another connector right here. I'm going to slide the wiring out first, just like that, and the connector will come out. Just slide that to the side like that.
I'm going to take a T25 and a ratchet, take this screw out right here.
I'm just going to use this trim tool from 1AAuto.com, take this push clip out, pull that out.
All right, now that is loose. But what we need to do is we need to take the fan off, because the fan has to come out with the shroud as one. What we need to do to take the fan off is we need to disconnect the fan clutch from the engine side. This is attached to one of the pulleys right there. So sometimes these are somewhat difficult to get off so what we're going to do is use this tool. We actually sell this at 1AAuto.com with many different sizes. This happens to be the 32 millimeter. That's going to slide on there, and then we slide this on. And with a pneumatic air hammer, we're going to give it a couple bumps and it's going to loosen up that nut, and we should be able to get it off.
All right, so now I'm going to take the tool. Now this fan clutch happens to be on there reverse thread, so it's going to seem like you're tightening it but you're actually loosening it. So we'll go like that, put our air hammer on there. Make sure you wear hearing protection and eye protection. All right, so that's loose. Took a little bit of effort but I got it. Now you can slide the tool off. I'll just move it a little bit, there we go. You should be able to just spin it off like that. You might need the tool once in a while, or you could use a wrench that fits, 32 millimeter wrench.
All right, now I'm just going to keep loosening this up. Be careful, you don't want the fan to fall. You don't want it to smash into the radiator, especially if you're going to reuse the radiator. If you're replacing it it's not a big deal. As I get closer to the end, I'll just move the fan and just grab the blade, and there we go. Now we can slide this right up, just like that.
I'm just going to disconnect this connector to the mass airflow sensor. Push down on this tab, wiggle it out. Take a straight blade screwdriver, loosen up this clamp right here. That should be good. Push that snorkel off, right there. And there's all these clips holding the top of the air box off. I'm just going to take the top off. And this last one over here, it's kind of tricky to get to. Pull the dipstick out of the way. You just grab the air box. Pull the air filter out.
I'm going to take these two bolts out. I'm going to use a 10 millimeter socket extension and an electric ratchet. You can use a regular ratchet if you don't have an electric one or an air powered one. Loosen them up, take them out.
Now I'll just grab the air box, just slide it up. This wire is on this little grommet right here, just try to slide that out. Just try to slide this off. All right, take that off. You can just slide this out of the way.
I'm going to pull this fill cap off before we drain the coolant. Make sure the engine is cold. You don't want to take this off while the engine is hot or you're going to get splashed in the face with coolant. Pull that off, and now we can raise the vehicle and drain the coolant.
Underneath the vehicle there may be a cover right here. You're going to have to remove it. There should be some fasteners there, there, and there, and there, and then also back there. This vehicle doesn't have it so we're just going to start right here. I need to loosen up this drain right here. This radiator is not the original radiator so I believe you're going to have a different size socket to use. If you have the OEM radiator for this one it's a 22 millimeter socket. I'm going to use an extension and a ratchet. Loosen this up. Make sure you put a drain bucket underneath.
I'm just going to remove this, and there we go. That coolant looks nasty.
To help the coolant drain out a little faster. I'm going to open this bleeder screw right here. Just use a straight blade screwdriver. Loosen this up.
All right, I'm going to test this coolant. Let's see how it does. What we do is suck up some of this coolant. It's going to test the level of protection you have. So with the tool level this is actually way out of spec. It should be right there around negative 35 degrees Fahrenheit. Negative 32 is ideal. So this is way out of spec, so it's a good thing we're going to drain and fill this coolant.
Now we want to remove this side from the radiator. I'm just going to take a straight blade screwdriver, slide up under this retaining clip right there, and then there's also one right here, just like that. Now I can just grab this hose and just wiggle it a little bit. All right, pry that off. That's good. Now I'll take the screwdriver, just take this hose off completely, and slide the clip out. Just wiggle this back and forth, pull it out.
There's that screw right here. I'm going to use a T20 socket extension and a ratchet. Take that screw out. Now I can move the radiator out a little bit, and we're going to take this screw out. Now if you weren't taking this section of the radiator off, and you were just doing the reservoir, you can loosen up the bolts on the headlight, move the headlight forward, then you might be able to gain access to that screw right there. I'm going to use a T20 on this screw, take this one out. Pull that screw out.
So I'm going to pull this coolant hose off. Just use a straight blade screwdriver or a pick. Pull up on the retainer clip and then just wiggle it off, there we go. Let that out. A lot more coolant came out. I'm sure you still have your drain bucket underneath there.
Now from underneath the vehicle ... you don't necessarily have to be from underneath the vehicle. I just wanted to show you how this worked. There's a little lever right here that you can actually grab from above the vehicle, and you just pull it towards the center of the vehicle, just like that, and that releases the lock that holds that in.
So now that clip is released. Now we're just going to grab the tank and slide it up. The coolant sensor is still down there. We'll have to disconnect that, but I'm just going to grab the tank and just pry it straight up. Be careful. You don't want to rock it back and forth too much because you could break other plastic. Just pull it up just like that. You're going to have some more coolant come out, just slide it up. You slide it up. I can disconnect the connector right here. Push down the tab, pull it out like that.
Here's the old reservoir. Here's the new reservoir from 1AAuto.com. It's machined the same way, has the same fittings for the coolant pipes, same fittings on the bottom as well, same retainer. Comes with the level sensor on the top. The top part is machined the same way for the coolant cap, and the same fitting. Get yours at 1AAuto.com and you'll be ready to rock and roll.
Now I'll take the new reservoir and I'll plug this connector in right here for the level sensor, and then slide this in position, and just push it down slightly and lock it in place. All right, that's good. Lock it down.
Take this hose, line this up, and lock it in place just like that.
Take this screw right here. It's just easier to put this on before I put the hose on. Get that started. You take a T25 extension and a socket. Tighten this down. Just snug. It is in plastic, so be careful.
All right, take this pipe, this upper hose, and just line that up right there. Lock it in place. And then over here, line this up over here and just wiggle it a little bit. Lock that in place. Make sure this reservoir is locked in too. That's good.
So these have to go on together. Just slide this in position. Once you get this close I'm going to start to tighten up the fan. Now these fan blades are ... the fan clutch is reverse thread, so it's almost like you're going to be loosening it. There's really no easy way to do this, just do it carefully. Once you get it started it's a little bit easier. Make sure the fan shroud is in properly. That's good.
All right, if you have the ability to torque this nut for the fan, you're going to Torque that between 22 and 29 foot pounds. I don't really have that ability, so I'm just going to put this tool on there and just give it a little tap. That should be good. Right here there's a push pin. That's going to go back in here, slide that in position and lock it down. On this side we're going to put this screw right here and I'm going to use a T25 and a electric ratchet. Tighten this down just snug. I'll put position this wiring harness right here and we'll plug the connector in right here. Lock that in place.
Now we're just going to slide this side of the lower air box in here. Yours may have something that this connects to. This vehicle doesn't, it just slides in position, and then this lower part slides there, and makes sure these holes are lined up. Take these two bolts, get these started. Take a 10 millimeter socket and a ratchet and tighten these down. I'm using an electric racket. If you don't have an electric ratchet just use a manual one.
Take the air filter. Reinstall it. I'll take the top part of the air box and slide it onto the snorkel first just like that. And then there's all these clips. Take these clips, lock this part down, connect the mass airflow sensor, or air flow meter. I'm going to slide this clamp right here. Take a straight blade screwdriver and tighten it down, just snug, not too tight. Give it a shake. Make sure it's good.
Take this piece, slide this into the air box, just like that. And there's retainers right here. Take those push pins, lock them down.
Then we can take the negative side, connect the negative side. Take the same 10 millimeter socket and ratchet, tighten it up. That's good. At this point, if you had that cover, you're going to want to put the cover back where it goes. When adding the coolant we're going to use a funnel, and you want to make sure you add the appropriate type of coolant. You can check your owner's manual. There is BMW specific coolant. Generally it's blue coolant, so we're going to fill up the reservoir. We're going to take this bleeder screw out. Just use a straight blade screwdriver or a Phillips head. Just move that funnel.
You could probably just loosen this up a little bit, or you can take it all the way out, just like that. Set it aside. You want to fill this all the way up to the top and have coolant come bubbling out of the bleeder hole. Once it's coming out of there, we're going to reinstall the bleeder screw. It is plastic, so be careful. You don't want to strip this. Get this started again. Then close that bleeder screw, and then you're going to adjust the level in here. Now there is a little dipstick in here. When this is full this is going to be all the way at the top. Now you can check it right here. It shows where the min and the max is, so you want to adjust that accordingly. You can add coolant or take out coolant. You can use like a turkey baster, or some type of fluid pump, to suck the fluid out. Then you want to let it run.
You want to leave the heat on. When you leave the heat on, if you don't have heat, you're going to want to crack this open a little bit and just make sure you get some of the coolant out. It's probably a good idea to shut the engine off, let it cool down, and readjust your coolant.
When you're done, when the fluid level's at the appropriate level, take the cap, put it back on.
Make sure you monitor your temp gauge while you're running the vehicle. If you run the vehicle for about 10 minutes the temp gauge should go right in the middle there. If it starts going to the red, shut the vehicle off and start over. Bleed the system again.
Thanks for watching. Visit 1AAuto.com for quality auto parts shipped to your door, the place for DIY auto repair. And if you enjoyed this video, please click the subscribe button.
Tools used
I wanna disconnect the battery. So, get the battery in the back, just use a 10-millimeter socket. Remove the negative cable. Loosen it up. Slide it off and out of the way. And make sure it doesn't arc out on there.
I'm gonna take this cover off. I wanna take these four screws out. I'm gonna use a T30 socket. Grab that cover, slide off. And take these two screws out, use a T30. And these two, same T30. And just grab right here and just slide it out. You can grab this intake duct right here. Try to pull it off. Just get that out of the way.
Disconnect this this connector right here. Just push on that tab and just try to slide that off, just like that. Then, it's held in right here, just slide that clip off. And take this connector off. Push on those two tabs and slide it out. Set that aside. And there's a screw right here. Just use a T25. Remove that screw. Pull that out. Just pull this pushpin out right here. Just grab this fan shroud and just slide it up. Be careful of the radiator.
Disconnect this connector right here. I'm just gonna use a pocket screwdriver. Slide that clip out. Use a straight blade screwdriver, loosen up this worm clamp, and then slide this snorkel off, just like that. And just grab the air box right here and just pry up. Just like that. There's some rubber grommets right there. And I'm just gonna take this cap off, the coolant reservoir, just so the coolant drains out a little faster.
We're gonna take the shield off. There's all these screws all over along here. They're 8-millimeter. There should be one there, one there, and then the same on the other side. Use an 8-millimeter socket. Take all these out. There should be one right there as well. All right, and then just pull this down. Slide it back.
And I'm gonna find the coolant drain right over here and I'll just use a Phillips head screwdriver. Make sure you have a drain bucket underneath. There you go. At the base of the reservoir, I need to pull this clip out. Just grab it. Just slide it towards the passenger side of the vehicle, just to that location right there.
Now, I'm gonna have to pull these coolant hoses off over this junction right here. I'm gonna use a pocket screwdriver, get underneath these clips right here, and just slide it up. And same with this one right here. Slide it up. I should be able to wiggle this back and forth. Just be careful. You don't wanna break it. Just put a little bit of pressure, just pushing it towards the back of the vehicle, and there it goes. Just be careful. Don't force this too much. And that's good.
All right, on this bottom clip right here just use the pocket screwdriver. Slide that up. And do the same, take this hose off. Use a straight blade screwdriver or a pry bar. Just pry that one out a little bit. Just be careful again. All right, now, we're just gonna rock this back and forth, pull a little bit of pressure upwards. Remember, don't pull too hard. There is a connector that's still connected, the electrical connector for the level sensor. So just put a bit of pressure. Rock it back and forth. All right, and eventually that'll pull up. And you can disconnect the connector right there. Just push down on the tab, and slide that out. Pull the whole thing out. Take this clip, just slide it in position just like that, and it's gonna sit right there. Once you get this locked in, then you can push it down like that. And this piece is gonna slide just like that.
Just lubricate these O-rings. Just gonna push this clamp down like that. And make sure you connect the electrical connector right there. Plug that in first and just slide this in position. I'm just gonna support from underneath and just press down. And make sure that's locked in place. Looks good. Slide this on, lubricate that, and same with this hose. It's good. Slide the fan in. There's some slots down below you need to get lined up. Just make sure you grab the fan and try to pull towards the back of the vehicle and make sure it's in there properly. And this bolt's gonna go right here. Connect the connector. Lock it in place. Lock that pushpin up in place. And connect that connector right there. Just push this little retainer tab right there.
Take the air box. Just line these two grommets up with these two tabs right there. Make sure you pull the wire out of the way. And those are lined up. Just push down. Lock it in place. Take the hose, line that up, connect the connector, lock that in place, and just tighten down this worm clamp. And take this air intake and just slide it into position. Just like that. Reattach it over here on the air box. That's good. And line those screws up. Get these all started and then you can snug them down. And slide this in position. Put these screws in. And tighten those up and put the drain plug back in. And just snug it, not too tight. Now, reinstall this panel. Just get it lined up. That's good. Take all the bolts and get those all started first. Now, just go around and tighten them all down. Now, we're gonna reconnect the negative battery cable and tighten up the nut. Just make sure you wiggle it. Make sure it's tight. That's good.
And you wanna fill the system with the appropriate coolant. There's a bleeder screw right here. If you need to access it, you can take this piece off right here and then you can loosen that up. And when coolant comes out of there, then you can close it up and make sure this is topped off right here. There's a little key here telling where the min and the max is. At this point, I'm gonna start the vehicle up, let it run, let it idle for a little bit, let it stabilize, and I'm gonna put the coolant cap back on before it gets to operating temp.
So the coolant level dropped a little bit, so I'm gonna top it up. Cap on. Let it run. Let it heat up. Make sure you're constantly monitoring the temp gauge. It's always a good idea to turn the heat up while you're warming this up. And just make sure you feel heat coming out, especially when the temperature gets up. If you see the temperature's already up there, just make sure the heat is coming through. You can always hold the RPMs up a little bit while you're doing this. Just constantly monitor that. Just make sure the temp doesn't go in the red.
After the vehicle's run for about 10 minutes, it's warmed up and you actually feel heat in the dash, then you can shut the vehicle down and let it cool down. You don't wanna take this cap off while it's hot. Once that's cooled down, take the cap off, and adjust accordingly.