What's up, guys? I'm Andy from 1A Auto. In this video, I'm going to show you how to replace the oil cooler thermostat on this 2001 BMW 325xi.
If you need this part or other parts for your vehicle, click the link in the description and head over to 1AAuto.com.
With the trunk open, over on the right side, or the passenger side, there should be a cover that goes right here. This vehicle doesn't have one. But you're going to want to remove that cover. Battery is located right here.
First thing I'm going to do is take a 10 millimeter socket and ratchet, loosen up this nut for the negative terminal. When it's loose, slide off the cable, and slide it out of the way.
I want to take these pushpins out right here. Just going to use some side cutters to get this center pin. Pull that up, and then slide it out. Be careful not to cut that. Get those out. Just grab this piece, and slide it out.
We're going to disconnect this connector right here. Just push down on that, and slide that out. There's another connector right here. I'm going to slide the wiring out first, just like that. Then the connector will come out. Just slide that to the side like that.
I'm going to take a T25 and a ratchet. Take this screw out right here.
Just going to use this trim tool from 1AAuto.com to take this push clip out. Get in there, pull that out.
All right, now that is loose. But what we need to do is we need to take the fan off because the fan has to come out with the shroud as one. What we need to do to take the fan off is we need to disconnect the fan clutch from the engine side. This is attached to one of the pulleys right there. So, sometimes these are somewhat difficult to get off. So, what we're going to do is use this tool. We actually sell this at 1AAuto.com with many different sizes. This happens to be the 32 millimeter. That's going to slide on there, and then we slide this on. And with a pneumatic air hammer, we're going to give it a couple bumps, and it's going to loosen up that nut, then we should be able to get it off.
All right, so now I'm going to take the tool. Now, this fan clutch happens to be on there reverse-thread. So, it's going to seem like you're tightening it, but you're actually loosening it. So, we'll go like that. Put our air hammer on there. Make sure you wear hearing protection and eye protection.
All right, so that's loose. Took a little bit of effort, but I got it. Now you can slide the tool off. We'll just move it a little bit. There we go.
You should be able to just spin it off like that. You might need the tool once in a while. Or you could use a wrench that fits. A 32 millimeter wrench.
All right, now I'm just going to keep loosening this up. Be careful. You don't want the fan to fall. You don't want it to smash into the radiator, especially if you're going to reuse the radiator. If you're replacing it, it's not a big deal. As I get closer to the end, I'll just move the fan, and just grab the blade. And there we go. Now I can slide this right up. Just like that.
Just going to disconnect this connector to the mass airflow sensor. Push down on this tab, wiggle it out. Take a straight-blade screwdriver, loosen up this clamp right here. That should be good. You can push that snorkel off right there. And there's all these clips. Pulling the top of the airbox off. I'm just going to take the top off. And this last one over here. That one is kind of tricky to get to. Pull the dipstick out of the way. Let me just grab the airbox. Pull the air filter out.
You're going to take these two bolts out. I'm going to use a 10 millimeter socket extension and an electric ratchet. You can use a regular ratchet if you don't have an electric one. Or an air powered one. Loosen them up, and take them out.
Now I'm going to just grab the airbox, slide it up. This wire is on this little grommet right here. Just try to slide that out. Just try to slide this off.
All right, take that off, and you just slide this out of the way.
I'm going to pull this fill cap off before we drain the coolant. Make sure the engine is cold. You don't want to take this off while the engine is hot, or you're going to get splashed in the face with coolant. Pull that off, and now we can raise the vehicle, and drain the coolant.
Underneath the vehicle there may be a cover right here. You're going to have to remove it. There should be some fasteners there, there, and there, and there; and then also back there. This vehicle doesn't have it, so we're just going to start right here.
I need to loosen up this drain right here. This radiator is not the original radiator, so I believe you're going to have a different size socket to use if you have the OEM radiator. For this one, it's a 22 millimeter socket. I'm going to use an extension and a ratchet.
Loosen this up. Make sure you put a drain bucket underneath. I'm just going to remove this, and there we go. That coolant looks nasty!
To help the coolant drain out a little faster, I'm going to open this bleeder screw right here. Just use a straight-blade screwdriver. Loosen this up.
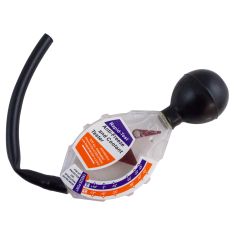
All right, I'm going to test this coolant. Let's see how it does. What we do is suck up some of this coolant. This is going to test the level of protection you have. So, with the tool level, this is actually way out of spec. It should be right there, around -35 degrees Fahrenheit. -32 is ideal, but ... So, this is way out of spec. So, it's a good thing we're going to drain and fill this coolant.
All right, now we want to remove this side from the radiator. I'm just going to take a straight-blade screwdriver. Slide up under this retaining clip right there, and then there's also one right here. Just like that. Now I can just grab this hose, and just wiggle it a little bit.
All right, pry that off. That's good. Now I'll take the screwdriver, and we'll just take this hose off completely. And slide the clip out, and just wiggle this back and forth, and pull it out.
There's a screw right here. I'm going to use a T20 socket extension and a ratchet to take that screw out. Now I can move the radiator out a little bit, and we're going to take this screw out.
Now, if you weren't taking this section of the radiator off, and you were just doing the reservoir, you could loosen up the bolts on the headlight, and move the headlight forward. Then you might be able to gain access to that screw right there.
We're going to use a T20 on this screw to take this one out. Pull that screw out.
So, I want to pull this coolant hose off. Just use a straight-blade screwdriver or a pick. We'll just pull up on the retainer clip, and then just wiggle it off. There we go. Slide that out. A lot more coolant came out. Make sure you still have your drain bucket underneath there.
Now, from underneath the vehicle ... You don't necessarily have to be from underneath the vehicle. I just wanted to show you how this worked. There's a little lever right here that you can actually grab from above the vehicle. And you just pull it towards the center of the vehicle, just like that. And that releases the lock that holds that in.
So, now that clip is released. Now we're just going to grab the tank and slide it up. The coolant sensor is still down there. We'll have to disconnect that. But I'm just going to grab the tank, and just pry it straight up. Be careful. You don't want to rock it back and forth too much because you could break other plastic. Just pull it up, just like that. You're going to have some more coolant come out. Just slide it up. You just slide it up. I can disconnect the connector right here. Push down on the tab, pull it out like that.
All right, now this one happens to be broken. So, I'm just going to pull this broken piece up. And then I can use a pick, just try to get in here and grab this somehow. And just slide that up. Otherwise, normally you would just be able to grab the top part and just pull up on it. If you have to, use a pick. Just be careful not to damage any of the plastic on the side there.
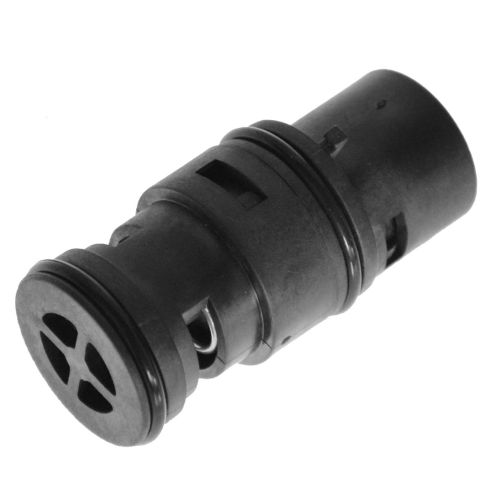
Here is the old part. Here is the new oil cooler thermostat from 1AAuto.com. The shape is the same. The top part is the same, even though the old one is broken. It has the same internals. Get yours at 1AAuto.com, and you'll be ready to rock and roll.
Now, there is a keyway on this thermostat. You're just going to slide this in back here. That's going to be on the back side there. Push it all the way down.
Now I'll take the reservoir, and just snap the lock back down. And then I'll just connect the coolant level sensor right here before I slide this in. Lock that in place, and then slide the reservoir on.
Okay then, and make sure this tab is lined up right here. Just going to hold underneath this panel as I push down, then lock it in.
Take this hose, line this up, and lock it in place just like that.
Take this screw right here. It's just easier to put this on before I put the hose on. Get that started.
You take a T25 extension and a socket. Tighten this down. Just snug. It is in plastic, so be careful.
All right, take this pipe, this upper hose, and just line that up right there. Lock it in place. And then over here, line this up over here, and just wiggle it a little bit. Lock that in place. Make sure this reservoir is locked in too. And that's good.
So, these have to go on together. Just slide this in position. Once you get this close, then I'm going to start to tighten up the fan. Now, these fan blades are ... The fan clutch is reverse-thread. So, it's almost like you're going to be loosening it. There is really no easy way to do this. Just do it carefully. Once you get it started, it's a little bit easier.
Make sure the fan shroud is in properly. That's good.
All right, if you have the ability to torque this nut for the fan, you're going to torque that between 22 and 29 foot-pounds. I don't really have that ability. So, I'm just going to put this tool on there, and just give it a little tap. That should be good.
Right here, there's a pushpin. That's going to go back in here. Slide that in position, and lock it down.
And on this side, we're going to put this screw right here. Then you're going to use a T25 and a electric ratchet to tighten this down. Just snug.
Now position this wiring harness right here, and we'll plug the connector in right here. Lock that in place.
Now we're just going to slide this side of the lower airbox in here. Yours may have something that this connects to. This vehicle doesn't. Just slides in position, and then this lower part slides there. And make sure these holes are lined up.
Take these two bolts, get these started. Take a 10 millimeter socket and a ratchet, and tighten these down. I'm using an electric ratchet. If you don't have an electric ratchet, just use a manual one.
Take the air filter, and install it. Now I'll take the top part of the airbox. Going to slide it onto the snorkel first. Just like that. And then there's all these clips. Take these clips, lock this part down. Connect the mass airflow sensor, or the airflow meter. Then we're going to slide this clamp right here. Just take a straight-blade screwdriver, and tighten it down. Just snug, not too tight. Give it a shake, make sure it's good.
Take this piece, slide this into the airbox. Just like that. And those retainers right here, take those pushpins, and lock them down.
Then we can take the negative side, connect the negative side. Take the same 10 millimeter socket and ratchet, tighten it up. That's good.
At this point, if you had that cover, you're going to want to put the cover back where it goes.
When adding the coolant, we're going to use a funnel. And you'll want to make sure you add the appropriate type of coolant. You can check your owner's manual. There is BMW-specific coolant. Generally, it's blue coolant.
So, we're going to add. We're going to fill up the reservoir.
We're going to take this bleeder screw out. Just use a straight-blade screwdriver or a Phillips-head. Just move that funnel. You can probably just loosen this up a little bit, or you can take it all the way out. Just like that. Set it aside.
You want to fill this all the way up to the top, and have coolant come bubbling out of the bleeder hole. Once it's coming out of there, we're going to reinstall the bleeder screw. It is plastic, so be careful. You don't want to strip this. Get this started again. Then close that bleeder screw. And then you're going to adjust the level in here. Now, there is a little dipstick in here. When this is full, this is going to be all the way at the top. Now, you can check it right here. It shows where the min and the max is. So, you want to adjust that accordingly. You can add coolant or take out coolant. You can use like a turkey baster or some type of fluid pump to suck the fluid out.
Then you want to let it run. You want to leave the heat on. When you leave the heat on ... If you don't have heat, you're going to want to crack this open a little bit, and just make sure you get some of the coolant out. It's probably a good idea to shut the engine off, let it cool down, and readjust your coolant.
When you're done, when the fluid level is at the appropriate level, take the cap, put it back on.
Make sure you monitor your temp gauge while you're running the vehicle. If you run the vehicle for about 10 minutes, the temp gauge should go right in the middle there. If it starts going to the red, shut the vehicle off, and start over. Bleed the system again.
Thanks for watching. Visit 1AAuto.com for quality auto parts shipped to your door, the place for DIY auto repair. And if you enjoyed this video, please click the Subscribe button.