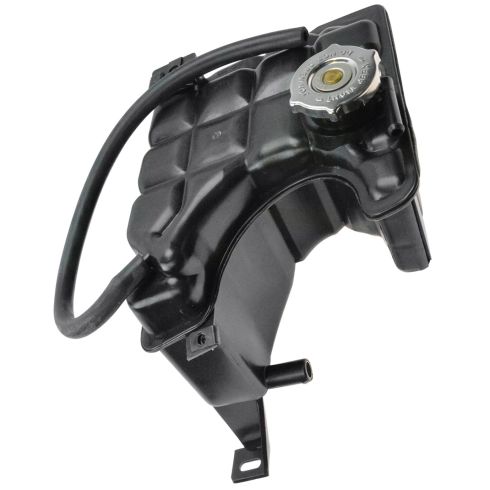
1AROB00207-Cadillac Deville Eldorado Seville Coolant Reservoir TRQ ECA92495

Replaces
1997 Cadillac Seville Coolant Reservoir TRQ ECA92495

Frequently bought together
Product Reviews
Loading reviews
3.75/ 5.0
12
12 reviews
On time, in great shape
July 24, 2017
The product was as advertised and more importantly was the how to video for it! I will definitely shop with 1A Auto again
Not great.
May 3, 2018
Upon inspection, everything looked correct however once installation began, i found that the o.e. a/c bracket did not fit into the new grooves on the new tank. After installing the tank and filling the system, my car kept giving me a "check coolant level" message on my dashboard. I checked the fluid and found out was full. Now it stays on all the time even though the tank is full. That's the risk taken when ordering online.
Easy fix for cracked plastic bottle
May 19, 2018
Quick delivery. Well made. Perfect fit, I did have to remove the nut plates and reuse the nut plates from the old leaking bottle. Due to the new nut plates being for a larger bolt.
Also did not use the pressure cap since the stamped writing on it was in German.
Meets the minimum requirements.
August 6, 2018
The part fits perfectly and meets the minimum needs, such as holding coolant. However, the coolant monitor does not function properly. It's kind of a pain to put in, so it wasn't worth pulling to put in different unit with a working monitor.
A reservoir tank for my 1998 Cadillac
August 12, 2018
They were quick to ship and ya da great YouTube video with step by step directions. However, the part didnt have matching bolts and after installing i found the sensor was bad. They refunded my money back and therefore i appreciate their business. Maybe next time the part will be an exact replacement.
Radiator Coolant Bottle
September 27, 2018
We all know not to drive when it is over-heating, my problem was with my Radiator Coolant Bottle, until I searched 1A-Auto it would of cost me at lease $74.00. What I saved through 1A-Auto was $18.00. Shipping is free and it arrived within 2 days. Needless to say I'm back on the road again. Thanks 1A-Auto for the part, time, and mostly the savings.
You continued Costumer
W.W. West
perfect fit
July 8, 2019
went in great no troubles ,nice product
Sensor does not work like stock
March 23, 2020
Tank shape is OK, but you do have to dry fit the mounting bracket at your workbench-- takes a fair amount of filing to get it to fit into the tank properly. Unfortunately, the sensor is not OEM. I installed, got erroneous "check coolant" and had 1AA auto replace the tank (you can't move the old sensor over). They were great about doing the replacement. The replacement tank gives the same error message. The old tank does not give this message, so I am pretty sure the sensor in the new tank. does not work properly.
Check coolant sensor is not working
August 18, 2020
The coolant sensor is not working properly, I see others are having the same issue. Not sure if just the sensor can be replaced or not, If not it's going to be a pain the butt to replaced the whole thing again. HOPE SO??
Quick shipping
May 7, 2021
Right part the first time excellent customer service rapid refund with no questions asked Highly recommend it
July 4, 2024
The first one came to me broke at one of the hose connections. But after it was exchanged 10 days it seems to be working well
Pleased overall
October 23, 2024
Had to swap out clip nuts from old tank, but everything else went well
Customer Q&A
Is the cap included?
May 24, 2018
10
Mine came with the cap.
May 24, 2018
Justin B
10
Yes the cap is included.
May 24, 2018
T I
10
Yes
May 24, 2018
Teryle H
10
Yes it came with the cap the only thing it did not come with was new hardware If you need it.
May 24, 2018
M A
10
Yes and make sure to have hose picks
May 24, 2018
O C
10
Yes it is. I want to mention the water level switch for me is working in reverse. It might just have been my car 2000 Eldorado when the bottle is full the circuit is complete so I had to put a jumper wire in the end of the connector so the low coolant level warning would go out.
May 25, 2018
Nicholas B
10
I think your talking about the reservoir tank& yes the cap is included!
May 28, 2018
Leon H
10
Yes
August 12, 2018
B S
10
Yes
August 28, 2019
P H
Cadillac is a registered trademark of General Motors Company. 1A Auto is not affiliated with or sponsored by Cadillac or General Motors Company.
See all trademarks.


