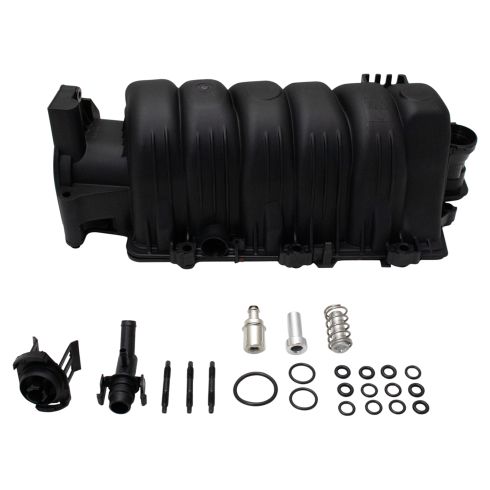
1AEIM00008-Chevrolet Buick Pontiac Olds Upper Intake Manifold TRQ IMA07940

Replaces
1995 Pontiac Bonneville V6 3.8L Naturally Aspirated Upper Intake Manifold TRQ IMA07940

Frequently bought together
Product Reviews
Loading reviews
4.62/ 5.0
29
29 reviews
February 15, 2012
This was a great replacement for my worn-out OEM upper manifold. Very pleased with the results...
EGR Valve
November 8, 2016
Parts list nor the video said anything about transferring the EGR valve and spring from old manifold to new housing. it wasn't until the vic ran like crap I figured it out.
The video is detailed and I often turn to this site for replacement parts and how to, but they dropped the ball on this one.
Perfect Fit
January 30, 2018
The part arrived quickly and fit perfectly. One word of advice. If you are inexperienced, which I am, be sure you get a new PCV valve and install it under the MAP sensor. Be sure to keep the spring that was on top of the old PCV. The manifold kit doesn't include that.
Quality piece
February 2, 2018
Used this to replace my upper intake on my 2000 Park Avenue. Seemed to be as good or better quality than the original oem.
Intake Manifold
March 20, 2018
The manifold was an exact fit, and easy to install. Used the video as a quick reference. I was a little concerned about the popping off the fuel injectors, but they were no problem. I've bought off of 1A before, and have never had problem with the parts being an exact fit, as advertised.
Above expectations
December 19, 2018
Intake was better quality then the OE part. Job went smooth.
Intake Manifold review.
December 30, 2018
The Intake Manifold that I had ordered was delivered within the time that we were told and in perfect condition.
The video from A1 auto that I watched to install this product failed to mention the part below the PCV valve needed to be removed from the old unit and replaced in the new. Therefore, the car did not run properly and I had a hard time figuring it out. Randy
IMPORTANT READ
January 6, 2019
Product fit as advertised for 3.8 Chevy impala. Only issue I experienced was there is no mention of the PCV valve that has to be removed from old manifold and installed in new. Even though it comes with the pcv cover for the MAP sensor, the instructions nor the video mentions the actual PCV and spring. After install and car running bad and a lot of research, I had to go to local parts store to purchase a PCV assy to replace the one I threw away. Be advise of this and other than that it was great product!!!
Just What the Doctor Ordered
February 18, 2019
I took the intake manifold and t-stat to a repair shop that agreed to install them for me and only charge me for the labor. Thus far, everything went very well, and my engine is no longer losing coolant or overheating.
read below
March 29, 2019
I purchased this the first time for my wife's car and started to have a high pitched squeal like a idler bearing could not find one but replaced it any ways took belt off squeal still there possible harmonic balancer replaced it . rechecked installation of intake I have done a lot of these in the past possible hair line crack you warrantied it for me I replaced it and no more noise wife is happy and so am I . so thanks for the great warranty policy you warrantied it with out question . thanks ...john
Works
June 19, 2019
The manifold itself was fine. I had to reuse my old hose inside the manifold - the one it came with did not fit right.
Buick Intake
May 4, 2020
Part arrived early and as described online. Self help online video made this install a breeze.
June 28, 2020
Very fast shipper! Quality produc
Great product
July 9, 2020
The parts that I ordered arrived in excellent condition and were excellent fit for my vehicle, will use this site for my future parts requirements, cheers David
Perfect fit
October 25, 2020
Intake plenum is a perfect fit for my 2002 Buick LeSabre. I would only torque it to 80 inch pounds instead of 89 as mine did crack a little where the bolts go but is not leaking yet. The plastic piece that goes into the upper intake manifold from the brake booster hose did not come with the little vacuum line plug so I will have to buy that separately. Overall will work perfectly.
2003 lesabre intake manifold
January 18, 2021
AFTER RECEIVING INTAKE MANIFOLD I SAW IT WAS A PERFECT FIT FOR MY CAR. EVEN THIUGH IT TOOK A LITTLE LONGER THAN EXPECTED, I WAS ABLE TO INSTALL IT CORRECTLY. I WOULD LIKE IN THE FUTURE TO HAVE 1A AUTO ADD INSTRUCTIONS TO WHERE EVERY ITEM GOES WITH DIFFERENT PARTS ETC.
OTHER THAN THAT I WAS PLEASED.
I DO LIKE THE 1A AUTO'S YOU TUBE VIDEO INSTRUCTIONS.
Upper Intake Manifold
February 3, 2021
I had my mechanic friend install the intake, which for him was easy. No book required. If I did it, it would have taken a few days. But mine for this engine was still original with 215 K. It was leaking in a couple of places. So, it was time to change it out.
Much better than Dorman
March 17, 2021
I originally purchased a Dorman brand intake manifold for a 3800 series 2 V6 and the inside baffles did not seat correctly. Even a replacement Dorman had the same defect. This product from 1A Auto is superior and was cheaper. I had the intake manifold installed in less than 15 minutes. This product also allows for the proper torque to be applied to the bolts without cracking. I highly recommend this product.
August 8, 2021
Fit perfect worked great.
Not bad
September 28, 2021
Worked ok except o-rings for fuel injectors were too fat.
October 14, 2021
Perfect fit, easy install
October 19, 2021
Installed easily took me about 2 hours.
Very good product
December 24, 2021
It fit my 1999 Pontiac Bonneville perfectly.
February 26, 2022
Great fit
Pretty good for the price
January 23, 2023
Pretty good, been a few months and hasn't shown me any issues, just make sure the white tube is connected to the MAP sensor hole before installing. Only complaint really is the o rings are a too small to fit in
High quality part, great price !!
February 13, 2023
Well made, included all parts needed to complete the job, took care of the old weak plenum and car runs great. Best price available. Very pleased !!!!
March 24, 2023
Perfect fit. Reasonably priced.
Replacing Upper Intake Manifold
August 18, 2023
So far, the upper intake manifold you sold me works great. My mechanic let me know, that it is serving its purpose. The only other manifold that probably would be better, would be a factory one, which is no longer available.
Again, thank you for this. It has allowed me to have a running engine. Just to let you know, that for the years 1996-2005 the 3.8 l Series 2 engine had an issue of this plastic manifold exploding, which mind did. So, if someone has this issue, you'll know what the problem might be.
It's ok
March 17, 2024
It works, but had to use a washer on one of the bolts because the plastic crushed before I reached torque spec.
Customer Q&A
Just to be sure, will this fit my 1998 Oldsmobile Eighty-Eight?
May 6, 2016
10
1995-1999 Olds Delta 88 Intake Manifold Upper V6 3.8L (excluding Supercharged Models)
1995-1999 Olds Delta 88-Royale Intake Manifold Upper V6 3.8L (excluding Supercharged Models)
May 6, 2016
Brian F
Do you have to drain the coolant to replace this?
November 16, 2017
10
You do not need to drain the coolant when changing just the upper intake manifold.
November 16, 2017
Tim K
are the gasket included ?
March 13, 2018
10
yes
March 13, 2018
Jaime B
Do you need to relieve the fuel pressure before removing the fuel rail? This wasnt in the video
August 24, 2019
10
No, I didnt.
August 24, 2019
Greg D
10
No. Just cover with a paper towel or something to prevent a mess. I did the job fine without relieving the pressure.
August 24, 2019
Brandon S
10
Thank you for the question! This is not required for this repair and as Brandon said, definitely use some paper towel or shop rags just in case.
August 24, 2019
Curtis L
Will this come with the intake manifold gasket too or is that separate?
July 7, 2020
10
Hello,
It would be separate.
July 8, 2020
Corey M
10
1A Auto should answer the Ques !.....My Recolection is the Gasket is made on to the Intake Manifold. Take another look at Their Description. . Buy at GM and it is separate. and Expensive......Clean the Surface of the Lower Intake real Good !.....If You find the Lower Intake leaks....just put in a Bottle of K-Seal and You'll be Fine ! ***DON"T*** use other Brands !
July 9, 2020
V A
hi bought one of these a while back ,and just now getting ready to install it.i was wondering should i put silicone or gasket sealer around water ports and gasket,or none?,,thank you
April 12, 2021
10
You should not have to use any sort of sealer when installing this part. All the gaskets are included and ready to go.
April 13, 2021
T I
What are the two different size metal tubes for that come with it? They are approx 2 inches long
April 15, 2023
10
Those specifications are not listed or available. Our parts are exact replacements for your vehicle's OEM parts. As long as your vehicle specifications match up with our listing, these parts will directly fit and function like the originals.
April 17, 2023
Jessica D
Who is the manufacturer for this part?
April 28, 2024
10
TRQ will be the manufacturer of this part. They stand for Trusted Reliable Quality.
April 29, 2024
Emma F
Are these redesigned not to melt like the originals?
May 30, 2024
10
This part will be built to the same factory specifications as your original equipment.
May 31, 2024
Nick R
10
Nothings guaranteed but I would leave off the engine cover too relieve some of the heat because the engine cover holes some of the heat so I will leave the engine cover off it . and at the end of the day after use of the car I usually leave the hood open so it can cool off faster,
June 2, 2024
Anthony -
Pontiac is a registered trademark of General Motors Company. 1A Auto is not affiliated with or sponsored by Pontiac or General Motors Company.
See all trademarks.


