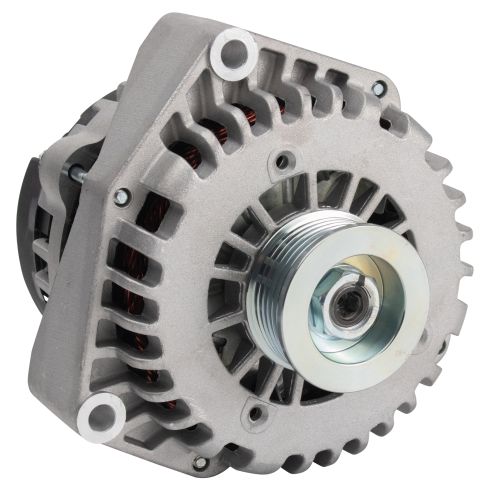
Drive End To Pulley 1st Groove Distance: 43 mm 1.69 in
Family: DELCO
Rotation Direction: Clockwise (Right)
Pulley Groove Quantity: 6
Brushless: No
Specification
Engine Displacement (Metric)
V8 5.3L
Product Features
Engineered to match exact vehicle specifications
Upgraded Service Life: Pressure-Fit High-Capacity Diodes for improved heat dissipation
Improved Reliability: Double insulated rotors and stators to reduce signal degradation
Item Condition:New
Attention California Customers:
WARNING: This product can expose you to chemicals including Lead and Lead Compounds, which are known to the State of California to cause cancer, and birth defects or other reproductive harm. For more information, go to www.P65Warnings.ca.gov.
Lifetime Warranty
This item is backed by our limited lifetime warranty. In the event that this item should fail due to manufacturing defects during intended use, we will replace the part free of charge. This warranty covers the cost of the part only.
Returns: Parts with electrical components cannot be returned once installed.
FREE Shipping is standard on orders shipped to the lower 48 States (Contiguous United States). Standard shipping charges apply to Hawaii and Alaska.
Shipping is not available to a P.O. Box, APO/FPO/DPO addresses, US Territories, or Canada for this item.
Expedited is available on checkout to the United States, excluding Alaska, Hawaii.
Final shipping costs are available at checkout.
How to Replace Alternator 2005-10 Chevy Silverado
Created on:
Tools used
13mm Socket
Socket Extensions
Flat Blade Screwdriver
15mm Socket
Pry Bar
10mm Wrench
Ratchet
3/8 Inch Drive Ratchet
1. Removing the Alternator
Loosen the 10 mm negative battery terminal and disconnect the negative battery cable
Attach a 3/8 ratchet to the serpentine belt tensioner
Push the tensioner down to loosen the belt
Pull the belt off by hand
Release the tensioner
Loosen the worm clamp securing the air snorkel to the mass airflow sensor
Loosen the worm clamp securing the air snorkel to the throttle body
Remove the air snorkel
Remove the 13 mm bolt securing the heater hose pipe bracket next to the alternator
Remove the AC hose from the mounting bracket next to the alternator
Disconnect the alternator electrical connector
Slide the main power cable boot off
Remove the 10 mm nut securing the main power cable to the alternator
Remove the main power cable
Remove the two 15 mm alternator mounting bolts
Pry the alternator up to remove it
2. Installing the Alternator
Clean any corrosion off the alternator mount bushings
Seat the alternator in position
Reinstall the 15 mm alternator mounting bolts
Torque the 15 mm alternator mounting bolts to 37 ft-lb
Connect the main power cable to the alternator
Secure the main power cable with the 10 mm nut
Torque the 10 mm nut to 80 in-lb
Reposition the main power cable boot
Reconnect the alternator electrical connector
Reposition the AC line into the mounting bracket
Reposition the heater hose bracket and secure it with the 13 mm bolt
Reposition the intake snorkel on the throttle body
Tighten the worm clamp to secure the intake snorkel to the throttle body
Reposition the intake snorkel on the mass airflow sensor
Tighten the worm clamp to secure the intake snorkel to the mass air flow sensor
Reinstall the serpentine belt around the crank pulley, over the water pump pulley, under the power steering pulley, over the AC compressor pulley, around the alternator and tensioner pulley
Hold the serpentine belt near the idler pulley
Turn the serpentine belt tensioner with a 3/8 ratchet
Slide the serpentine belt over the idler pulley
Release the tensioner
Reconnect the negative battery cable and tighten the terminal with a 10 mm wrench
Hi, I'm Mike from 1A Auto. We've been selling auto parts for over 30 years.
What's up, guys? I'm Andy from 1A Auto. Here I'm going to be installing an alternator on this 2008 Chevy Silverado work truck. If you need this part or other parts for your vehicle, click the link in the description and head over to 1AAuto.com.
I'm going to disconnect the battery. This vehicle, there is a bracket missing here. Normally there would be a bracket here with four 13 millimeter bolts. You would take those out to access the negative battery cable. I'm just going to use a 10 millimeter wrench, loosen up the cable. You can probably do it without taking that bracket off but just make it easier to take the bracket off. Loosen this up. Wiggle it back and forth and set it aside.
Now I'm going to remove the serpentine belt. I'm just going to use 3/8ths ratchet for the tensioner right here. You can use a serpentine belt tool as well. Just loosen up the tension in the belt, take it off right here on the idler pulley then loosen the tensioner. Get my ratchet out of the way. Now we can remove the belt off the alternator, off the AC compressor, off the power steering pump, the water pump and then off the crank.
Now I'm going to remove this snorkel off the top of the engine. Just use a straight blade screwdriver. Loosen up this worm clamp right here on the mass airflow sensor. Just grab the snorkel and take that off. We'll take the screwdriver again over on throttle body, loosen up the worm clamp right there. Just grab this and rock it back and forth. Slide it off. There's a hose right here on this back side, we'll have to disconnect it from the snorkel just like that and set this aside.
I'm just going to move this little pipe out of the way. That just goes to the valve cover. This pipe is going to be in my way so I just want to get it out the way a little bit. I'm going to use a 13 millimeter socket and extension and a ratchet. Just take this bolt out. Take that out, and that way I can maneuver this pipe out of my way. This pipe is an AC pipe--you can just loosen this up here. Can release it from this bracket and just move that out of your way a little bit. I'm not going to disconnect them but just to move it out of the way.
Now I'm going to disconnect this electrical connector. Push down. There's a little lock tab here, and then slide it up. That's the little lock on the connector. Set that aside. Now we're going to disconnect the big cable that's on the back of the alternator. Just move this boot down and you can access the nut. We'll take a 10 millimeter wrench and we'll loosen up the nut. If it's loose, you can take it off by hand usually. Take this positive cable off and set it aside. Sometimes I take the nut and just put it back on so I don't lose it.
Now I'm going to take these two alternator bolts out. They go through the bracket. I'm going to use a 15 millimeter socket and extension and a ratchet. Once it's loose, pull that one out and this one as well. Slide that out. All right, now I want to pry up on the alternator. I'm going to use a pry bar. Sometimes this can be tricky depending on how long the alternator's been in there. Can get underneath here. Try to pry. Just be careful. You kind of want to twist it up as you could potentially break the ears on the bracket. Just pry in between there. Just pry it up. You can go back and forth on both sides. It's a little bit tight in there. Once you get one side up, then you can rock it back and forth a little bit. And there we go. It's loose. We can just slide it forward just like that.
Here we have the old alternator. Here we have the new alternator from 1AAuto.com. It's a direct replacement. It's got the same pulley. It's got the same mounting holes as the old one. The backside, the connectors are the same. Comes with the same stud for mounting the power wire and it also comes with a nut. It's a direct replacement, there is no core charge. Get yours at 1AAuto.com and you'll be ready to rock and roll.
Before I install the new alternator, sometimes these get some corrosion on them, these little bushing things. I'm just going to take a little wire brush, just try to get some corrosion off. Should be good. If you see a little bit of corrosion on this side too, you can wipe some of that off. Could use some emery cloth or some sandpaper as well.
All right, now I'm going to slide the new alternator underneath this coolant pipe. You could disconnect this coolant pipe if you wanted to. If it was in your way more but I'd rather disconnect less things. Get the alternator lined up. Just slide it down in position. Don't wiggle it too much because like I said before, you don't want to break these ears off. If it doesn't slide down too easy, you probably going to to clean more of that corrosion out.
Now, I'm just want to line up these holes so I'm just going to take a Phillips head screwdriver and just move this into position. Line the holes up. I can take the bolt. Get that started. Take the other bolt, get that one started as well. Can grab the bolt, try to pull it out, then you know at least you got a couple threads started. That one's good. And that one's good. I'll take my 15 millimeter socket extension and a ratchet, just snug these up a little bit. Just snug those both up. Now I'm going to use a torque wrench and I'm going to torque these bolts to 37 foot pounds.
I'm going to take this nut off that comes with the alternator. We'll install this power cable. It's just going to slide on there and then reinstall the nut. I'll take a 10 millimeter socket and a torque wrench, and I'm going to torque this to 80 inch pounds. Make sure you're on inch pounds and not foot pounds. Once that's torqued, take the boot and slide it over the nut just like that.
Now we can reconnect this electrical connector. Just line that up and lock it in place. Now we're going to reinstall this AC line into this bracket. Just lock it in place. Then take this coolant hose. Just take this 13 millimeter bolt. Get that in position and snug this down. I'll take my 13 millimeter socket extension and ratchet and just snug it down. Now we can reinstall this engine snorkel. Slide this over near the throttle body. Before I install it on the throttle body, we have this hose underneath here. I'm going to slide that onto this just like that and then slide this on the throttle body. Take the straight blade screwdriver. Get this started then we'll install this side on the mass air sensor. Take this screwdriver and snug this worm clamp down.
All right, now I'm going to install the serpentine belt. I'm going to around the crank pulley first. Get that lined up. Then come around the water pump pulley and down around the power steering pump pulley then up around the AC compressor. Then you're going to go over here around the alternator and the tensioner pulley. And then I'm going to hold it down near the idler pulley. Then I'm going to take my ratchet and this is a flex head ratchet so it makes it a little bit easier, and then I'm going to relieve tension on the pulley and just snake it under the idler. Just like that. Then take my ratchet away.
Now I'm going to grab the negative battery cable. Slide this over the terminal on the battery and then take a 10 millimeter wrench and just snug this up. Not too tight--you don't want to break it. Just make sure you grab the terminal. Grab the cable and make sure it doesn't twist. That's good. And then if you had that bracket here, you're going to want to reinstall that bracket.
Thanks for watching. Visit us at 1AAuto.com for quality auto parts, fast and free shipping and the best customer service in the industry.
ALA94477
In Stock
Product Reviews
Loading reviews
4.71/ 5.014
14 reviews
5 Stars
4 Stars
3 Stars
2 Stars
1 Star
13
0
0
0
1
Chevy Avalanche Z71 alternator replacement.
[{"url": "https://wac.edgecastcdn.net/001A39/prod/media/pNISJll75W64CYGsite/2c82ae018f5a89993b59c92f78dd5538_1658426575798_0.jpeg", "caption": "Perfect fit. Looks great!"}]
David
July 21, 2022
Exact match, 1st time. I recommend 1a auto to anyone interested.
good product
Lenzie
October 7, 2022
inexpensive but seems to be working great.
The Part Store For Me
Albert
February 3, 2023
Price, knowledge, quality of the part and quick shipping has convince me to always check 1aAuto first..
Would definitely buy from this company again, great service
Lori
March 1, 2023
Fast shipping & works great
Works great
Justin
March 8, 2023
It arrived really quick and works great! Replaced on my 2006 gmc sierra 1500
True fit for a 2005 Chevy Silverado v6
Walter
May 14, 2023
Simple to purchase. Arrived on time and quick. Worked perfectly.
Works great. Looks nice. I'm happy
[{"url": "https://wac.edgecastcdn.net/001A39/prod/media/pNISJll75W64CYGsite/ca911037b1d15ad8815077b3ca9453bf_1685852471261_0.jpeg", "caption": "Looks like a proper new alternator should"}]
Michael
June 4, 2023
I put this in my truck that I bought used a few months ago. It had an aftermarket alternator from a local parts store in it that was causing all kinds of issues with voltage fluctuation. I noticed an immediate difference even at idle
Hayden
July 10, 2023
Didn't work when I received it
New Alternator
Justin
October 21, 2023
Perfect fit and less than 15 minutes for install!
Very good alternator
Andrew
November 13, 2023
Worked perfect for my 2008 Silverado 4x4 5.3. Nice unit I would recommend this alternator.
Alternator
Carlos
December 20, 2023
I am very satisfied with my purchase and will buy again
Alternator replacement
Marcus
February 21, 2024
Works great and the video to install product was spot on!
Happy customer
Lewis
March 17, 2024
Bought this alternator for my 2009 Chevrolet Tahoe LTZ
Quick, easy and simple job
Fit right in, runs quietly, no issues
sean
October 18, 2024
The alternator was the right part I needed. The part was delivered on time.I will be ordering something else from them again. Thanks
Customer Q&A
The highest amp Alternator you can or should install on a 07 tahoe 5.3 LT3?March 22, 2022
DERRECK W
10
This is the correct alternator for the 2007 Chevy Tahoe with the 5.3L engine.
March 23, 2022
Jessica D
10
Thank You!
April 18, 2022
John D
Will this fit a 06 Silverado 5.3?November 22, 2022
John D
10
This alternator is listed to fit 2006 Chevrolet Silverado 1500 models with a V8 5.3L engine
November 22, 2022
Jessica D
Does this fit 2007 Trailblazer 4.2L 6cyl?July 19, 2023
Curtis W
10
No, this part is not listed to fit the V6 4.2L.
July 20, 2023
Kemal S
Customer service
877-844-3393
Monday - Friday 8:00am - 9:30pm ET Saturday - Sunday 8:00am - 4:30pm ET
Chevrolet is a registered trademark of General Motors Company. 1A Auto is not affiliated with or sponsored by Chevrolet or General Motors Company.See all trademarks.
Enter Vehicle Year Make Model
Specify your vehicle's year, make and model to guarantee fit.
Year
Make
Model
Options
Drivetrain
This part doesn’t fit a . Select from parts that fit.