Replaces
This part doesn’t fit a . Select from parts that fit.
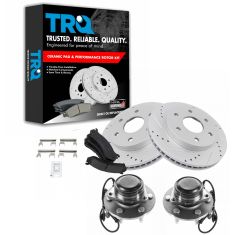
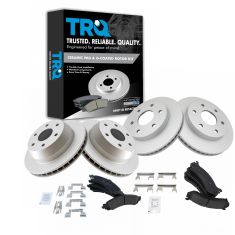
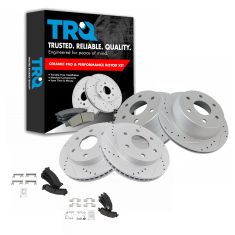
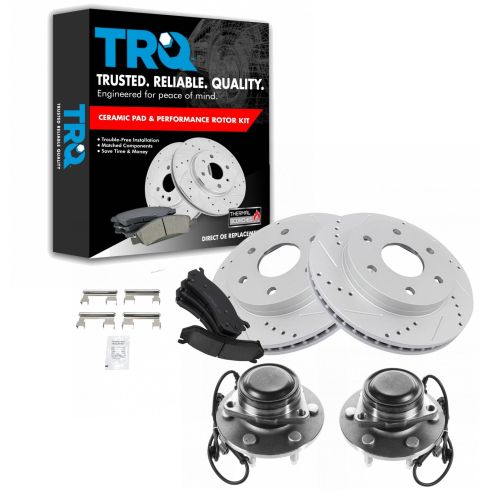
Part Details
What are Tapered Bearings and Why Use Them? Tapered bearings use rollers shaped like flat-topped cones and two races angled from the outside in of the bearing. This angle makes the bearing better at handling forces exerted on the bearing during cornering (known as axial load) in trucks and large cars. Your model came from the factory with tapered bearings. Roller ball bearings work well for smaller cars, but replacing a tapered bearing with a roller ball bearing increases wear and failure.
Product Features
Item Condition:
New
Attention California Customers:
 WARNING: This product can expose you to chemicals including Lead and Lead Compounds, which are known to the State of California to cause cancer, and birth defects or other reproductive harm. For more information, go to www.P65Warnings.ca.gov.
Lifetime Warranty
This item is backed by our limited lifetime warranty. In the event that this item should fail due to manufacturing defects during intended use, we will replace the part free of charge. This warranty covers the cost of the part only.
FREE Shipping is standard on orders shipped to the lower 48 States (Contiguous United States). Standard shipping charges apply to Hawaii and Alaska.
Shipping is not available to a P.O. Box, APO/FPO/DPO addresses, US Territories, or Canada for this item.
Expedited is available on checkout to the United States, excluding Alaska, Hawaii.
Final shipping costs are available at checkout.


Created on:
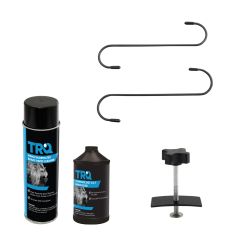
Tools used
Brought to you by 1AAuto.com, your source for quality replacement parts and the best service on the Internet.
Hi, I'm Don from 1A Auto. I hope this how-to video helps you out, and the next time you need a part for your vehicle, think of 1AAuto.com. Thanks.
In this video, we're going to show you how to replace the brakes on this 2002 Chevy Suburban. The items you'll need for this include a new brake pad and rotor kit from 1AAuto.com, an 18mm and 22mm socket and ratchet, a piece of pipe for extra leverage, a T55 Torx bit, a large C-clamp, a torque wrench, a wire brush, jack and jack stands, brake cleaner, and brake grease.
You want to just loosen up these 22mm caps, and then pull the hubcap free. Then you want to loosen these lug nuts while the vehicle's on the ground, then raise the vehicle and remove them the rest of the way, unless you have air powered tools, then you can do it while it's in the air, and then just remove the wheel. You want to check for any deep groves in your rotor. You want to check in here for the life of your brake pads and over here for the life of the other one. You can see ours is actually in decent shape.
There's two T55 Torx bolts that you need to remove. We'll fast forward as we use a T55 Torx bit and a ratchet to remove those. Then, using a large C-clamp, just put it back behind the caliper here, and the other part right here on the brake pad, and just twist this in. This is going to push your caliper piston in and make it easier to pull the caliper off. Just remove the C-clamp and lift your caliper up and off and set it aside. Using a flat blade screwdriver, just pry out your brake pad. Sometimes the brake pads can be stuck in there. Use a flat blade screwdriver and a hammer to pry it free. You want to remove these two 18mm bolts on your caliper bracket.
You can see we use a piece of pipe for some extra leverage, here. We'll just fast forward as he breaks the other one free and removes both of these bolts. Now, slide the rotor off. On the left is the old rotor and brake pads, on the right are the new ones from 1A Auto. You can see they're identical and they'll fit exactly the same.
Spray your new rotor with brake cleaner and just wipe it down. Do the same thing to the back. Now, apply brake grease to the tabs on either end of your brake pads. Using your wire brush, just clean up those brake slides on your caliper bracket. Push your rotor back into place and then twist on a lug nut. This will hold the rotor in place. Turn the wheel and put the caliper bracket back in to place. Replace those two 18mm bolts. We'll fast forward as Don does this and tightens both of those up. Torque both of these to 75 foot-pounds.
Push your new brake pads into place. Use a hammer if necessary to lightly tap that into place. Using an old brake pad, just put it onto the caliper pistons and then tighten it in with your C-clamp. This will just push those pistons in the rest of the way. Grease up your caliper bolts. Out the caliper back into place and slide those slide bolts back in. We'll just fast forward as Don tightens those up. You'll want to tighten these to about 30 foot-pounds.
Now, replace your wheel and then replace those lug nuts and tighten them preliminarily, lower the vehicle, and tighten them the rest of the way. Torque the lug nuts in a crossing pattern to 100 foot-pounds. Replace the hubcap and tighten up those caps. After doing work on your brakes, you want to pump the brake pedal until it firms up and then try a stop test from five miles per hour and ten miles per hour, and you're all set.
We hope this video helps you out. Brought to you by www.1AAuto.com, your source for quality replacement parts and the best service on the Internet. Please feel free to call us toll-free, 888-844-3393. We're the company that's here for you on the Internet and in person.
Tools used
All right. So one of the first things you need to do is safely raise and support the vehicle. Once you've done that, you're going to remove all six of your lug nuts. Remove your wheel. Now, the next thing that we would want to do is take a look at our caliper right here. Look all around it to make sure you don't see any moisture coming out. If you see moisture coming out of it, more than likely it's got a fluid leak. Assuming it looks like it's in good condition, we're going to go ahead and push back the piston a little bit. Grab your small pry bar. Come right in between the caliper and up against the pad if you can, or even the rotor. And then we're just going to carefully slowly push this back.
Once your caliper is off, take a good look. Make sure you don't see any moisture coming around these boots right here. If you see any moisture, you have a brake leak, you need to replace your caliper. Now we can grab onto those pads. We'll take them right off of here and just take a nice look. This one has plenty of meat all the way around. It's not damaged in any way. If anything, I could use a little bit of parts cleaner, but that's about as much as I would go. Let's take a look at this one. That looks perfect as well. If they were worn at an angle or anything like that, there would be an issue that you'd need to diagnose. Let's get this bracket off of here to remove the rotor. Now, before we go ahead and get our new rotor up on, we want to make sure that we clean up the hub area of the bearing that's going to mate against the new rotor. So it's nice and clean. You don't want any raised areas. The next thing you need to do is clean up the rotor braking surface. Let's use some copper never seize right here on the hub.
Let's get the rotor back up on here. Now we're going to use one lug nut, screw it all the way on so it holds the rotor from moving around. The next thing we're going to need to do is push back the brake caliper. To do that, you can either open up this bleeder screw right here, and you take a risk, of course, breaking it either going in or out, or you can just go ahead and turn the caliper around. I like to use a pad and then you would just use something to squish this down and force those pistons back down and in. This is a tool that works great for the job. Let's put it in here. As I crank, it's going to spread and it's going to push back those pistons. I'm going to do this nice and slow. You'll notice this is pushing in both pistons at the same time. If you tried to push in one piston at a time, more than likely the other piston is going to want to come out.
So now we just need to take a peak along here and just double-check those boots. Make sure that they're not swollen or pushed out or ripped or torn in any way and there's definitely no leakage. These look great. So what I'm going to do is I'm going to continue on by using a little bit of caliper grease, and I'm going to go right along the mating surfaces, where the caliper is going to touch directly against the brake pad. All right. So we made our way over to the bench with the caliper bracket because it's time to start cleaning it up and preparing it for installation. Let's grab our small pocket screwdriver or pretty much anything you got that you can grab onto this area right there and remove the 10. Do the same to the other side. Next, we're going to move along to cleaning up this area right here, all the areas that you saw that this 10 was riding against. So if you see any rust buildup, make sure you clean it down.
You can use a nice wire brush and try to get in there. Spend some time. You could use your screwdriver, scrape it all up or, of course, you can use a nice sanding grinding wheel and clean it up good. You just want to be careful not to take off too much of the material of the actual bracket. Okay. So we cleaned up those areas great. Both sides of the caliper bracket look decent. Something that I did happen to notice that I want to mention to you is all this extra rot that's built up everywhere, there's a possibility that any of this could flake off and get into your braking systems, such as in between your pad and rotor, which could of course cause an issue. So just take a little punch or chisel or prybar or whatever you got, and just kind of try to get some of this crud off of here. So we got off the majority of the rust off this thing. Now we're going to clean out the inside there. Use one of these bore brushes.
So now that we have this as clean as we can get it, right out here and on the inside where those sliders are going to go, we're going to use some of this moly grease or caliper grease, and I'm going to go along the areas that we just finished sanding down. Now we have our 10s. You'll notice that you have a side that's a little thicker and a thinner side. If you were to look at the bracket, you can see exactly how it needs to go. The thicker side is going to be the side facing the boot. Go and slide it up against there and then lock it in. Do the same to the other side.
Making our way back over to the vehicle, the next things that we need to do is clean up slider bolts here and of course get all the thread locker off of our mounting bolts. Now that I have these cleaned up, let's continue on by installing the caliper. Let's grab our bracket and our two bolts. I like to use a little bit of thread locker on them, but we'll call it your prerogative. Go ahead and slide that in. Start in those bolts, we'll snug them up, and then we're going to torque them to 139 foot-pounds. You're going to notice that one of your pads has two of these brake wear indicators and then the other one's going to have one. The pad that has two goes on the inside.
The outer pad on there. Let's grab the caliper, slide it right down over here. Be careful for these boots. You want to make sure that they're lined up with the hole so the slider can go through. Perfect. At this point, we're going to add some lubricant to the sliders. When we're going to add it, we're going to put it along here all the way up to there, but you don't need to get it up onto the threaded area. Let's go ahead and put those in there. Bottom these out, torque them to 80 foot-pounds. The next thing that I would want to do is pump up the brake and make sure everything's functioning properly. You also pump up the brake for safety so that way there, when you get inside the vehicle, after you've done this job, you will have a brake pedal. Now that we've pumped up the brake, I just want to check that brake fluid real quick. Now let's go ahead and get this off of here and we'll get the wheel on. Now let's go ahead and torque our lug nuts to 140 foot-pounds. Center cap, go ahead and pop it on there.
Tools used
Just take this center cap off. Use a straight-blade screwdriver. Get behind here. Use a 22-millimeter socket to take the lug nuts off. Take the wheel off.
We're gonna take these two caliper bolts out. We're gonna use a T55 socket. I'm just going to tap them in, because this is pretty rusty. There we go. Cracked it free. I'll use the gun. That one came right out.
Slide those up. Take a straight-blade screwdriver. Just pry out on the caliper a little bit. Compress the piston and slide the caliper off. We have to flip it over. Good idea to attach it somehow, so it doesn't fall. But if you can get it to sit right there, that's good. And just take the old brake pads off.
Use an 18-millimeter socket. Take these two caliper bracket bolts off. These are normally on there pretty tight. There we go.
All right. Those are broken free. Take those out.
Grab the brackets. Slide it right off.
Grab the rotor. Slide it off. If it doesn't come off that easy, take a hammer and just hit in these areas. Just try not to hit the studs.
Now we're gonna clean up this bracket. Just take a straight-blade pocket screwdriver. Get these clips off. And there's a lot of rust underneath here. Take a wire brush, clean this up. If you have to you can use a file. Just be careful. You don't want to take too much material off.
And take some brake caliper lubricant, and just wipe that down. Brake caliper grease, right there and right there. And take the new caliper slides or anti-rattle clips. Put those on there.
Line it up. Find the right one. Put it on there. Then put a little more brake caliper grease on here. Just a thin coat, just where the pads are gonna make contact.
We ended up replacing the hub, but if you have your old hub on here and it's rusty, take a wire brush. Just clean these areas. Make sure it's smooth.
Take a little bit of anti-seize. Just go around the hub, mostly around the center here, and spread it out, a nice, thin coat.
I'm just gonna take the rotor, put it on backwards. I'm just gonna clean this surface. Use a little brake parts cleaner. I'm gonna wipe it with a rag. There's just that protective coating on there to prevent it from rusting. And flip it over. Do the same on this side and wipe it down.
Now take the old caliper bolts. I'll just put a little thread-locking compound on there, and line the caliper bracket up. It goes this way. And put the bolts in. Get those lined up.
And use a torque wrench and torque these to 129 foot-pounds. Good.
Now install the new brake pads. Now, the warning indicator on the inside is gonna go at the bottom, in just one, not one at the top. And just slide that into position, and the outside one will have both.
That's good. Now I'm gonna compress the caliper. Use a caliper compressing tool. If you have to, use the old brake pad to help you. And just go slow. You don't want to push these in too fast. This is gonna push the brake fluid through the hoses, through the lines, back up into the master cylinder.
All right, those are compressed. Take the tool out. Just make sure the seals look good, the dust seals. And those look good. Now put the caliper back over the pads. Line it into the bracket.
Take the brake caliper pins. Just use a little brake parts cleaner on them. Wipe them off. Get some brake caliper grease. Grease them up and slide the pins back in position. Get them started and tighten them down.
Now I'm gonna torque these bolts to...these caliper guide pins to 80 foot-pounds. There we go.
Then put the wheel back up. Put the lug nuts on.
Now I'm gonna torque these lug nuts to 140 foot-pounds in a star pattern to tighten the wheel down evenly. And just go around again, double check.
Install the center cap. Now just pump the brake pedal. There's gonna be an air gap between the caliper piston and the brake pads. Pump that up. Just go slow, and once it feels good, then you're all set.
And double check your brake fluid level in the brake reservoir. The max line is right there. If you give it a little shake, our fluid is right about there.
Tools used
All right. So, one of the first things you need to do is safely raise and support the vehicle. Once you've done that, you're going to remove all six of your lug nuts. Remove your wheel. Now, the next thing that we would want to do is take a look at our caliper right here. Look all around it to make sure you don't see any moisture coming out. If you see moisture coming out of it, more than likely, it's got a fluid leak. Assuming it looks like it's in good condition, we're going to go ahead and push back the piston a little bit. Grab your small pry bar, come right in between the caliper and up against the pad if you can or even the rotor, and then we're just going to carefully, slowly push this back. So, now the next thing that I would want to do is come right on the backside and I would remove the bolts that are holding the whole caliper bracket to the knuckle itself. There's going to be two of them and they're going to hold on this whole unit. Me, personally, what I like to do is inspect everything as I go. I don't want to just take this off and potentially have bad brakes. So, I'll actually take the caliper apart. I'm going to take off the two bolts that hold the caliper to the bracket and inspect those pads so I know I have good parts.
Once your caliper's off, take a good look. Make sure you don't see any moisture coming around these boots right here. If you see any moisture, you have a brake leak. You need to replace your caliper. Now, we can grab onto those pads. We'll take them right off of here and just take a nice look. This one has plenty of meat all the way around. It's not damaged in any way. If anything, it could use a little bit of parts cleaner, but that's about as much as I would go. Let's take a look at this one. That looks perfect as well. If they were worn at an angle or anything like that, that would be an issue that you'd need to diagnose. Let's get this bracket off of here. Let's remove the rotor. The next thing we need to do is get this cap off of here. I'm just going to use this pry bar. Next, we're going to remove our 36-millimeter axle nut. Get that washer off of there. Remove your 18-millimeter outer tie rod end nut. The next thing we need to do is hit right along here on the knuckle to break the outer tie rod end free. You can also notice that your outer tie rod end threads don't come all the way down to this point. So, if you wanted to, you can just give a couple of light bonks in an upward direction here. If that doesn't work, go ahead and make your way up here.
So, now if you follow this cable coming up along your upper control arm past your frame, and if you could see up behind here, see if I can bend that, you can see right where the connection is going to go in. Okay? That's got a little push clip that's going down into this bracket there. So, we're going to just go ahead and take that out. I have a little forky tool. Now, I'll bring it to where you can see. This was the push clip that was going down into this metal piece here. Separate the two. I always like to take a peek, make sure there's no funny colors in my connector. Make sure nothing's broken or torn. Set that aside. At this point, you can go ahead in between here. You can use something as simple as a pocket screwdriver or your finger even maybe, and you can start popping off these clips. This one right here is a little bit different. It's got two little ears that you're going to need to squish in. You can either do one at a time and just kind of try to work it at an angle or you can try to squeeze both with some pliers. There it is. The next thing we need to do is break our axle free from the wheel bearing. Go ahead and break that free with some penetrant and then use a punch right in the center there and a hammer. If you can see the axle moving, then you're doing all right. Now, the next thing we need to do is come from the backside of the knuckle, approximately where the axle is going to be. If I was to press in and out on the axle, you can see where the bolt's going to be.
For this one up here, obviously, I'm not going to be able to use my socket and ratchet. I'm going to have the upper ball joint in the way. Just use my wrench, carefully get it on there. There we are. And then we'll just wrench it right off of there. Go ahead and spray the area with some penetrant. The next thing we're going to do is remove the bearing from the knuckle itself. Before I get to hitting on it, I'm going to go ahead and put on this axle nut there. That's going to prevent the bearing from potentially falling off and hurting me. And then I'm just going to take my hammer and I'm going to give it a couple of loving bonks to try to pull it away from the knuckle. So, I have a nice clear gap here. I'm just going to keep on working at it. All right. That looks good. Remove the nut off of here, remove our bearing, and remove it from the backing plate. Now, the next thing we need to do is clean up the area where the new bearing is going to ride. If you were to look right along this area here, all in this circle is going to be up against the bearing. So, let's go ahead and clean that up as much as possible and then right along this edge right here as well. Pretty much the flat areas facing out towards us, the bearing is going to be pressed right up against it.
So, we've got the inside pretty cleaned up as much as we could. We cleaned up the outer portion here where the bearing is going to mount up against. Now, just check that splined area. Make sure there's no crud inside there. If you need to clean it down, go ahead and clean it down using some parts spray. Now, I'm going to push through all those bolts. Just take a peek at them and make sure they're still in good condition. If there's any thread locker, just try to clean it off of there. I'm going to go ahead and use a little bit of thread locker. I like to use thread locker on these for sure. Perfect. I'm gonna put a little bit right here too. Let's take a quick look at that backing plate. Make sure it's in good condition, it's not damaged in any way, it's not bent. Grab our new bearing, go ahead and put the wire right straight through there, and then line up the area where the wire is supposed to go through. Just like that. Now, we're going to take that and we're going to put the wire facing towards the top front of the vehicle. And just go ahead and twist it until it fits in on the axle and slide it right in. Okay.
All the bolts are bottomed out. Let's go ahead and torque them to 133 foot-pounds. That's torqued. Let's get our ABS cable back on here. Push the small side because if you were to look you'd see a larger side, put the smaller side right through here. Make sure it clicks in. Make sure it's secure. This is going to go across the top of your control arm. And then make its way over to here. This clip should sit right inside this groove. This groove right here is for that clip. Okay. We'll connect these in, give them a nice tug, make sure it's secure. Put your push clip through the hole. The next thing we're gonna do is get this outer tie rod end back on here. Torque this to 48 foot-pounds. Okay. Let's get our washer on there and our axle nut. The next thing we need to do is hold this so it can't spin. I'm just going to use a nice long pry bar, put it across the studs, and then we're going to torque our axle nut to 177 foot-pounds. Now, it's going to be time to get our cap back on. We want to make sure we cover this back up. Just take a peek at it and make sure it's in decent condition. If you don't see any holes in it, I would use some of this gasket maker. I'm going to come right along the area that's going to seal up against that bearing. This is going to keep the moisture out of there. That looks pretty great. Let's go ahead and get it on there. There it is. Neaten it up a little bit. Awesome.
The next thing that you would want to do is make sure you clean up the area on your rotor that's going to mate up against your wheel bearing. So, if you were to look at the backside, all right along here that's going to mate against the bearing needs to be clean. Let's use some copper never-seize right here on the hub. Let's get the rotor back up on here. Now, we're going to use one lug nut, screw it all the way on so it holds the rotor from moving around. The next thing we're going to need to do is push back the brake caliper. To do that, you can either open up this bleeder screw right here, and you take a risk, of course, breaking it either going in or out. Or you can just go ahead and turn the caliper around. I like to use a pad, and then you would just use something to squish this down and force those pistons back down and in. This is a tool that works great for the job. Just put it in here. As I crank, it's going to spread and it's going to push back those pistons. I'm going to do this nice and slow. You'll notice this is pushing in both pistons at the same time. If you tried to push in one piston at a time, more than likely the other piston is going to want to come out.
So, now we just need to take a peek along here and just double-check those boots. Make sure that they're not swollen, or pushed out, or ripped, or torn in any way, and there's definitely no leakage. These look great. So, what I'm going to do is I'm going to continue on by using a little bit of caliper grease and I'm going to go right along the mating surfaces where the caliper is going to touch directly against the brake pad. The next things that we need to do is clean up our slider bolts here and, of course, get all the thread locker off of our mounting bolts. Now that I have these cleaned up, let's continue on by installing the caliper. Let's grab our bracket and our two bolts. I like to use a little bit of thread locker on them, but we'll call it your prerogative. Go ahead and slide that in, start in those bolts, we'll snug them up, and then we're going to torque them to 139 foot-pounds. You're gonna notice that one of your pads has two of these brake wear indicators and then the other one's going to have one. The pad that has two, goes on the inside. Put the outer pad on there. Let's grab the caliper, slide it right down over here. Be careful for these boots. You want to make sure that they're lined up with the hole so the slider can go through. Perfect.
At this point, we're going to add some lubricant to the sliders. When we're going to add it, we're going to put it along here all the way up to there, but you don't need to get it up onto the threaded area. Let's go ahead and put those in there. Bottom these out. Torque them to 80 foot-pounds. The next thing that I would want to do is pump up the brake and make sure everything's functioning properly. You also pump up the brake for safety so that way there, when you get inside the vehicle after you're done with this job, you will have a brake pedal. Now that we've pumped up the brake, I just want to check that brake fluid real quick. Now, let's go ahead and get this off of here and we'll get the wheel on. Now, let's go ahead and torque our lug nuts to 140 foot-pounds. Center cap, go ahead and pop it on there.
Tools used
Brought to you by 1AAuto.com, your source for quality replacement parts and the best service on the Internet.
Hi, I'm Mike from 1A Auto. I hope this how-to video helps you out, and next time you need parts for your vehicle, think of 1AAuto.com. Thanks.
In this video, we're going to show you how to replace the front brakes on this 2005 GMC Savana 2500. It's a similar process on the Chevy Express. The items you'll need for this is a new break set from 1A Auto, 18mm, 21mm, 22mm socket and ratchet, a breaker bar and a piece of pipe for leverage, a flat blade screwdriver, penetrating oil, a hammer, large C-clamp, white grease, torque wrench, and jack and jack stands.
Start off by removing the wheel cover or whatever wheel trim you might have. This one has a chrome one. Pull that off, and then just use your socket and pull or loosen the lug nut covers. Pull the center cap off. If you don't have the benefit of air tools, you want to loosen the lug nuts with the vehicle on the ground, then jack up and secure the vehicle. Then remove the lug nuts, wheel, and tire.
Turn the wheel so that you can get to the brake. On the back of the caliper, there's two 18mm bolts. You just want to remove these. It can be a little difficult, so it helps to use a piece of pipe for extra leverage. We're just going to fast forward as he removes this.
The next step, you want to use a flat blade screwdriver to just pry the brake pads away from the caliper, and it will allow you to pry off that caliper. Just keep using the flat blade screwdriver, top and the bottom, you could see he's just going back and forth until, eventually, it will come off. You just want to set that aside.
Now, using the flat blade screwdriver, you just want to pry out your brake pads. Now on some vehicles, it's going to be more difficult than on others. It depends on the condition of the brakes. In this case, it takes just a little effort, and if you have to, you can use a hammer just be careful not to damage or bend anything. We're just going to fast-forward a little bit as he removes those brake pad slides.
There are two 21mm bolts back here that hold on this caliper bracket. Ours are a little rusted, so we spray them with some penetrating oil first, just to loosen them up and let that sit for a second. Then, using a breaker bar, and, actually, a piece of pipe for extra leverage, we just remove those bolts, and we're just fast-forwarding here as he does that. When you remove those bolts, the caliper bracket will come right off.
Now, you just want to take a hammer and hammer the back of that rotor. Just keep turning it and hammering the back of it, and it's going to come off. With the old rotor; the new rotor. New pads; same size. With this caliper guide, you can replace these boots . If they're torn, you pull them out and you push them in. The most important thing about the brakes here, what we found was the pedal was soft, it didn't feel like they should, and you'll notice that when these were sliding or weren't sliding and getting stuck on this corroded brake slide hardware, you know it's the new parts, allow the pad to slide just it should when they're new.
Now we're just cleaning up the new rotor real quick. What you want to do is you want to take some white grease and just put it on the clips of these new brake pads. Then, using a flat blade screwdriver, just scrape some of the corrosion on that caliper bracket. This will just help those slides to clip back on. Now, what you want to do is just clip those slides on, and as Don was saying: "They make a difference." New ones are definitely worth it and 1A Auto does sell these. This just clips right into place. We'll just push them down.
Now, what you want to do is just reset the pistons in this caliper. What you want to do is take one of your brake pads. If you're changing them, you want to use one of the old ones, and you want to lay it across these two pistons. Then, using a large C-clamp, as you tighten the clamp, that paddle push those pistons back in and reset them, as you can see here. Now they're reset.
Now we're just going to put on our brand new rotor, and once you get it into place, you just want to put one of those lug nuts on, and it will just hold it into place. We put the rest of the brakes together. Now you can put your caliper bracket back on, and, to place those bolts, you want to just do them first by hand. Then, once you get them lined up and both them in place, you can use a socket and ratchet to tighten them the rest of the way. Now you want to just torque those bolts to 100 foot-pounds.
Now you can put your brake pads back in. Now, for these caliper pens, what you want to do is you want to clean them off a little bit, and then put some white grease on them, this will help them so that they slide easier.
What you want to do, pull down your caliper and just fit it into place. Now you can see up here, you want that little gasket there to go in and you can slide your bolts back in. We'll fast-forward here as he tightens those up with a socket and ratchet. Torque these bolts to 100 foot-pounds. We're just going to fast-forward here as you remove that nut, put the wheel into place, and you just want to replace all those nuts and tighten them in a crossing pattern.
Again, if you don't have air tools, you just want to lower the vehicle and tighten those the rest of the way on the ground. Then you want to torque those lug nuts to 100 foot-pounds. Before actually driving the vehicle, you want to pump the brake until they're firm, and then you want to do a test, stopping from 5 mph then 10 mph.
We hope this video helps you out. Brought to you by www.1AAuto.com, your source for quality replacement parts and the best service on the Internet. Please feel free to call us toll-free, 888-844-3393. We're the company that's here for you on the Internet and in person.
Tools used
Tools used
Tools used
Brought to you by 1AAuto.com, your source for quality replacement parts and the best service on the Internet.
Hi, I'm Don from 1A Auto. I hope this how-to video helps you out, and the next time you need a part for your vehicle, think of 1AAuto.com. Thanks.
In this video, we're going to show you how to replace the brake pads on this 2002 Chevy Suburban. The items you'll need for this include new brake pads from 1AAuto.com, a 22mm socket and ratchet with a piece of pipe for extra leverage, a T55 Torx bit, a large C-clamp, a torque wrench, jack and jack stands, and brake grease.
You want to just loosen up these 22mm caps, and then pull the hubcap free. Then you want to loosen these lug nuts while the vehicle's on the ground, then raise the vehicle and remove them the rest of the way, unless you have air powered tools, then you can do it while it's in the air, and then just remove the wheel. Check your rotors. If there's any deep grooves or rust you'll want to replace the rotors as well. You can also check your pad life. You can see ours are actually in good shape, but we're going to show you how to replace them anyways.
There's two T55 Torx bolts that you need to remove. We'll fast forward as we use a T55 Torx bit and a ratchet to remove those. Then, using a large C-clamp, just put it back behind the caliper here, and the other part right here on the brake pad, and just twist this in. This is going to push your caliper piston in and make it easier to pull the caliper off. Just remove the C-clamp and lift your caliper up and off and set it aside. Using a flat blade screwdriver, just pry out your brake pad. Sometimes the brake pads can be stuck in there. Use a flat blade screwdriver and a hammer to pry it free. Apply brake grease to the tabs on either side of your brake pads.
Push your new brake pads into place and use a hammer if necessary to lightly tap that into place. Using an old brake pad, just put it onto the caliper pistons and then tighten it in with your C-clamp, and this will just push those pistons in the rest of the way. Grease up your caliper bolts, put the caliper back into place, and slide those slide bolts back in. We'll just fast forward as Don tightens those up. You want to tighten these to about 30 foot-pounds. Now, replace your wheel and then replace those lug nuts and tighten them preliminarily. Lower the vehicle and tighten them the rest of the way. Now, torque the lug nuts in a crossing pattern to 100 foot-pounds. Replace the hub cap and tighten up those caps. After doing work on your brakes, you'll want to pump the brake pedal until it firms up and then try a stop test from five miles per hour and ten miles per hour, then you're all set.
We hope this video helps you out. Brought to you by www.1AAuto.com, your source for quality replacement parts and the best service on the Internet. Please feel free to call us toll-free, 888-844-3393. We're the company that's here for you on the Internet and in person.
Tools used
I'm going to use a 22-millimeter socket, take off the lug nuts, so we can remove the wheel. And remove the wheel. I'm going to take these two caliper slide bolts out. I'm going to use an 18-millimeter socket. Get those free first, and slide those out. Now, I'll take a screwdriver, I'm just going to pry the pistons of the caliper in a little bit, just go in between the caliper and the rotor, make it easier to take the caliper off. Now you can take a brake caliper hanger and support the brake caliper itself, just hook it on the upper control arm, or fold the caliper over and just set it so that it doesn't fall. Just make sure there's no tension on the brake hose.
Now we can take the brake pads off. Just use a straight blade screwdriver. Pry them off. Now, we want to take the caliper bracket off. We're going to take these two bolts out. I'm going to use an 18-millimeter socket, loosen those up. Take those bolts out and slide the bracket off. Take the rotor off. If your rotor is stuck on there, you can take a hammer and just hit in these areas. Just be careful of not hitting the studs. Slide it off. Just take a little anti seize, and just wipe it on the hub surface. Just a nice, thin coat.
Take the new rotor. Just going to put it on backwards, first. Take some brake parts cleaner. Just clean the back side of the rotor. Use a rag, wipe it off. And flip it over, and clean the front side, and wipe it down. If you want to, you can put a lug nut on to hold the rotor on. Makes installing it a little bit easier. Keeps the rotor in place. All right. Just take the brake caliper bracket. Use a screwdriver, straight blade screwdriver. Slide these anti rattle clips off where the pad slides off. Take a wire brush, just clean off the rust on this area.
All right. Now, just take some brake caliper grease, and just put a little bit on the ears, where the pad slides are going to go. Take the new pad slides, line them up, press them on. And take a little caliper grease, just put a nice thin coat right here, and right here, and do the same on the other side. And, just slide the caliper bracket over the rotor.
Take the bolts. You can put some thread lock adhesive on them. Now we're going to torque these bolts to 129 foot-pounds. Now, I'm going to take the brake pads, put the brake pads on. Now the warning indicator for the inboard pad, the one that goes on the inside, is going to be at the bottom. There's only one. There's nothing on the top. The one that goes on the outside has both squealers or warning indicators. Slide those into position.
Now, I need to compress the pistons back into the caliper. You can use a piston compressing tool. They make different types of tools. This is a ratchet type. As I tighten this up, it's going to push the brake fluid...push the piston back into the caliper, which is going to push the brake fluid through the hoses, through the lines, and back up into the master cylinder. Just go nice and slow. You don't want to rush this. The slower the better.
All right, those pistons are compressed. Now slide the caliper over the brake pads. Now you can take the two brake caliper bolts, clean them off with some brake parts cleaner, just wipe them off. These aren't too bad. And just take some brake caliper grease, on the guide pins. Now install the caliper bolts, or guide pins, and torque those to 80 foot-pounds.
Now you can take this lug nut off and put the wheel back up. Now put the tire back on. And the lug nuts. I'm going to torque the lug nuts to 140 foot-pounds in a star pattern or in a cross pattern, so that it tightens the wheel down evenly. Just go around again, double-check.
Now after you're done, you want to make sure you pump up the brake pedal, nice and slow. There's going to be an air gap between the caliper piston and the brake pads. So just do that, until that feels pretty good. And then double-check your brake fluid level, and adjust accordingly.
Tools used
Tools used
Tools used
Tools used
Tools used
Just take the center cap off. Use a straight blade screwdriver. Get behind here. This is 22-millimeter socket. Take the lug nuts off. Take the wheel off.
I'm gonna take these two caliper bolts out. I'm gonna use a T55 socket. I'm just gonna tap them in because this is pretty rusty. There we go. Cracked it free. Now use the gun. That one came right out. Slide those out. Take a straight blade screwdriver, just pry out on the caliper a little bit, compress the piston. Slide the caliper off. We need to flip it over. It's a good idea to attach it somehow so it doesn't fall. But if you can get it to sit right there, that's good. And just take the old brake pads off. Use an 18-millimeter socket. Take these two caliper bracket bolts off. These are normally on there pretty tight. There we go. All right, those are broken free. Take those out. Grab the bracket, slide it right off. Grab the rotor, slide it off. If it doesn't come off that easy, take a hammer and just hit in these areas. Just try not to hit the studs. Now I'm gonna use a 36-millimeter socket. Take this nut off. Take this washer off as well. This is pretty rusty. I'm just gonna spray a little rust penetrant in there. Let that soak. I'm just gonna use a punch and give it a couple taps, just to make sure this is loose. You don't wanna push it too far, just make sure the axle's separated from the hub a little bit.
Then spray the backside a little bit with some more penetrating oil. Let that soak. Disconnect the connector up top, this little tab. Just slide that. And then the other connector is gonna go down to the hub. Disconnect these. Use a trim tool. Pry up. Pop that out. You need to pop these off, like this. Or if you have trouble with it, you can just pop the retainer open and just slide these out. Sometimes these break right there, and it's just easier to open those up. Slide the wire over here. Use some needle-nose pliers, just squeeze this clip. And slide that out, outta the way.
Now I'm just gonna take these three bolts off on the backside of the knuckle. These go to the hub. I'm gonna use a 15-millimeter socket. Take those out. Just be careful near the CV boot, you don't wanna rip it. There we go. Got them all at least loosened. And take this bolt out. And this top one I can't get that out. I'm just gonna leave that in there. When the hub comes forward, then that bolt will be loose.
Now I'm gonna take a hammer and hit the hub from the backside to try to separate it from the knuckle. Sometimes these are frozen on there pretty good. And it's actually starting to move. You can grab the backing shield and just see if you can wiggle it. Spray a little bit more rust penetrant in there. The axle, a little tap. And just slide it out. And that bolt is just loose. I'm just gonna leave that right there for when I go to reinstall it. Just gonna clean up this knuckle. Just use a wire brush. Clean up some of this rust. Take this backing shield off. Gonna reuse this. If this is rusty, you can clean this up with a wire brush a little bit. I'm gonna use some anti-seize on this area so that if I ever have to take this off again, it comes off easy. Just put a little on the splines too. Slide the wire through the backing shield and install the new hub. Get it lined up. That's good. Get the bolt started. Gonna start with that top bolt. It's kinda hard to get to.
All right, with that bolt started, go ahead and take the wire. We can rerun the wire. And I can either pop that one out or just pop the new one off and reuse the old one. Screwdriver, pop that off. Lock it in place. Put that there. And we'll plug this in right there. And then reposition this, and that's good. And you get the other bolts in. And tighten these bolts up. Move this a little more. All right. Now we're gonna go back to all these bolts and torque them to 133 foot-pounds. And do the same on the other two. Put the washer on. Put the nut on. It is a good idea to replace the nut. But you can reuse it if you have to. And tighten this up. I'm just gonna put the pry bar through here, and then the other end is on the ground. That's gonna prevent the hub from spinning. And I'll torque this nut to 177 foot-pounds. That's good. Now we're gonna clean up this bracket. Just take a straight blade pocket screwdriver. Take these clips off. And there's a lot of rust underneath here. Take a wire brush, clean this up. If you have to, you can use a file. Just be careful, you don't wanna take too much material off. And then take some brake caliper lubricant and just wipe that down. Brake caliper grease there and right there. And take the new caliper slides or anti-rattle clips. Put those on there. Line it up, find the right one. Put it on there. Put a little more brake caliper grease on here, just a thin coat. Just where the pads are gonna make contact. Take a little bit of anti-seize, just go around the hub. We'll see around the center here and spread it out. Nice thin coat. Just gonna take the rotor, put it on backwards. I'm just gonna clean the surface. Use a little brake parts cleaner. And we'll wipe it with a rag with just that protective coating on there to prevent it from rusting. And flip it over, do the same on this side. And wipe it down.
Now take the old caliper bolts. I'll just put a little thread-locking compound on there. And line the caliper bracket up, goes this way. And put the bolts in. Get those lined up. And use the torque wrench, and torque these to 129 foot-pounds. Good. Now install the new brake pads. Now the warning indicator on the inside is gonna go at the bottom and just one, not one at the top. Just slide that in position. And the outside one will have both. That's good. Now I'm gonna compress the caliper. Use the caliper compressing tool. If you have to, use the old brake pad to help you. And just go slow. You don't wanna push these in too fast. This is gonna push the brake fluid through the hoses, through the lines, back up into the master cylinder. All right, those are compressed. Take the tool out. Just make sure the seals look good, the dust seals. Those look good. Now put the caliper back over the pads and line it into the bracket. Take the brake caliper pins, just use a little brake parts cleaner on them. Wipe them off. Take some brake caliper grease. Grease them up. And slide the pins back in position. Get them started. And then tighten them down. Now I'm gonna torque these bolts to these caliper guide pins to 80 foot-pounds. There we go.
And put the wheel back up. Put the lug nuts on. Now I'm gonna torque these lug nuts to 140-foot-pounds in a star pattern to tighten the wheel down evenly. And just go around again, double-check. Install the center cap. Now just pump the brake pedal. There's gonna be an air gap between the caliper piston and the brake pads. Pump that up. Just go slow. And once it feels good, then you're all set. And double-check your brake fluid level in the brake reservoir. Max line's right there. If you give it a little shake, our fluid's right about there.