Replaces
This part doesn’t fit a . Select from parts that fit.
Frequently bought together
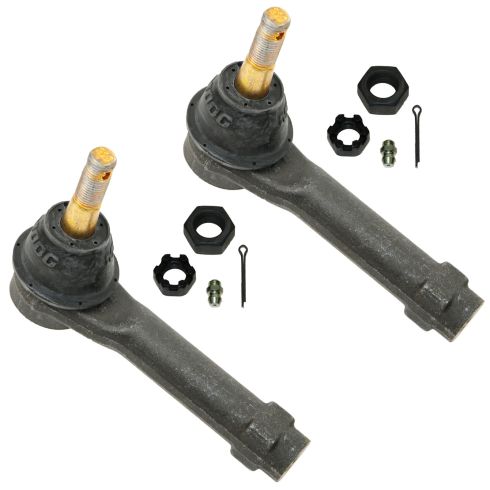
Part Details
Install Tip: When replacing steering components, have a professional alignment performed afterwards. This ensures proper tracking and even tire wear.
Item Condition:
New
Lifetime Warranty
This item is backed by our limited lifetime warranty. In the event this item should fail due to manufacturing defects during intended use, we will replace the part free of charge. This warranty covers the cost of the part only.
FREE Shipping is standard on Orders shipped to the lower 48 States (Contiguous United States). Standard shipping charges apply to Hawaii, Alaska and US Territories. Shipping is not available to Canada.
Expedited is available on checkout to the United States, excluding Alaska, Hawaii and US Territories as well as P.O. Boxes and APO/FPO/DPO addresses. Final shipping costs are available at checkout.


Created on:
Tools used
Brought to you by 1AAuto.com, your source for quality replacement parts and the best service on the Internet.
Hi, I'm Don from 1A Auto. I hope this how-to video helps you out, and next time you need parts for your vehicle, think of 1AAuto.com. Thanks.
In this video, we're going to show how to replace an outer tie rod on this 2002 Chevy Suburban, and it's the same part and similar process on these Suburbans from 2001 to 2006. We show you on the passenger side, but the driver side is the same procedure. The items you'll need for this are a new outer tie rod from 1AAuto.com; 7mm, 13mm, 18mm and 22mm socket and ratchet; flat-blade screwdriver; adjustable wrench; tape measure; pliers; hammer; and a grease gun.
You want to just loosen up these 22mm caps, and then pull the hubcap free. Then, you want to loosen these lug nuts while the vehicle is on the ground, then raise the vehicle and remove them the rest of the way, unless you have air-powered tools. Then, you can do it while it's in the air.
Now you want to measure from the boot on your inner tie rod to the edge of your outer tie rod and just remember that measurement. Now, using your adjustable wrench, loosen up this nut right here, and then you want to remove this 18mm nut down here. Now just hit on your knuckle with a hammer and this is going to break up that outer tie rod and make it easier to pull out. Now just hold this nut with the adjustable wrench, pull the outer tie rod off and just twist it until it comes free. We'll fast forward as Don does this. You want to make sure that the inner tie rod doesn't spin while you're removing the outer tie rod.
Now, put the grease fitting into your new outer tie rod and just tighten that 7mm grease fitting up. Then twist the outer tie rod back onto your inner tie rod and push it down into place. Now, replace the castle nut and just tighten that up. Then push the cotter pin through and, using your pliers, just bend the ends of it. Now, using your grease gun, fill the tie rod with grease. Measure, and you should get about the same distance. That's a good preliminary alignment. You should have your car aligned after this. Tighten up the lock nut to hold it in place.
Now replace your wheel and then replace those lug nuts and tighten them preliminarily. Lower the vehicle and tighten them the rest of the way. Now torque the lug nuts in a crossing pattern to 100 foot-pounds. Replace the hubcap and tighten up those caps.
We hope this video helps you out. Brought to you by www.1AAuto.com, your source for quality replacement parts and the best service on the Internet. Please feel free to call us toll-free, 888-844-3393. We're the company that's here for you on the Internet and in person.
Tools used
Now one of the first things you're gonna wanna do before you start any job is to make sure you're safe as possible. You wanna have safety glasses and hand protection at all times. The next thing you're gonna wanna do is safely raise and support your vehicle so that your wheels are off the ground. Next, if there's a center cap, remove the plastic center cap and that will expose your lug nuts. Remove all 6 using a 22-millimeter socket. Remove your wheel. Now that we have a nice clear view of our tire rods, I'm gonna spray down this area right here. This is the adjustment area. Use a little bit of penetrant. That's gonna help you along. Using some nice long pliers, I'm gonna grab right onto this and I'm gonna turn it clockwise. That'll break free this jam nut. Okay, that broke free. Let's remove the nut that holds the outer tie rod end to the knuckle.
Now we're gonna hit right here on the knuckle to break our outer tie rod end free from the knuckle. Turn your outer tie rod end counterclockwise and count the amount of times it turns around as you remove it. One, two, three and so on. Okay. Write down that corresponding number so you can remember. We have our outer tie rod end. Let's go ahead and put that on. And we're gonna count it in the same amount of threads that we counted the original one off. That was one, two, three and so on. Okay. Just bring this so it's close. Get that nut off of there. I'm gonna put this on there. Let's bottom that out. Now we're gonna torque this nut to 48 foot-pounds. All right. So now that we have that torqued, we need to pay special attention to where the slot on the castle nut lines up with the hole in the stud. If it doesn't line up, you need to continue tightening until it does. Okay, so that looks pretty good. Let's try it.
That slides right through. Spin it over. The cotter pin's gonna ensure that there's no way that this nut can come loose. Now it's gonna be time to tighten up your jam nut. To tighten this we're gonna turn it counter clockwise. When you torque it, you would wanna torque it to 37 foot-pounds if you have the ability. Let's see here. Okay. Just make sure that it's nice and snug. By the time you're finished, make sure your outer tie rod end is nice and parallel to the ground or at least as parallel as it can be. Now let's get the wheel back up on here. Okay. Now with the wheel barely on the ground so it can't spin, we're gonna torque the lug nuts to 140 foot-pounds. Torqued. If you have a center cover, put it on there now. Now that you've finished your service, go ahead and take it for a road test and make sure you get it down to a local reputable alignment shop.
Tools used
Tools used
Before you start, you wanna be aware that after you're done this job, you're gonna wanna go to an alignment specialist so that you can have the vehicle aligned so you don't wear out the tires prematurely.
I'm gonna remove the wheel. Use a 22-millimeter socket, take the lug nuts off. And take the wheel off.
I'm gonna loosen up the jam nut. You can use a 22-millimeter wrench or a 7/8 wrench. Just get that loose. That's good. I'm just gonna spray a little rust penetrant on here. Gonna use an 18-millimeter socket, take this nut off. And if the nut doesn't come off and the stud starts spinning, you can use an 8-millimeter socket to hold that stud from spinning and then just use the wrench to take the nut off. Now you can take a hammer and just give a tap on the bottom of the tir rod or take a pickle fork and separate it this way. Just if you use a pickle fork, it's probably gonna rip the boot right here. So I'm just gonna give it a hit right here. There we go. And now we're gonna take the outer tie rod off. As we unscrew this, just count the threads. So 1, 2, 3, 4, 23, 24. So write that number down and when you go to put it back together, you're gonna count them to put the other one in the same position that that one was in.
And take the new tie rod end. Get this started. Make sure you count. One, 2, 3, 4, 5, 22, 23, 24. And line this up in the knuckle. Take the castle nut. Get that started. Now what you can do is to prevent the stud from spinning, you can take a prybar. Just pry in between the knuckle and pry down on the tie rod. Use an 18-millimeter socket and tighten this up. And tighten this to 37 foot-pounds. And then just check to see where the stud...where the hole is for the castle nut and if you need to, you can snug it up a little bit more to get it to line up. And that hole lines up. Now take the cotter pin, slide it through. Should slide through this way. And take some side cutters and just bend it. Just tap it out of the way. And then trim off the excess. And we'll snug up the jam nut. And tighten that to 50 foot-pounds.
Put the wheel back on. And the lug nuts. Now we're gonna tighten these lug nuts down to 140 foot-pounds and I'm gonna do it in a cross pattern to tighten the wheel down evenly. And just go around again, double-check.
Tools used
You wanna keep in mind when you're doing this job, after you're done, you're gonna wanna go to a local garage and have the vehicle aligned so you don't have premature tire wear.
Take this center cap off. We'll just use a straight blade screwdriver. Just get behind here, slide it off. Get the lug nuts off. Use a 22-millimeter socket. Now take the wheel off.
Loosen up this jam nut. I'm gonna use a 7/8 wrench. And just take some rust penetrant, this thing's a little bit rusty. So let that soak a little bit. Now take a 18-millimeter socket. Take this nut off. And take a hammer and just hit the bottom of the tie rod to release it from the knuckle. Just like that. Now I'm gonna take off the tie rod. Just count how many turns you have. So 1, 2, 3, 4, 5, 7, 21, 22. And write that number down. And take the outer tie rod, one, two. And then count the turns that you counted before, 3, 21, 22. Take the jam nut off. I mean, the castle nut off. And slide it in the knuckle. Slide the stud part into the knuckle. Put the nut on. Just gonna use a pry bar. Pry down on the outer tie rod end to prevent the stud from spinning. And just snug this up a little bit. It's the 18-millimeter socket. And torque this to 37-foot-pounds. And if the hole doesn't line up for the cotter pin, just tighten the castle nut until it lines up. Little more. Should be good. Put the cotter pin through. And take my cutters and just bend this over. And just trim the excess. Tighten up this jam nut. I'm gonna use a 13/16 wrench. And if you have the ability to torque it, torque it to 36-foot-pounds.
Put the wheel on. And the lug nuts. And now I'm gonna torque these lug nuts in a star pattern or cross pattern to 140-foot-pounds to tighten the wheel down evenly. And just go around again. Double-check. And put the center cap on.