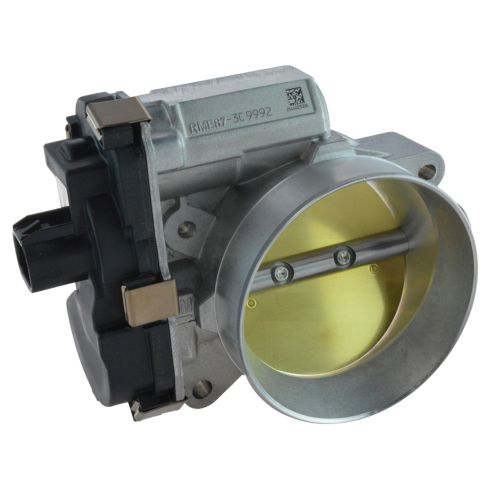
1ATBA00021-Chevrolet GMC Cadillac Hummer Saab Throttle Body Assembly TRQ TBA07525

Replaces
2012 Chevrolet Avalanche Throttle Body Assembly TRQ TBA07525

Frequently bought together
Product Reviews
Loading reviews
4.56/ 5.0
32
32 reviews
Throttle body
March 3, 2017
Part fit perfect and came in a great shipping package. Took awfully long to receive the part though .
Chevy Tahoe2011 throttle body
March 26, 2018
A1 auto ship it fast. took 3 minutes to install and then had to do a throttle position relearn with an OBD ll reader throttle body seems to work awesome
Terrible product
October 31, 2018
I ordered an alternator for different car didnt work ordered this for my Chevy didnt work my fault for being cheap NEVER Again!!!??????
Cautious on installing!!!!!!
November 1, 2018
Videos says you can programme it yourself, but in my case I had to go to the stealership to get it programmed. 110$ for a 5 min programming. If you installed this part and you turn truck on and its 3000rpm ... Turn it off call dealer to get it programmed or some one with snap on tool
Throttle body for a 2011 Silverado
December 6, 2018
needed a new throttle body on my 2011 Silverado. Factory one twice the price is 1A Auto. Works as it should and even got one mile per gallon better fuel mileage. Highly recommend this product.Write
May 10, 2019
great quality and service
Great Price & Quality
October 23, 2019
Exact replacement for the throttle body on a 2009 Chevy Silverado 1500 5.3L V8 VIN:(0). Had this on in about 5 minutes but could not reset the throttle position manually had to get it reset with a scanner tool, other than that my truck is running great now. Definitely recommend!
January 7, 2020
Very easy to install. Recalibration video helped as well. Had no issues and the Chevy Tahoe now runs great.
Throttle body 09 GMC 1500
March 27, 2020
The part went on beautifully. 15 minutes. Thanks for the video.
Hooyah Hugo Melchor disabled Navy Veteran.
Great part, great customer service
April 23, 2020
Part came in on time and in great condition. Instructional video was awesome. Not a do-it-yourselfer but followed video and got it done. Definitely recommend!
2012 GMC Sierra throttle
August 18, 2020
Works better than the oem ac delco I had! Throttle body relearn video Was on point
Great throttle body
September 23, 2020
shipping was fast. Part fit perfectly was install like in 20 minutes I had to take it to relearn the throttle body its working like a champion thanks 1aauto
Throttle body
February 20, 2021
Throttlebody fit like it should installation instructions were clear truck is running perfect
GM replacement throttle body
April 5, 2021
I have ordered many parts from 1AAUTO. Every time I do I am pleased with the service the price and the quality of the parts I receive and the warranty is outstanding too
September 2, 2021
pflowers024@gmail.com
It works very well..i was done in 20mins assembling it..relearning was a no brainer..gas mileage is better.idleing is great..price was super great .thanks guys..plus I got my brake pads an rotors easy peasy.im ready for winter..love the video's.very ez to understand in plane English I appreciate u..until the next project
Thanks again
Perfect OEM Alternative
November 30, 2021
Worked like a charm on my 2009 Chevrolet Silverado. Easy install. But you must reprogram with computer. Not plug and learn.
Would not recommend for 2009 Silverado 5.3L
December 15, 2021
Bought TBA, had installed by mechanic, updated software, ran for a week and then same problem... error messages appeared. ENGINE POWER REDUCED, SERVICE STABILITRAK, SERVICE TRACTION CONTROL. Did not fix problem. Had to buy new TBA from GM, truck running fine now. Buyer beware on these.
2011 Tahoe throttle body.
January 13, 2022
Really helped with performance. If you want to improve your high mileage vehicle operation. This helps.
February 25, 2022
So far so good, thanks to 1Aauto I have the Yukon xl running again, takes me about 30 minutes total to do the job done , the only thing is that they dont come with new gasket, other than that the truck is been running fine
2weeks in and doing great
March 2, 2022
Works great.
April 9, 2022
Worked great. Easy install
April 9, 2022
Works great
April 9, 2022
good
1A top notch parts distributor!
June 7, 2022
Great product, worked at promised, price was excellent. Do your homework on the parts you need and save some money because the repair shops do and then mark it up. 1A is the real deal, will be back!
bolted right in. truck has her pep back
August 3, 2022
bolted right up torqued to spec. and did the manual learning curve. my truck is running great with a 170k miles on her.
Easy installation
October 2, 2022
Very easy to install and seems to have improved the idle and acceleration on my GMC Yukon.
Perfect part, perfect price
February 23, 2023
Outstanding part is an identical match for the OE Throttle body. I honestly didn't realize how badly my truck was running until I installed the new Throttle body. Works perfect and smoothed everything out
09 Chevy Silverado
April 25, 2023
Took about 30 minutes from start to finish and solved my problem! Part fit perfectly
Throttle body for 09 Silverado
May 24, 2023
Received the part in less than 3 days.. Took about 20 minutes to install. The only problem was it took awhile for the ecm to reset. Considering my trk has 187000 miles and this is first time I've had to replace the throttle body. I can't complain. Gets 5 stats.
February 3, 2024
This part works great for my truck
September 17, 2024
Had to replace with GM-AC DELCO PART
October 26, 2024
Works great
Customer Q&A
Would this fit my 2009 4.3 Silverado?
July 29, 2018
10
This part is not listed to fit your vehicle. We may have a part that is listed to fit! Please search our site using your vehicle info and then choose the appropriate category. All the parts we carry are guaranteed to fit the vehicle they are listed for. Thank you!
July 30, 2018
T I
does a new gasket come with the throttle body?
October 20, 2019
10
This item will not come with a new gasket. Please let us know if you have any further questions.
October 20, 2019
Emma F
10
No
October 20, 2019
Andrew P
10
yes
October 22, 2019
WILLIAM P
Where do I find new throttle body mounting gasket?
October 13, 2020
10
If you are able to provide us with your VIN, we would be happy to see what we have available for you. Please let us know if you have any further questions.
October 13, 2020
Emma F
What's the warranty?
October 30, 2021
10
This item is backed by our limited lifetime warranty. In the event this item should fail due to manufacturing defects during intended use, we will replace the part free of charge. This warranty covers the cost of the part only.
October 30, 2021
Ricale A
Will this work on the 6.2L vortec in my 2011 Silverado?
February 6, 2022
10
Yes, this part will fit your vehicle.
February 7, 2022
T I
10
Yes this will work for you, this works on my Yukon xl Denali 6.2 l ,
February 25, 2022
Jose G
10
Yes
March 3, 2022
Adam M
Will this work on flex fuel engines?
April 9, 2022
Will this work on flex fuel engines?
April 9, 2022
10
Yes worked great on my flex fuel Silverado
April 9, 2022
W I
10
Working great with mine as well
April 9, 2022
J K
10
yes. as long as its a 5.3 in that year model thats listed it will work
April 9, 2022
K O
Do you do international shipments to Dubai?
August 20, 2022
Chevrolet is a registered trademark of General Motors Company. 1A Auto is not affiliated with or sponsored by Chevrolet or General Motors Company.
See all trademarks.


