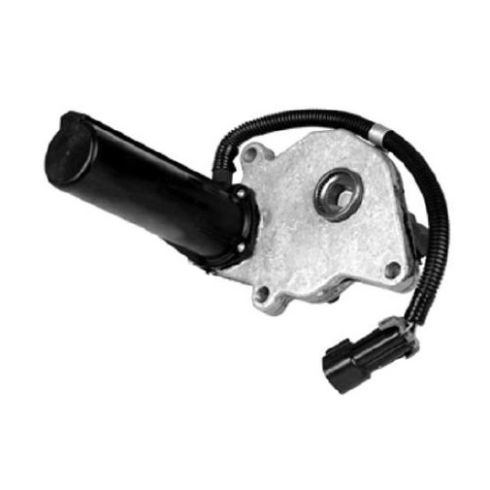
1AFWM00002-Chevrolet GMC Cadillac Transfer Case Shift Motor Dorman OE Solutions 600-901

Replaces
1999 GMC Suburban K1500 with RPO Code NP8 (Push Button, 2 Speed Transfer Case) Transfer Case Shift Motor Dorman OE Solutions 600-901

Frequently bought together
Product Reviews
Loading reviews
5.00/ 5.0
5
5 reviews
In time for snow
February 24, 2018
This fixed the problem of my 1998 Tahoe no engaging into 4 wheel mode. Just in time for another northern snow storm
right
September 21, 2018
1A Auto had the RIGHT part for a fair price was delivered RIGHT on time . The instruction video was RIGHT on.Now my son's truck is running RIGHT. Thanks 1A Auto.
Great Sevive
February 26, 2019
Great Service and Price and got it in a timely manner! I will use 1A Auto again!
Parts were exactly as described and arrived when promised.
October 1, 2019
The parts I ordered were competitively priced quality products. Exactly what I needed.
Works Perfect
June 10, 2022
Excellent product, worked perfectly.
Customer Q&A
book hours suggested to replace transfer case shift motor in 2005 Silverado 1500 4x4?
February 8, 2018
10
1998 Tahoe transfer case shift motor was replaced as we could put into 4 only from underneath had already replaced inside switch
February 9, 2018
Sue S
My truck will not shift in to 4WD. The indicator stays on 2 Wheel high and the message center says service 4WD is this the part causing the issue? I plan to check the plug with my multimeter before I order parts. Im just guessing at this point. Any a
September 27, 2020
10
Thanks for your inquiry. There could be multiple reasons why you're having this particular problem. We suggest taking your vehicle to a nearby reputable shop to identify the cause. Once you know the cause, we'll be happy to see if we carry the parts and how-to videos needed for your repair.
September 29, 2020
Adam G
My Tahoe doesnt engage 4wd low, it engages everything else perfectly except 4wd low. Any ideas?
October 8, 2024
GMC is a registered trademark of General Motors Company. 1A Auto is not affiliated with or sponsored by GMC or General Motors Company.
See all trademarks.


