Replaces

This part doesn’t fit a . Select from parts that fit.
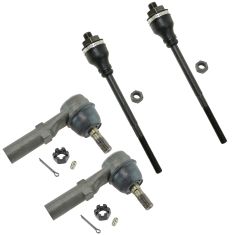
Frequently bought together
Part Details
Install Tip: When replacing steering components, have a professional alignment performed afterwards. This ensures proper tracking and even tire wear.
Item Condition:
New
Lifetime Warranty
This item is backed by our limited lifetime warranty. In the event this item should fail due to manufacturing defects during intended use, we will replace the part free of charge. This warranty covers the cost of the part only.
FREE Shipping is standard on orders shipped to the lower 48 States (Contiguous United States). Standard shipping charges apply to Hawaii and Alaska.
Shipping is not available to a P.O. Box, APO/FPO/DPO addresses, US Territories, or Canada for this item.
Expedited is available on checkout to the United States, excluding Alaska, Hawaii.
Final shipping costs are available at checkout.

Created on:
Tools used
Brought to you by 1AAuto.com, your source for quality replacement parts and the best service on the Internet.
Hi, I'm Mike from 1A Auto. I hope this how-to video helps you out, and next time you need parts for your vehicle, think of 1AAuto.com. Thanks.
In this video, I'm going to replace an inner tie rod on this 2002 GMC Sierra. This procedure is the same for millions of GMC Sierra, Chevy Silverado, 1500 and 2500, 3500, pretty much all the same basic procedure. You'll need a couple of large adjustable wrenches. I found those work fine. You don't really need the exact size. Two large adjustable wrenches will work.You'll also need a tape measure and you'll need a grease gun with grease, and we do recommend that you have your vehicle aligned after a repair like this.
Here you can see, I have the vehicle up on a lift. Here is my inner tie rod running from here to here. This is the outer tie rod. You could see, I pull this boot down and I pull and what I'm looking at is basically the relationship of here to here and I can see some movement in here. I want to replace this. What I'm going to do is, I'm going to pull out, then I'm going to measure from there to there. Just a shade under ten inches, 9 and 15/16"�. Now, I'm going to pull it back in, and check here. It's about 9 and 7/8"�. When I put this back together, I'm going to set this right between 9 and 7/8"� and 9 and 15/16"�. I'm going to pull it apart. I'm just going to clean this off.
Take a nice big adjustable wrench. I'm loosening that up. On this end, I'm going to put a wrench on my outer tie rod just to hold it in place. We'll get that loosened up. I'm just going to speed up here. We loosened up the nut that's close to the center steering rack and then we loosened up the tie rod where it connects the outer tie rod. Take that nut off for the center steering first and then just turn the whole entire inner tie rod counter clockwise and take it out of the outer tie rod.
Here's a new tie rod from 1A Auto. It's always a good idea to put some thread lock on the inside. If you have your vehicle up on a lift, or a jack, you'll want to jack it up just to get, make sure your stabilizer bars up and out of the way. Thread it in and then use a wrench and tighten this. This should be tightened to 74 foot-pounds. Anywhere between 70 and 80 foot-pounds. In this shot, what I didn't explain very clearly, you can see where that red arrow is. I have a jack underneath the suspension. It just helps lift it up so that the stabilizer bar isn't in the way when you start the tie rod into the center steering link. With this wrench, just pull it nice and tight. Now I'm going to assemble the outer end. I'm going to put this nut on. Then to bring this down on my tire and in. Make sure it's going together straight. If you remember our measurement, basically, we want to be right at 9 and 31/32, so we've got a long way to go. I'm going to speed it up here as I keep using the wrench to turn the tie rod end into the outer tie rod end. I measured a couple of times just to see where I'm at. That is, it's just a little bit further than we want. Knock it off, right there. We've got our one wrench on here and then to tighten, hold on to the outer tie rod, taking that up nice and secure. Now make sure we grease the fitting. What I'm watching, I'm watching this boot here. Once that boot starts changing shape a little bit, I know the grease is in there. Then, while on here. I'm going to hit all my other grease spots as well.
We hope this helps you out. Brought to you by www.1AAuto.com, your source for quality replacement parts and the best service on the Internet. Please feel free to call us toll-free, 888-844-3393. We're the company that's here for you on the Internet and in person.