Replaces

This part doesn’t fit a . Select from parts that fit.
Frequently bought together
Part Details
Install Tip: When replacing steering components, have a professional alignment performed afterwards. This ensures proper tracking and even tire wear.
Our steering and suspension components are pre-greased and sealed for long life and do not require the extra maintenance typically required by greaseable versions.
Item Condition:
New
Attention California Customers:
 WARNING: This product can expose you to chemicals including Lead and Lead Compounds, which are known to the State of California to cause cancer, and birth defects or other reproductive harm. For more information, go to www.P65Warnings.ca.gov.
Lifetime Warranty
This item is backed by our limited lifetime warranty. In the event that this item should fail due to manufacturing defects during intended use, we will replace the part free of charge. This warranty covers the cost of the part only.
FREE Shipping is standard on Orders shipped to the lower 48 States (Contiguous United States). Standard shipping charges apply to Hawaii, Alaska and US Territories. Shipping is not available to Canada.
Expedited is available on checkout to the United States, excluding Alaska, Hawaii and US Territories as well as P.O. Boxes and APO/FPO/DPO addresses. Final shipping costs are available at checkout.


Created on:
Tools used
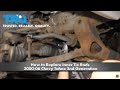
Brought to you by 1A Auto.com, your source for quality replacement parts and the best service on the internet.
Hi, I'm Mike Green. I'm one of the owners of 1A Auto. I want to help you save time and money repairing and maintaining your vehicle. I'm going to use my 20-something years experience restoring and repairing cars and trucks like this, to show you the correct way to install parts from 1A Auto.com. The right parts, installed correctly, that's going to save you time and money. Thank you, and enjoy the video.
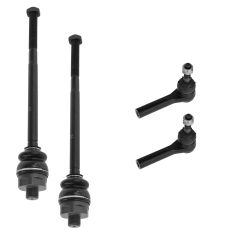
In this video I'm going to show you inner and outer tie rod replacement. This truck actually just needed the inner, but if you're replacing the inner, you might as well replace the outer as well. These tie rods fit this whole generation of GM trucks and SUV's - trucks from 98 - 06 and SUV's from 99 - 07.
The tools you'll need are a jack and jack stands, a 22 mm lug wrench or socket and ratchet. You'll need either a 35 mm wrench or a 12 inch adjustable wrench that can go to 35 mm and then you'll need a second adjustable wrench as well, a tie rod removal tool, a grease gun, torque wrench, and pliers.
The clunking noise was the inner tie rod. You can see here, when I shake the tire back and forth you'll see the inner tie rod move but that steering arm inside doesn't move, so you know there's play in there and it needs to be replaced.
Start out by raising and securing the vehicle on a jack stand and then remove your cap and wheel. We're going to remove this bolt. We've got a ratchet. If you don't have a breaker bar, use a ratchet and a piece of pipe. The bolt should come off pretty easily. Take the bolts off most of the way. I'm planning on replacing the outer tie rod as well, so I'm going to use a pickle fork to separate it. The best way to go about this is to get the wrench on it from underneath and push. That should break her free. I'm just going to speed up as I pull that out. You want to make sure that your outer tie rod spins with the wrench so the whole assembly spins and you don't shorten or lengthen the tie rod -- the inner and outer tie rod assembly.
There's your whole assembly out. If you can see here, I've got my old assembly, inner tie rod and outer tie rod, and I want to measure right from the edge of this surface here right to the end. I'm taking my new inner tie rod and outer tie rod and I put them together, just to compare. This will give you a good preliminary alignment. We'll put this nut a little closer. We can put it together now. It will be a good preliminary alignment until you can get your vehicle to a shop where you can get a real alignment.
I'm just leaving my nut right there and spinning my outer tie rod off. The nut marks the place where your tie rod was and then taking off that outer tie rod just makes it easier to get the inner one on. That allows me put my inner tie rod on. Speed it up here as I use the wrench to tighten the tie rod up. Then I can put my outer tie rod right back on and go right up to the nut. Then I'll just fast-forward here as I put that outer tie rod back on the inner tie rod. Now I'm just taking the nut or just getting the outer tie rod in place. Take the nut off the new tie rod, and I'm just going to get some of the debris off the steering knuckle there, and then you can push on the stud on the tie rod and get it lined up with the steering knuckle, and then push it up and in, and start your nut back on.
We'll tighten this up to 65 foot-pounds. Pull a little tighter here and we can get this cotter pin through. We'll fast-forward here as we install the cotter pin and bend the end over and then use a 7 mm wrench and install our grease fitting. We'll take a wrench screw up here. The other one holds the outer tie rod and just tighten up the block nut. Now you want to use a grease gun and grease both the joint for the outer tie rod and the inner tie rod.
Use some more fast-forward here. As you put the wheel and tire back on, start all the lug nuts one by one by hand first, then use your wrench to preliminary tighten them, then you can lower the vehicle back down on the ground, torque the lug nuts to 120 foot-pounds. I'm using a crossing pattern and then I do it one more time, go around all eight and make sure they're tight. Then you can put your center cap back on and you should be all set.
We hope this helps you out. Brought to you by www.1AAuto.com, your source for quality replacement parts and the best service on the internet. Please feel free to call us toll-free, 888-844-3393. We're the company that's here for you on the internet and in person.
Tools used
Tools used
Tools used
Tools used
Tools used
You want to keep in mind when you're doing this job after you're done, you're going to want to go to a local garage and have the vehicle aligned so you don't have premature tire wear. Take the center cap off. I'll just use a straight blade screwdriver, just get behind here, slide it off. Take the lug nuts off. Use a 22-millimeter socket. Gonna take the wheel off. [inaudible 00:00:34] off this jam nut. I'm going to use a 7/8 wrench. And just take some rust penetrant, this thing is a little bit rusty so let that soak a little bit. Gonna take a 18-millimeter socket, take this nut off. And take a hammer and just hit the bottom of the tie rod to release it from the knuckle. Just like that.
Now when I take off the tie rod, just count how many turns you have. So 1, 2, 3, 4, 5, 7...21, 22 and write that number down. Now I'm going to take a large adjustable wrench and loosen up the inner tie rod end. And loosen this up and just slide it off. Take a little thread locker, put it on the threads before you put the new one on and line it up. And then use my adjustable wrench to tighten this up. If you have the ability to use a torque wrench and torque this, you want to torque this to 74 foot-pounds. And take the outer tie rod, one, two, and then count the turns that you counted before. Three...21, 22. Take the jam nut not off...I mean the castle nut off and slide it in the knuckle. Slide the stud part into the knuckle. Put the nut on. Just gonna use a pry bar, pry down on the outer tie rod in to prevent the stud from spinning, and just snug this up a little bit. Use the 18-millimeter socket. And torque this to 37 foot-pounds. And if the hole doesn't line up for the cotter pin, just tighten the castle nut until it lines up. Little more. Should be good. Put the cotter pin through. And take my cutters and just bend this over then just trim the excess.
Tighten up this jam nut. I'm going to use a 13/16 wrench, and if you have the ability to torque it, torque it to 36 foot-pounds. There's a grease fitting right here. Just take a grease gun and give it a couple pumps. And I really give it a couple of pumps until I see the boot move a little bit. And that's good. Put the wheel back on. And the lug nuts. And now I'm gonna torque these lug nuts in a star pattern or cross pattern to 140 foot-pounds to tighten the wheel down evenly. And just go around again, double-check. And put the center cap on.
Tools used
Tools used
Before you start, you wanna be aware that after you're done this job, you're gonna wanna go to an alignment specialist so that you can have the vehicle aligned so you don't wear out the tires prematurely.
I'm gonna remove the wheel. Use a 22-millimeter socket. Take the lug nuts off. And take the wheel off. I'm gonna loosen up the jam nut. You can use a 22-millimeter wrench or a 7/8 wrench. Just get that loose. That's good. I'm just gonna spray a little rust penetrant on here. And use an 18-millimeter socket, take this nut off. And if the nut doesn't come off and the stud starts spinning, you can use an 8-millimeter socket to hold that stud from spinning, and then just use the wrench to take the nut off. Now you can take a hammer and just give a tap on the bottom of the tie rod, or take a pickle fork and separate it this way. Just if you use a pickle fork, it's probably gonna rip the boot right here. I'm just gonna give it a hit right here. There we go. And now we're gonna take the outer tie rod off. As we unscrew this, just count the threads. So 1, 2, 3, 4, 23, 24. So write that number down. And when you go to put it back together, you're gonna count them to put the other one in the same position that that one was in.
Now I'm gonna take off the inner tie rod end. I'm gonna use a large adjustable wrench because I don't have a wrench that's big enough to fit this. Slide this over and loosen it up. And eventually we'll get that off. Take the inner tie rod end and get this started. Now we're gonna tighten this up with the adjustable wrench. If you have the ability to torque this, you wanna torque this to 74-foot-pounds. Just do the best you can. That's good. Then you wanna take a grease gun and hook it up to this grease fitting and give it a couple pumps. You can do it until you start seeing the boot move a little bit, then you know there's plenty of grease in there. And take the new tie rod end. Get this started. Make sure you count 1, 2, 3, 4, 5, 22, 23, 24 and line this up in the knuckle. Take the castle nut, get that started. Now, what you can do is to prevent the stud from spinning, you can take a pry bar, just pry in between the knuckle and pry down on the tie rod, use an18-millimeter socket and tighten this up. And tighten this to 37-foot-pounds. And then just check to see where the hole is for the castle nut. And if you need to, you can snug it up a little bit more to get it to line up. And that that hole lines up. Now take the cotter pin, slide it through, actually we'll slide it through this way and take some side cutters and just bend it. Tap it out of the way, and then trim off the excess. And we'll snug up the jam nut and tighten that to 50-foot-pounds. Put the wheel back on and the lug nuts. I'm gonna take these lug nuts down to 140-foot-pounds, and I'm gonna do it in a cross pattern to tighten the wheel down evenly. Just go around again. Double-check.
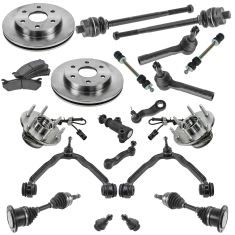
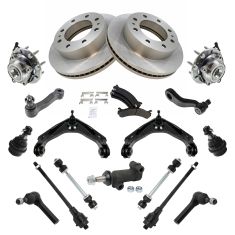
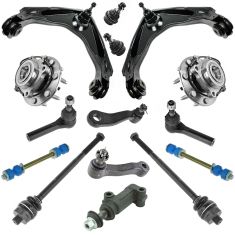
Replaces Chevrolet GMC Hummer Front Steering, Suspension, & Brake Kit TRQ PSA72873
$729.95
Replaces Chevrolet GMC Cadillac Front Steering, Suspension, & Brake Kit TRQ PSA64825
$634.95
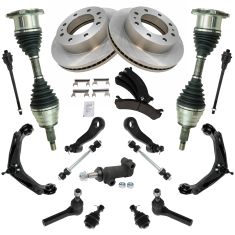
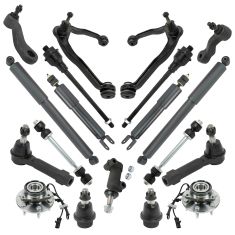
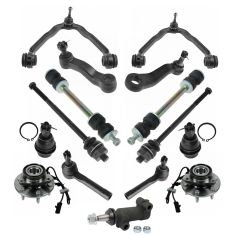
Replaces Chevrolet GMC Front & Rear 21 Piece Steering, Suspension, & Drivetrain Kit TRQ PSA40551
$628.95
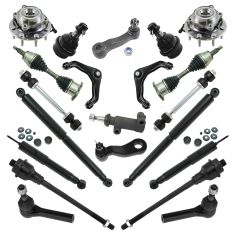
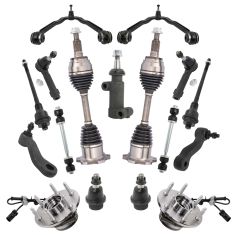
Replaces Chevrolet GMC Hummer Front 17 Piece Steering, Suspension, & Drivetrain Kit TRQ PSA85021
$559.95
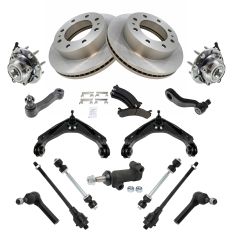
Replaces Chevrolet GMC Front Steering, Suspension, & Brake Kit TRQ PSA72872
$559.95
Replaces Chevrolet GMC Front Steering, Suspension, & Brake Kit TRQ PSA72871
$559.95

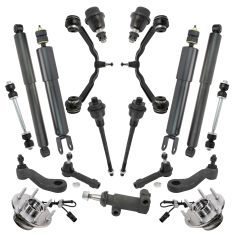
Replaces Chevrolet GMC Front & Rear 21 Piece Steering, Suspension, & Drivetrain Kit TRQ PSA38054
$549.95
Replaces Chevrolet GMC Cadillac Front 17 Piece Steering, Suspension, & Drivetrain Kit TRQ PSA69967
$514.95
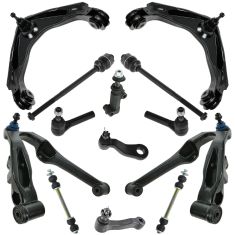
Replaces Chevrolet GMC Hummer Front 13 Piece Steering & Suspension Kit TRQ PSA65894
$489.95
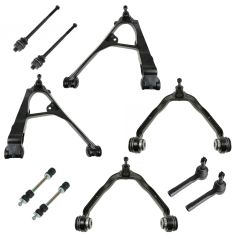
Replaces Chevrolet GMC Hummer Front 10 Piece Steering & Suspension Kit TRQ PSA65893
$439.95
Replaces Chevrolet GMC Front & Rear 19 Piece Steering, Suspension, & Drivetrain Kit TRQ PSA38053
$424.95
Replaces Chevrolet GMC Front & Rear 19 Piece Steering, Suspension, & Drivetrain Kit TRQ PSA30317
$424.95
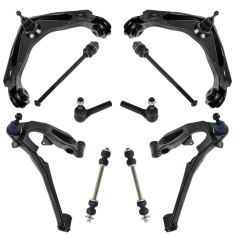
Replaces Chevrolet GMC Hummer Front 8 Piece Steering & Suspension Kit TRQ PSA65892
$391.95
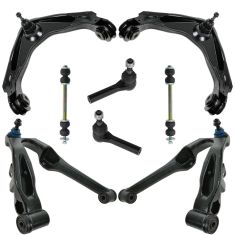
Replaces Chevrolet GMC Cadillac Front 10 Piece Steering & Suspension Kit TRQ PSA58569
$379.95
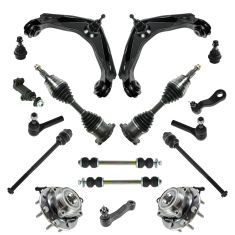
Replaces Chevrolet GMC Hummer Front 15 Piece Steering, Suspension, & Drivetrain Kit TRQ PSA59764
$379.95
Replaces Chevrolet GMC Cadillac Front 15 Piece Steering, Suspension, & Drivetrain Kit TRQ PSA66550
$339.95