Replaces
This part doesn’t fit a . Select from parts that fit.
Frequently bought together
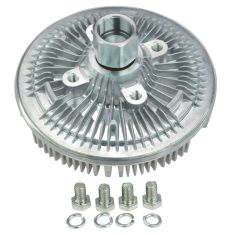
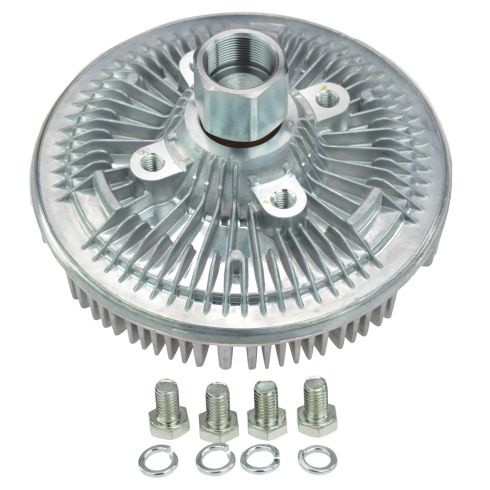
Part Details
Item Condition:
New
Attention California Customers:
 WARNING: This product can expose you to chemicals including Lead and Lead Compounds, which are known to the State of California to cause cancer, and birth defects or other reproductive harm. For more information, go to www.P65Warnings.ca.gov.
Lifetime Warranty
This item is backed by our limited lifetime warranty. In the event that this item should fail due to manufacturing defects during intended use, we will replace the part free of charge. This warranty covers the cost of the part only.
FREE Shipping is standard on Orders shipped to the lower 48 States (Contiguous United States). Standard shipping charges apply to Hawaii, Alaska and US Territories. Shipping is not available to Canada.
Expedited is available on checkout to the United States, excluding Alaska, Hawaii and US Territories as well as P.O. Boxes and APO/FPO/DPO addresses. Final shipping costs are available at checkout.


Created on:
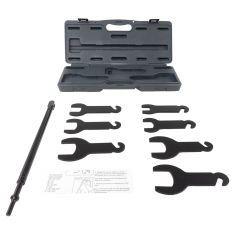
Tools used
Brought to you by 1AAuto.com- your source for quality replacement parts and the best service on the Internet.
Hi, I'm Mike Green. I'm one of the owners of 1AAuto. I want to help you save time and money repairing and maintaining your vehicle. I'm going to use my 20-plus years experience restoring and repairing cars and trucks like this to show you the correct way to install parts from 1AAuto.com. The right parts installed correctly. That's going to save you time and money. Thank you and enjoy the video.
In this video we'll be showing you how to replace the fan or the fan clutch on this 2002 GMC Yukon. This is very similar for most GMC SUVs and trucks from 99 to 06 and 07. Tools you'll need are pretty basic, eight, 10 and 13-millimeter sockets and ratchet, a flat-blade screwdriver, a large adjustable wrench and a hammer.
We're going to begin by using an eight-millimeter socket ratchet or wrench to disconnect our negative battery cable and then we're going to loosen two clamps: this one here at the front of your throttle body and this one right down here near your air box. Now with those loosened up, these rubber hoses may stick on so you may want to take a screwdriver and kind of gently just work it under in a few different places. Get the hoses unstuck. Then you pull the hoses off; pull it off the front of the throttle body here. See this one is a little more difficult. Right under here there's a clamp, so pull this up. You just want to work this out of this pin here. It usually comes off pretty easy. Bring this whole assembly right up and out.
Next, we're going to remove two 10-millimeter bolts, one here and one right over here and then pull this little hose out of here. We're basically going to take off the upper fan shroud. You'll want to pull this hose up and out, work it carefully back and forth and pull up and you should be able to pull that out. Then down here there are little pins. You actually pry the center of them up first. Once you pry the center up they'll come right out. There are four of those, there, there and then the same kind of area on the other side right there, then one right there.
Next step is to remove the fan here, large adjustable wrench; put it onto that nut. The best way is to use a little old-fashioned impact. Obviously you still have the belts on the motor once you've broken it loose. To replace your fan clutch, a 13-millimeter socket and you basically just remove these four bolts. The fan separates from the fan clutch. Put your new fan clutch in. Tighten up these four bolts again. These bolts should tighten up to about 20 to 25 foot-pounds.
Put the fan on using our big adjustable wrench. Tighten as much as you can. Use the power of impact to tighten it up further. Now we're going to put the upper shroud back on. Your four pins pop in, push them down to lock. This one pops in; push it down and then the two on this side and then your two bolts, 10 millimeter. We'll tighten up those 10-millimeter bolts and now fasten your upper radiator hose on there correctly and put your air intake back in. Make sure you get those hoses connected properly and securely and then nice and tight. Make sure it's pushed onto the throttle body correctly and that clamp is all tight. Then you can reconnect your battery and you're all set.
We hope this helps you out. Brought to you by www.1AAuto.com- your source for quality replacement parts and the best service on the Internet. Please feel free to call us toll free 888-844-3393. We're the company that's here for you on the Internet and in person.
Tools used
If you were to look right down here, you're gonna see a clamp. If you were to look at the other end where it connects on to the throttle body, you're gonna see another clamp. You'd go ahead and loosen those up. Also, if you come right up here, you're gonna see an 8-millimeter bolt. Look, if you loosen that up, you can take this right out. Once you have that out of the way and the clamps are loosened, you can wiggle this around. I'm gonna draw it off of the throttle body right here and I'm gonna take them right there. Take it off of right here. Remove it from the vehicle. Next we're gonna remove the bolts right up here that hold this in. Let's use our little forky tool here or you can use a screwdriver or whatever you've got. We're gonna lift up on the center of these push tabs here and then you should be able to take it right out of there. That's what it looks like. There's two on this side and two on the passenger side. Remove them all. Have all those out, let's go ahead and get this off of here. The next thing we need to do is get the fan clutch off of here. You wanna do that before you remove your serpentine belt because that's gonna help keep the water pump from spinning. I'm gonna carefully try to put a little bit of penetrant on there, right along the area between the actual clutch itself and the pump. Let that sit for a second. We're gonna need to use a 36-millimeter wrench of some sort.
I have one that goes on my air chisel but if you have a 36-millimeter wrench and a hammer, you could try to give it a couple light bonks and see if you can get it to break free. Once that breaks free, you can go ahead and spin it right off. Just be careful not to let it spin too freely because if it comes off, falls down, it could potentially damage your radiator. Get that right out of there. All right, so we got our fan. Let's put it right on the bench. On the backside you're gonna see four bolts. Go ahead and remove those. So you might notice that the fan clutch doesn't wanna come out of there, just go ahead and give it a nice bonk. There we are. Double-check your fan. Make sure it's in good condition. If there's any issues with it, of course, you'd wanna replace that as well. This one looks good, aside from a little rust, which I'm really not worried about. Let's get that clutch out of the way, bring our new one over. This looks great. Slide this right on over. Line up those bolt holes. All right. Start in all four of your bolts and then we'll bottom them out. Go ahead and torque these to 17 foot-pounds. Now it's gonna be time to get the fan clutch on to the water pump. Don't use any threadlocker or anything like that. You don't need to use any threadlocker and you don't wanna use any Never-Seez. Just go ahead and go metal-on-metal. Turn this clockwise until it bottoms out. Okay. So that's pretty much it.
Now, at this point, what I like to do is just give it a couple taps to tighten it. You don't wanna continue tightening it to the point that it's gonna be over-tightened because you do, of course, need to get this off again someday. If you were gonna torque it down, you would torque it to 41 foot-pounds. And that's it. Let's go ahead and get our fan shroud back on here. Go ahead and lift up on that upper hose. Slide it down in. There we are. This looks good. We're gonna line up down here. You're gonna see, I have a little piton and a hole. Line that up. It should sit right in. Do the same on the other side. There we are. So now we're gonna take our push clips. Make sure that the center is pulled up. If it's pushed in, that means it's in the locked position. Go ahead and slide it in. Lock it in. Do the same to the other one. And then come right up top up here and start in your bolt. Now we'll do the same to the other side and then we'll snug this up. We'll get our intake back on here. It's gonna go right underneath this hose here. Line it up there. Grab this. Slide it in. Push it all the way in so it's up against the whole throttle body. Make sure your clamps are nice and tight. Your hose over here should have a little clippy-do. Ours is actually broken but it's gonna push in right there and that'll hold it secure. This cover back on here, just slide it all the way back so it's sitting inside the pitons. Put this down and tighten up your bolt.
Tools used
Tools used
Tools used
Remove this cover, I'm gonna use an 8-millimeter socket. Loosen that bolt up, and slide the cover out. And loosen up this worm clamp. You can use a 8-millimeter socket or a straight blade screwdriver. And the same with this one right here. Use a trim tool, and just separate this retainer right there, or that bracket. Now slide the snorkel off there, and pull it out. Just to gain more access, I'm gonna pull this airbox off. Disconnect the mass air flow sensor. Grab the airbox. Pull it straight up. Then, you can slide it out. There's two tabs. And this holds it in.
I'm gonna take these two bolts out up top. Use a 10-millimeter socket. And there's four push pins, two on this side and two on the other side. I'm gonna use a push pin removal tool or a trim tool. Just remove these. Now take this hose retainer off right here. Just use a trim tool. Slide that up. Slide this hose out right here. This should be, hmmmm. Just move this hose out of your way. Just slide this cover right out.
I'm gonna use a fan clutch tool with the 36-millimeter adapter and just go right here, this setup. Once you get it loose, should be able to spin it off just like that. And pull it out. Take these four bolts out. I'm gonna use a 13-millimeter socket. And just hold the fan up. Just give it a little tap with a hammer. Take the new fan clutch, and put the fan right in position. That looks good. Take the bolts. Get the bolts started. Now, we're gonna torque these bolts to 17-foot-pounds.
Just take the fan, and just line it up. Now if you have a torque wrench and you're able to hold the water pump pulley from spinning, you can torque that to 41-foot-pounds. We don't have that. I'm just gonna use an adjustable wrench and just a hammer. Give it a couple good taps. And that's good. All right. Now take this fan shroud. Hold the hose out of the way. Line it up with some alignment pins right there on both sides. Put these push pins in. Lock 'em down. Do the same on the other side. Put these bolts in. Get those lined up. And tighten these down. And line this retainer up and right there. Put that hose in that position. And slide the airbox back in position. What you want to do is slide this piece. It's gonna go right here. It's gonna slide there. And then push the two push pins straight down. Push down. It's good to go. Reconnect the mass air flow sensor. And put the snorkel back on. Line this up with the throttle body and the airbox. And tighten up the worm clamps. And line this bracket back up. Put the cover on. Slide it in the back. Get the bolt started. Snug it down.
Tools used