All of our auto parts are intended for Left Hand Drive USDM vehicles. If your vehicle is Right Hand Drive, please ensure the part is correct for your specific vehicle.
Highest Quality Materials
Made from highest quality materials that meet or exceed OEM standards
Quality Tested - built to a strict level of product standards.
Item Condition:New
Attention California Customers:
WARNING: This product can expose you to chemicals including Di(2-ethylhexyl)phthalate (DEHP), which is known to the State of California to cause cancer, and birth defects or other reproductive harm. For more information, go to www.P65Warnings.ca.gov.
Lifetime Warranty
This item is backed by our limited lifetime warranty. In the event that this item should fail due to manufacturing defects during intended use, we will replace the part free of charge. This warranty covers the cost of the part only.
Returns: Parts with electrical components cannot be returned once installed.
FREE Shipping is standard on Orders shipped to the lower 48 States (Contiguous United States). Standard shipping charges apply to Hawaii, Alaska and US Territories. Shipping is not available to Canada.
Expedited is available on checkout to the United States, excluding Alaska, Hawaii and US Territories as well as P.O. Boxes and APO/FPO/DPO addresses. Final shipping costs are available at checkout.
How to Replace Heater Blower Motor with Fan Cage 2005-10 Chevy Cobalt
Created on:
Tools used
Razor Blade / Gasket Scraper
1/2 Inch Drill Bit
Coarse Threaded Bolts (to replace rivets)
Flat Blade Screwdriver
Phillips Head Screwdriver
6mm Socket
Drill
Ratchet
1. Remove the AC Blower Fan Motor
Reach under the passenger side dash and use a box cutter to cut out the blower motor fan.
Unclip the wiring harness.
Use a drill to remove the rivets securing the blower motor fan into its housing.
Separate the plastic housing from the blower motor.
2. Install the new AC Blower Fan Motor
Install the plastic housing on the new motor
Use small course thread bolts and bolt in with a socket and ratchet to replace the rivets.
Insert the new motor into place and bolt in with your socket and ratchet.
Plug in the wiring harness.
Brought to you by 1AAuto.com, your source for quality replacement parts and the best service on the Internet. Hi I'm Mike from 1AAuto. I hope this how-to video helps you out and next time you need parts for your vehicle think of 1AAuto.com. Thanks.
In this video we're going to show you how to replace an AC and heater fan motor. Usually you'll start hearing the motor groan or make a higher pitched squeaking noise. That's when you know it's starting to get bad and sometimes they do just quit all together. The fan in this vehicle is actually molded into place. You do have to cut it out. The tools you'll need are a flat blade screwdriver, a utility knife, you'll need a drill with a half inch bit to drill out a couple of plastic rivets, a small socket ratchet, and eight small coarse thread bolts or screws. The lead goes in right above your passenger's feet, just use a screwdriver and press the tabs there and it comes right out. Then you get a nice sharp razor knife and you actually just cut. There's a groove all the way around the motor. You just push your razor knife right up into it.
Now I'm going to speed up the tape. Obviously you want to do this very carefully. Be very careful not to cut yourself with the razor knife. Like I said, there's a groove all the way around. Stick your razor knife up in there and just pull or push in a controlled manner and work your way all the way around the motor. There is a block in the front of the motor where the groove basically does not exist and that's the part where you try and cut into it that as much as possible and in the end probably a little piece of that will break off. The motor is held to this housing with two plastic rivets. I'm going to use the three-eighths drill. I'm going to speed up here. I just drilled those two plastic rivets. They're pretty easy. Don't use a lot of pressure; you don't want to drill too far through. Drill a little bit with the three eighths and then I actually do switch to a half-inch diameter drill bit to finish it off. Push down on the two studs where you removed the nuts and separate the plastic housing from the motor.
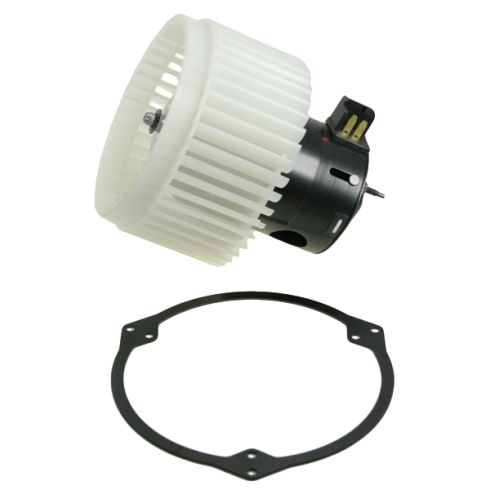
The old motor comes out. The new motor from 1A Auto, exactly the same as the old motor, put it obviously where the lead goes. That goes to the corresponding area on this housing. Put it down on. Speed up here again as I put those two nuts on and then tighten them up. You don't want to tighten them incredibly tight but you want them nice and firm. Now you need eight of these small coarse thread bolts. Basically you just use them. Place the rivets and molding. Fast forward here. As I just used, like I said, some small coarse thread bolts about the size of the diameter of the holes and bolt that together. You use them in place of where the rivets were, as well as you'll use a ring provided with the motor to reinstall it. Obviously we can't mold it back in so it comes with a ring. Put the ring in place and then use the small bolts to bolt it on to the plastic. You want to make sure your bolts aren't too long. You only want them to be a centimeter long, or so, or else they could interfere with the fan if they go too far through the housing.
I'm going to go through this kind of relatively fast. You've got the new motor with the ring on it. Put it up in there. Start a couple of the bolts in by hand as much as you can. Then get the two ones that are easiest to get to. Tighten them up somewhat and then you can tighten the third one that's more difficult to get to. Tighten that one up and then just reconnect the lead and you should be all set.
We hope this helps you out. Brought to you by www.1AAuto.com your source for quality replacement parts and the best service on the Internet. Please feel free to call us toll free 888-844-3393. We're the company that's here for you on the Internet and in person.
HMA84757
In Stock
Product Reviews
Loading reviews
4.85/ 5.020
20 reviews
5 Stars
4 Stars
3 Stars
2 Stars
1 Star
18
1
1
0
0
Blower motor
John
February 26, 2017
Was a little worried trying to change out the blower motor on my 2006 Saturn Ion, but it was okay. The video on your website made it easy and showed me what to do. Cut out the old motor and followed the instructions and it was a breeze. I used a mirror to see under where the motor is screwed back in. You should mention that in the video for some of your novice do it yourselfers. Thank you! I now have a quiet running blower motor!
Works perfect on 2007 Pontiac G5
Robert
July 9, 2017
Perfect fitting part on my 2007 Pontiac G5. No issues whatsoever following the tutorial video provided to do the install myself. Great website, great company! Keep up the awesome job guys!
T
August 7, 2017
Had multiple choices for the part i needed . Chose the one that best fit my needs. Ordering was easy and recieved my part quickly with stanfard shipping. Was also notified as soon as my part was shipped
Still makes noise
Nikole
August 14, 2017
The blower still makes a noise on lowest setting. Not all the time. It happens randomly. I dont know if all of them are made this way within their gears.
Blower motor
B
November 13, 2017
It was sent on time with everything I needed to bolt it up and fit just like the oem , works great with no problems .
Product quality and delivery
SAUNDRA
November 4, 2018
Qualty was very good watch a1auto video to install made job a breeze. Have used a1 auto on many occasions on different car products where in excellent condition and arrived on time or before scheduled time. Prices are good value.
Fast and easy
M
November 9, 2018
It was my first time using a1 auto and it was by far the best platform for fast and easy purchasing it not only told me what I needed to complete the job but also gave me a step by step video to help me threw the entire process
Great service
J
December 17, 2018
The part is a perfect fit. The blower motor runs very quietly and seems to be more powerful than the original. It's an easy install. Very happy with the part and the ease of service from the website. I would definitely recommend this part to anyone who needs this replaced. I recommend this company to everyone I know and spread the word about how great their service and fast shipping is.
Excellent quality parts!
D
February 23, 2019
Perfect! Fit perfectly and works better than the original ever did, the videos they have here to help with installing parts are exceptional as well. All around great products and service.
Super easy Install & works perfect
Johnny
March 20, 2019
Ordered this from 1A Auto, received the part 1 week sooner than expected/quoted for time. In depth video showed how to do everything from cutting out the old one to bolting in the new one with the provided metal ring for retrofit. My 2009 Chevy cobalt actually already had metal bolts where they said you had to drill out rivets & replace with some coarse thread bolts,
... the rivet wasn't actually melted so it made this even faster! 1A auto also included 6 bolts for the adapter ring which i was super happy about not having to go and find them! Also did the resistor at the same time for fan speed settings and was really quick and easy as well.
Perfect
M
March 21, 2019
I purchased this after watching the how to video. The video gave perfect instructions and the product went in smoothly. It runs quiet and smooth now.
Fan Motor
Lonnie
April 16, 2019
With the exception on my 2006 having a different fan housing this blower motor was very easy to install. I looked at the youtube video, decided even at 62 that I could do the job, ordered the part and now I have a fan that does not make noises when it is on. Thanks 1AAuto for your video, parts and your quick delivery. Bring on the summer. LOL
Lonnie
Motor blower review
B
September 30, 2019
I purchased a blower motor from this site and it was delivered quick. Easy to install and they even had a how to video.
Excellent
R
October 29, 2019
I have found the service and price that A1 auto parts offers to be at the top of the list. I saved almost 50% on my last purchase as compared to local parts houses and in some cases even more. the step by step instructions are something auto parts stores can't offer.
Thanks
The posts were a little off from center but it works well
Jason
January 19, 2020
So the posts were a little off so after a little drilling to make it fit and has worked like a champ since. The last heater kept blowing the blower resistor and this new heater fixed the issue.
Carlos
December 18, 2020
There was some complications at first but gladly the costumer service team served me amazingly and fast, I'm extremely thankful. Happy car, happy daughter.
Just the way it ordering a replacement park should work.
Fred
May 9, 2023
Quick ordering. Great videos. Arrived in three days. Pain to remove old one but that's due to GM. Took about 45 minutes. I ended up using a hack saw blade which work better than the utility knife which I started with.
New one bolted in perfectly. Thanks for including the 6 additional screws. Took about 20 minutes. No fan noise and lots of air flow. Didn't realize just how bad the old one had become before it just quit.
Thanks A1 Auto.
Jonathan
March 19, 2024
strong speed fan
Worth it.
Troy
June 13, 2024
Better than original! Make sure you gave the wright stuff before starting.
You need a 7mm socket, 1/4in socket, and #8 5/8im screws.
Super sharp utility knife too.
Great price and Quality
Richard
October 14, 2024
The Part worked out great perfect fit
Customer Q&A
what size coarse thread screws do i use ?August 23, 2017
Bob C
10
At this time we do not have the dimensions of these screws. We suggest searching a affiliated dealership website parts department that has these specifications.
August 25, 2017
Alex P
Customer service
877-844-3393
Monday - Friday 8:00am - 9:30pm ET Saturday - Sunday 8:00am - 4:30pm ET
Enter Vehicle Year Make Model
Specify your vehicle's year, make and model to guarantee fit.
Year
Make
Model
Options
Drivetrain
This part doesn’t fit a . Select from parts that fit.