Replaces

This part doesn’t fit a . Select from parts that fit.
Frequently bought together
Part Details
Item Condition:
New
Attention California Customers:
 WARNING: This product can expose you to chemicals including Lead and Lead Compounds, which are known to the State of California to cause cancer, and birth defects or other reproductive harm. For more information, go to www.P65Warnings.ca.gov.
Lifetime Warranty
This item is backed by our limited lifetime warranty. In the event that this item should fail due to manufacturing defects during intended use, we will replace the part free of charge. This warranty covers the cost of the part only.
FREE Shipping is standard on Orders shipped to the lower 48 States (Contiguous United States). Standard shipping charges apply to Hawaii, Alaska and US Territories. Shipping is not available to Canada.
Expedited is available on checkout to the United States, excluding Alaska, Hawaii and US Territories as well as P.O. Boxes and APO/FPO/DPO addresses. Final shipping costs are available at checkout.
Created on:
Tools used
Okay, friends, to get started on doing this job, there's something that I like to mention right off the bat. You want to be as safe as possible. You want to make sure you have hand protection and eye protection. Something else that I also like to mention is you're going to want to have a nice collection bucket to collect your coolant that comes out of the radiator. When you do this job, you want to make sure you recycle the coolant properly. Go ahead and take this collection bucket, and we're going to put it right underneath the petcock on this. To explain where the petcock is, if you were to look down along the driver side of the radiator, you're going to see a little white twisty knob on the bottom corner of the radiator. Right below that is where the drain hole is going to be, and that's also where the mount is for the radiator where it goes into the mount on the bottom.
So, put your collection bucket so it's directly underneath it. Go ahead and reach down and turn this counterclockwise. Let's go ahead and open up our radiator cap. Okay. It's going to start draining much faster now. It's always a great idea to check your cap. Generally speaking, I like to replace them whenever I'm replacing a radiator. I'll just leave this on the radiator just hanging out. All right, friends, one of the first things we need to do is remove our negative battery terminal. I'm going to use my 10-millimeter wrench, loosen this up, and get it right out of the way. A nice wiggle, set it aside so there's no way it can make connection with that battery terminal. Now that we have the coolant fully drained, it's important to make sure that you go ahead and flush out the rest of the cooling system. The reason for that is because you want to make sure you get out all of the old coolant, or at least as much as possible.
Once you've done that, go ahead and blow out the system to make sure you have any of the contaminants out of there and make sure you recycle that fluid as well. The next thing I like to do is remove the top engine cover. You'll have a 10-millimeter nut there and you should have one right here. Now, if you were to look down along the passenger side of the engine, you're going to be able to see the tensioner. You're going to see that it's a piston. Following it along, we're going to make our way right over to here. If you were to use a 19-millimeter socket and turn it clockwise, you'll be able to squish this piston. And then, of course, you'll be able to remove the belt from your pulleys. It's kind of a tight space, but you can do it. Okay. I'm gonna turn this nice and slow because it's under pressure. That's compressing the piston. Now, we'll go ahead and get our belt right off of here and slowly release it.
Take a quick note of your belt routing. Once you've done that, go ahead and get the belt off of here. All right. Now, let's go ahead and grab onto this cover. Just give it a little wiggle, it should want to pop off of there. Next, we're going to remove our 10-millimeter nut. Careful not to break the stud on your alternator. Go ahead and grab that wire, pull it right off of there. Next, we're going to have to remove this connector right here. There's going to be a little push tab over on the driver side aspect of it. I'm just gonna push on that with something like a screwdriver just so I can get plenty of leverage. And then I'm just going to try to wiggle this and draw it off. There we are. I always like to take a peek. If you see any funny colors like I have here, obviously, that needs to be serviced. I'm just gonna use my pick, come down along the side, pull up on this tab, and I should be able to slide this off. There we are.
Now, to get a little bit more slack from this wiring harness, I'm just gonna follow it down to this connector right here. We'll disconnect this as well, and set all of this aside. Now, it's going to be time to remove our alternator mounting bolts. You'll have a 12-millimeter bolt up here, which I'm going to remove and then reinstall just a couple of threads. And then right down here, you're going to find a 14-millimeter bolt. This one right here, I like to usually start with a ratchet and a nice deep socket. And then after that, I'll use a ratchet wrench so I can get it out. Okay. That one's nice and loose. Like I said, I'm going to leave it in a couple of threads. That's just going to help prevent this from shaking around as I loosen the bottom one. All right. That's nice and loose. I can get this out by hand now. Okay. It's a nice long one. Set that aside. Let's get this top bolt out of here. There it is. Now, I'm just gonna use a nice pry, add a little bit of leverage to try to break our alternator free from its holding point.
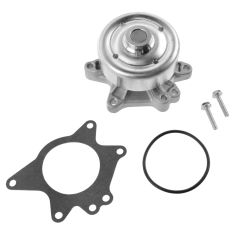
Now, we're going to go ahead and put our coolant collection bucket underneath the water pump. The reason for that is because, of course, some coolant is probably going to come out of this area. Once you've done that, I just wanted to show you your brand new water pump here. If you were to look at it, this is going to be where the top bolt is, which is located right down here. Following it around, you're going to have a bolt, another one, another one, and then all the way down at the bottom and then one far over here. So, with all that said, let's start taking out those bolts. There's our top bolt. What I like to do with this at this point is I'll take my brand new water pump, slide it into its corresponding hole. Some of these bolts might be a different size, so you want to make sure you got them where they belong. Now that we have all of our bolts out of here, let's go ahead and pop our water pump off. Just be very careful because, of course, there may be coolant in there, you don't want to get it in your eyes.
Let's get the water pump out of there. There it is, friends. Okay, friends, now the next thing we need to do is clean down the housing area where the water pump is going to go. You want to make sure that you have nothing on there that's going to cause an issue. I like to use a nice razorblade like this. Obviously, you want to be very careful. Go ahead and hold it flat up against the housing area and then just kind of rub it along. And we're going to get off any of the debris that's around the area. We're just going to take a rag with some parts cleaner and we'll clean down the area. We have that engine nice and cleaned down, we're just going to take our nice O-ring gasket here. I like to use a little bit of petroleum jelly and just kind of go around it. This is going to make a nice little area for the gasket to actually hold onto the engine while it gets set. So, now that I have it coated, just put it right into the groove area on the engine itself and you'll notice that it sits. If you don't use the petroleum jelly, there's a possibility that it could fall off.
Now, looking at our new water pump, there's something that I wanted to mention before I go ahead and put it into the vehicle. If you were to look at the new water pump, you're going to see that there are areas that are thicker than the others. There are two of them to be specific. The reason why they did that is so that you can know that they have a different torque than the other bolts. The torque for these two bolts right here are 80-inch pounds. So, you want to make sure you torque them to only 80. All the other bolts that you have going around the water pump are going to be torqued to 96 inch-pounds. With that said, let's go ahead and grab our gasket, our new bolts, and let's get ready to mount this into the vehicle. Now, looking at the back of our new water pump, we're going to go ahead and put on our other new gasket. Obviously, you want to make sure you line up those holes, just like that. And then if you wanted to start a couple bolts through there just so you can hold it in there, that's going to be up to you.
I like to do it. So, I'm going to start it right through there. I'll put another one through on the other end and then I'll start the bolts into the engine. Slide this right down in here, line it up. Remember that the tall bolt hole comes up to the top, just to make it a little bit easier for you when you're doing this. Go ahead and start in both those bolts and then we'll start in all the others and then we'll torque them to manufacturer specifications. Let's go ahead and bottom all these out now. Okay. So, now that we have all of our bolts bottomed out going all the way around the water pump, we're going to go ahead and torque them. I just want you to remember that there are two different torques for those bolts. The bolts that are in the elongated holes are going to be torqued to 80 inch-pounds. All the rest of the bolts are going to be torqued to 96 inch-pounds. You can do them in any order that you want. I just go around in a circle, but just remember that they are two different torques.
You wanna make sure that this is pushed out as far as it can go. This area is going to go right over this area on the engine. So, we're going to slide it right down over that. And then, of course, we'll put over, we're going to start the top one in just a little bit, we'll start the bottom one in a little bit, and then we'll snug them up. Okay. So, those are both started. Let's go ahead and snug them up. Now it's going to be time to torque both these bolts. Keep in mind that they're two different sizes. The top one up here is going to be torque to 18 foot-pounds and the lower bolt will be torque to 40 foot-pounds. Now that we have the alternator bolted in, it's going to be time to start connecting it back together with the wiring. Something we want to pay attention to is the area on the wiring that's going to connect to the alternator. You want to make sure that it's nice and clean so it can make a good contact point. Let's go ahead and clean that up with some sandpaper.
Okay. So, we have everything nice and cleaned up. This looks good. Let's start connecting it in. I'm going to start with the very bottom down at the AC compressor. Go ahead and connect that in. Basically, just do all of your wires. Put this onto the bracket so it's secure. Let's move along. We've got our wiring for the alternator. If you want to use a little bit of dielectric grease, we'll call it your prerogative. Okay. Let's get this on there. Start our nut on, and then we'll snug it right up. Okay. It's bottomed out. Just a teeny bit more. Give it a nice wiggle. Make sure it's secure. It should also have a nice cover. You want to make sure you cover it because this will have positive current going through it and you don't want to ground it out once you reconnect your battery.
Perfect. Make sure your wiring is nice and secure. Make sure there's nothing that's hanging down anywhere that could connect onto the belt or cause an issue. This looks great. Let's move along. Now, it's time to install the belt in the vehicle. Put it on in the same route that you removed it. Slide that onto the water pump. Perfect. Now, before we go ahead and remove our tool from the tensioner, just double-check the belt. Make sure it's sitting inside all of the grooves going around the grooved pulleys and, of course, it's sitting along the top of the smooth pulleys as well. And, of course, make sure that everything is settled as it should. This looks really great. So, it's time to move along. Let's go ahead and get our cover back on here. Just line it up with the studs, put on your mounting nuts, and snug it right up. Do the same to the other one.
All right. Let's go ahead and get our negative battery terminal back on here. Go ahead and snug it up. Double-check to make sure it's secure. That feels good. Now it's going to be time to go ahead and fill our cooling system. Toyota recommends to use Extended Life Pink fluid inside this cooling system. So, that, of course, is what we're going to use. Now, if you got concentrate, you need to make sure that you mix it 50/50. That's going to make it so your coolant freeze point is at approximately negative 32. All right. So, now it's going to be time to fill our cooling system. Let's go ahead and fill it. So, we're just going to continue filling this until we have no more air bubbles coming out of this. Once we're done, let's go ahead and start up the vehicle, we'll let it run for a few minutes, and just keep watching to make sure there's no air coming out. Make sure you keep an eye on the level of this because you don't want it to go empty and you definitely don't want it to overflow. All right. Now that we have that nice and bled out, let's go ahead and close up the radiator. And now what we need to do is clean up our mess. You don't want to leave any coolant under there that could potentially get on the ground. Make sure you recycle it all properly.