Hi, I'm Mike from 1A Auto. We've been selling auto parts for over 30 years. We're dedicated to delivering quality auto parts, expert customer service, fast and free shipping, all backed by our 100% satisfaction guarantee. Visit us at 1AAuto.com, your trusted source for quality auto parts.
In this video, we're going to be working with our 2006 Chrysler 300. We're going to show you how to remove and replace your vehicle's blower motor or blower fan. If you like this video, please click subscribe. We have a ton more information on this and many other vehicles, and if you need this part for your car, you can follow the link down in the description over to 1AAuto.com. Here are the items you'll need for this repair.
Your blower motor and blower motor resistor are located underneath your dashboard behind this carpeted panel under the glove box. You'll have to remove each of these plastic clips. This is a great use of the 1A Auto interior trim removal tools, because you can slide this forked end underneath and pry them out. They do still take a little bit of work, but it's a lot safer than doing this with side cutters or screwdrivers. Once that's down you can remove the carpeted panel from under your dash. Pop the red safety tab over to the side. Push down and release the connector from your blower motor.
Then, using an eight millimeter socket, ratchet, and extension, remove the four bolts securing the blower motor into the heater box. There's one in the back here that you can't see, but it's going to be from where I'm looking at about the 12 o'clock position. With the bolts removed, wiggle the blower motor and release it. There are three wire harness retainers down here that you'll have to pop off using your trim removal tool. Remove your blower motor from the vehicle.
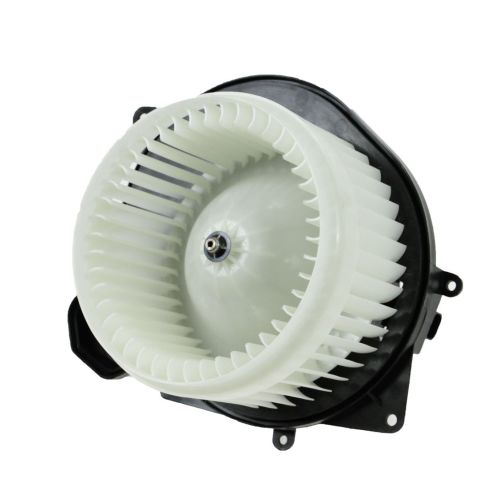
Here we have our old blower motor that we removed from our vehicle, and our new part from 1AAuto.com. As you can see, these parts are exactly the same. There are some minor aesthetic differences, like these holes here in the center of the fan, but that's not going to affect the performance of our part at all. If anything, it's actually going to help keep that motor cool, which should increase the longevity of our part.
Now this old blower motor is a great example. These vehicles were available with or without a cabin air filter. That was an option on these cars. Ours does not have the cabin air filter, and you can see the kind of havoc it wreaks. When we removed this part, there was a big dust cloud that came out of it, made a huge mess. I'm going to have to clean the carpets and the floors now, but imagine what all that dirt and debris does to these components, as well as being pushed through the rest of your HVAC and air conditioning system by this motor. That dirt and debris is going to damage the motor, clog up parts inside, and on top of that, this is all getting blown around the cabin with you when you have your heat or AC on.
You can see the bottom side of our new blower motor is the same as well with the same four bolt mounting locations, the same three tabs to secure our wiring harness. We actually broke one on the way off, so that'll be good to have. We have the same air duct here as well as the same motor and same two pin connector. Where ours is all old and dirty, and beat up, this new part from 1A Auto is going to go in direct fit, just like our original equipment, and we're going to install an optional cabin air filter system in this vehicle to improve all of the performance of this part of the car and fix you up right.
Reinstall the wire harness connectors. Make sure you put them in the right place. Reinstall your blower motor assembly into the bottom of your HVAC box. You’ve got to wiggle the back up around the wire harness back there. Once you get that in, it will line right up. Reinstall your four eight millimeter bolts. Once you've got your screws started, tighten them down with your eight millimeter socket, ratchet, and extension.
Reconnect the electrical connector and snap the safety tab back into place. Reinstall the carpeting under the dash and snap the pushpins back into place. With your carpeting reinstalled, you're good to go.
Thanks for watching. Visit us at 1AAuto.com for quality auto parts, fast and free shipping, and the best customer service in the industry.