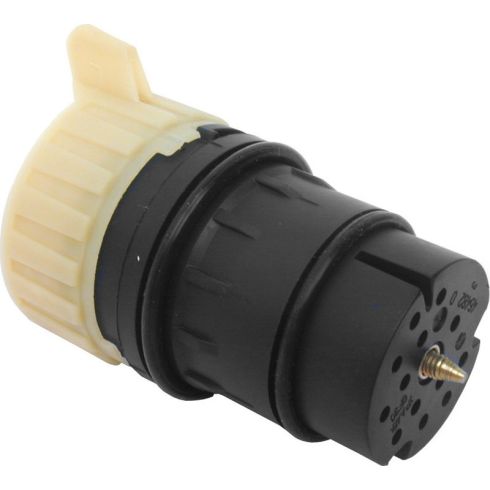
1ATRX00021-Dodge Mercedes Benz Chrysler Automatic Transmission Wire Harness Connector DIY Solutions TRP00242

Replaces
2006 Mercedes Benz CLK55 AMG Automatic Transmission Wire Harness Connector DIY Solutions TRP00242

Frequently bought together
Product Reviews
Loading reviews
3.67/ 5.0
6
6 reviews
April 13, 2013
received my item fast, And very easy to install with basic tools. for those who will replace this iten them selves, unplug wires, unscrew bolt inside then twist and pull out to remove harness cdo not over tighten) very fragile.
Wrong part in database may have nothing wrong with 1A Auto order
June 13, 2018
From checking the database from 1 A Auto my Mercedes 1995 S320 saying this is for its transmission 722.6X which shoul dbe it BUT the transmission in the car is a 722.5X for some reasons.
From Internet reseach to Youtube indicating 722.6X would be the transmission. Mercedes VIN number otherwise to be a 722.5X transmission and also mechanic checked after raised the car seeing it is 722.5X so I got a wrong part.
I am return it so please have RMA number for me; sorry but I have always been 1A Auto customer and always be.
Still leaks
January 31, 2020
After the part was installed it still leaked. So I just when to the dealer to get the oem part replaced again.
Good part
April 21, 2020
It stopped the leak. Worked perfect
Nice fit! Accurate part
December 26, 2020
Its a nice quality part for a great price. It went in as it should with no leaks.
3 Months
June 13, 2022
Had it installed by a mechanic and it started to leak after 3 months. They inspected and said it was a faulty part.
Customer Q&A
Would this fit on my 2006 chrysler 300 3.5l with 4 SPD transmission ? Limited submodel ?
November 19, 2019
10
Thank you for your inquiry. This will only fit on transmission model 722.6xx. It replacement OE part number 2035400253!
November 19, 2019
T I
Does this cause transmission shift problem?
January 30, 2020
10
Thanks for your inquiry. There could be multiple reasons why you're having this particular problem. We suggest taking your vehicle to a nearby reputable shop to identify the cause. Once you know the cause, we'll be happy to see if we carry the parts and how-to videos needed for your repair.
January 30, 2020
Adam G
10
There is a couple things that have to be changed the speed sensors in the transmission on the conductor plate and this electrical connector Hass to be changed as well because the stock one fills up with transmission fluid very simple and easy fix I purchased a conductor speed sensors and the connector
January 30, 2020
Derrick P
10
It can cause a number of things if it's bad. When in doubt, change it out. Pretty cheap and easy to change out.
January 30, 2020
AJ L
10
It may but if it does not correct it may be tcm which controls shifting. Check for error codes if you dont have plugin stop at local auto parts center and they can give you a print out.
January 31, 2020
JOHN C
This part didnt fit my 2005 chrysler 300c 5.7 rwd why not ?
April 29, 2022
10
Our parts are exact replacements for your vehicle's OEM parts. As long as your year, make, and model match up with our listing, these parts will directly fit and function like the originals. If you are having fit issues please reach out to our customer service department for assistance!
April 29, 2022
T I
10
It should fit, its just super super super difficult to fit it in there seeming as the O rings are brand new and used to seal leaks so its a tight fit. If doing this on the ground you dont have much leverage to push in there and its extremely difficult. It took me like 3 hours of pushing to finally get it in. A lift would make this much easier because you can use your whole body for pushing. It should fit although it seems like it doesnt. I did it on my 06 300c 5.7 rwd
April 29, 2022
Angel I
Mercedes Benz is a registered trademark of Daimler AG. 1A Auto is not affiliated with or sponsored by Mercedes Benz or Daimler AG.
See all trademarks.


