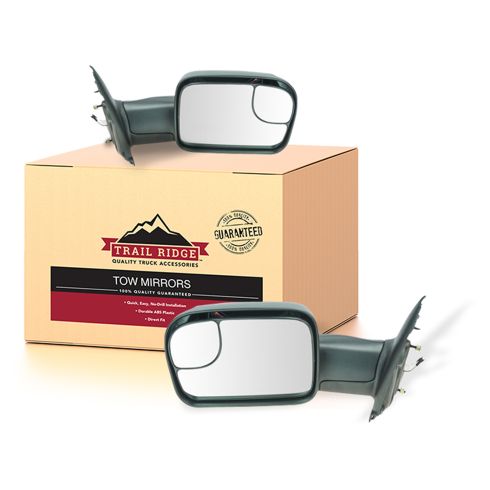
Kit Includes: (1) Passenger Side Mirror (1) Driver Side Mirror
Adjustment Type: Electric
Specification
Side Location
Driver & Passenger Side
Install Tip: Use caution when installing, pinching the wires can result in shorting.
Upgraded Mirrors: These upgraded mirrors fit and function like the originals. Add-on mirror upgrades may require additional wiring for complete operation and installation.
Trusted Quality: Trail Ridge Truck Accessories are developed and built with a promise to provide high quality, durable parts for your truck; backed by the best warranty in the automotive industry. Manufactured from the highest quality materials and constructed to meet or exceed OEM standards. Every Trail Ridge part is rigorously tested ensuring superior fit, function, and durability. Quality, trusted value, and hassle-free installation backed by our 100% satisfaction guarantee.
Turn Signal Upgrade increases driver visibility during turns Features and Benefits Set
Direct fit - No modifications for easy install
Heavy Duty - Built with high quality materials prevent rust, dust, and chipping
DOT certified
Matching set for a restored look
Item Condition:New
Attention California Customers:
WARNING: This product can expose you to chemicals including Chromium (Hexavalent Compounds), which is known to the State of California to cause cancer, and birth defects or other reproductive harm. For more information, go to www.P65Warnings.ca.gov
Lifetime Warranty
This item is backed by our limited lifetime warranty. In the event that this item should fail due to manufacturing defects during intended use, we will replace the part free of charge. This warranty covers the cost of the part only.
FREE Shipping is standard on orders shipped to the lower 48 States (Contiguous United States). Standard shipping charges apply to Hawaii and Alaska.
Shipping is not available to a P.O. Box, APO/FPO/DPO addresses, US Territories, or Canada for this item.
Expedited is available on checkout to the United States, excluding Alaska, Hawaii.
Final shipping costs are available at checkout.
How to Install Tow Mirrors 2002-08 Dodge Ram 1500
How to Install Tow Mirror 2002-2008 Dodge Ram 1500
Remove the T40 Torx screw in behind the door handle. And remove the door handle.
Remove the four Phillips screws in the door panel.
Pry up the switch panel.
Disconnect the harnesses.
Lift the door panel up and off.
2. Removing the Side Mirror
Pull off the insulation.
Disconnect the mirror harness.
Remove the three 10mm nuts.
Push the tabs on the connector in.
Pull the mirror out and off.
3. Replacing the Side Mirror
Line up the mirror and push it into place.
Replace the three nuts.
Reconnect the mirror harness.
Replace the insulation.
4. Replacing the Door Panel
Remove the lock bezel from the door panel by pushing the clips in.
Line up the door panel and hang it back onto the door.
Pull your harnesses up through the door panel.
Replace the four Phillips screws.
Reconnect the switch panel and press it down into place.
Replace the door handle and tighten the T40 bolt.
Replace the lock bezel.
How To Repair Replace Camper Style Fold Out Tow Mirrors Dodge Ram 02-08 1AAuto.com
Brought to you by 1AAuto.com your source for quality replacement parts and the best service on the Internet. Hi I'm Mike Grier. I'm one of the owners of 1A Auto. I want to help you save time and money repairing and maintaining your vehicle. I'm going to use my 20 plus years experience restoring and repairing cars and trucks like this to show you the correct way to consult parts from 1AAuto.com. The right parts installed correctly that's going to save you time and money. Thank you and enjoy the video.
In this video we're going to show you how to replace your standard mirrors with the tow style mirrors. We sell them in heated tower as well as the manual, a pretty easy operation. We're doing it on an '04 Ram. These are the same for any '02 to '08. The tools you'll need are a T40 torx driver, Philips screw driver, flat blade screwdriver and a 10 mm wrench or a socket and ratchet.
To remove your front door panel, you are going to start by removing a T40 torx screw and hold your handle on right there. Then you're going to remove for Phillips screws, one there, one up here and two down in the lower part of your door panel. There's my T40 torx driver. We're going to speed it up here. Take that T40 screw out and then your handle comes off. Then I'm going to start with the Philip screwdrivers, take those two off and then slightly take my jacket off so you can see my 1A Auto sweatshirt off and remove the lower two Philips screws.
I use a regular screwdriver. Carefully pry out on your switch plate in here so you can pull it up and both these connectors; they have a little button right here. Press the button and work the connector into the switch, the same thing here, button right there. Now you just lift the door panel up over the lock. The lead for our mirror right here, press down on the little button, pull it off and then a 10 mm wrench or a socket and ratchet. We're going to do all of our fasteners here.
We'll just speed up the video here as we just remove those 3 10 mm nuts that hold the mirror on. There's little clips on the connector here. Here's a close-up on those clips. You just want to pry out with the screwdriver and then pull on the mirror. Pull on your mirror. We're going to undo these clips. Your original mirror comes off. Here's the upgrade to the tool mirror. It's a style that flips out like that and had gives you better view angle. It's got the heat, the connector if you compare it to your original. It has all the same prongs and mount just like your original. Let's see. Squeeze my head a little bit so I have these deflectors. I'm going to put it under the deflector first, just guide that top, top over into the hole and those two come through as well.
Then once you get to this point, just hold it on and then thread your 3 10mm bolts back on to the studs. Now we can plug it in. Key on, right, left, up, down and then you put the mirror up, right, left, down and up so we are all set. There goes this. We'll just unplug our switch again and put the foam pad back on there and then put our door panel back on. Before you put the door panel back on, you want to take this lock bezel and push the clips in and pop it off. It just has a little teeth there that hold it in so you just push them with your finger over.
Keen observers will note that the standard mirror is back on the truck and that's because I shot this door panel footage at a different time. I'm going to put it back on, what you want to do is there is teeth at the bottom. Rest it like that and bring it up, holding your harnesses up out of the way. Lock your door, press your door and lock down. Pick that up and over and pull it back up. You might have to pull it back up just a little bit and slide it down. Then we can put the four Philips screws back in. We will fast-forward through putting those four Philips screws in and tightening them up. Our switch plug the smaller connector in, then the larger connector, then feed the wire down in, shoot down in. Our door handle, going to put extension and my bit into place and that should do it. You just start turning, it pretty much finds its own way. For your lock, snap right down and you are all set.
We hope this helps you out. Brought to you by www.1AAuto.com your source for quality replacement parts and the best service on the Internet. Please feel free to call us toll-free 888-844-3393. We are the company that's here for you on the Internet and in person.
Remove the 10mm bolt behind the door handle
Remove the door handle
Remove the #3 Phillips screw from the middle of the door panel
Remove the #3 Phillips screw from the sail panel
Remove the two #2 Phillips screws from the bottom of the door panel
Lift the door panel up and off
Disconnect the window switch wiring harnesses
2. Removing the Mirror
Disconnect the mirror connection
Remove the three 10mm nuts
Remove the mirror
3. Installing the New Tow Mirror
Insert the tow mirror into place
Tighten the 10mm bolts to the mirror
Connect the factory connector to the mirror
Unravel the wire on the new mirror
Pull back the corner of the watershield
Insert the wiring into the circular hole in the door without placing it near a moving part
Run the wiring down from the mirror
Pull the boot protecting the wiring harness inside the door jamb out
Run the wiring through the hole near the boot
Pry off the other side of the boot
Twist the end of the wires and tape them to a flat blade screwdriver
Pull the wires through the boot
Pull up the kick panel and pull it out
Pop the weather shield behind the kick panel by prying out the plastic clips
Fold the shield back and feed the wires through carefully
Repeat the steps for installing the mirror on the other side
Peel your passenger side carpet back
Pull out the center console trim panel
Run the passenger side wires underneath
Use the straps from the old harness to extend the passenger side wiring
Twist the ends of the wire and place them in a single-barrel crimp connector
Repeat the process for the other end of the crimp
Reach up under the driver's side of the carpet
Pull the wire through
Remove the 10mm ground bolt
Cut the end of the ground wire with a little bit of slack
Install the eyelit connector to the ground wire (black)
Crime the passenger side ground wire with a crimp
Tighten the 10mm bolt to the ground
Tape the red wire to a sharp pick
Peel back the carpet
Send the wire down through the rubber boot underneath the driver side carpet
Pull the wire through the boot
Leave enough slack to tuck the wiring underneath the carpet
The second of the white wire with the yellow tracer from the latch side of the connector
AKA 4th one in from the left
Install a double barrel crimp onto the yellow tracer wire
Stack the leads from the mirror on top of eachother
Insert the leads into the crimp, crimp them, and close the safety latch
Turn the vehicle on and check for running light operation
Push the passenger side carpet back into place
Press the center console trim into place
Press the plastic weather shield connectors in on the driver side
Press the kick panel into place
Reinstall the rubber boot in the door jamb on both sides
4. Reinstalling the Door Panel
Remove the door lock bezel
Connect the window switch wiring harness
Insert the door panel into place
Insert the door lock bezel into place
Tighten the #3 Phillips screw from the middle of the door panel
Tighten the #3 Phillips screw from the sail panel
Tighten the two #2 Phillips screws from the bottom of the door panel
Insert the door handle into place
Tighten the 10mm screw to the door handle
Brought to you by 1AAuto.com, your source for quality replacement parts and the best service on the Internet.
Hi, I'm Mike from 1A Auto. I hope this how-to video helps you out, and next time you need parts for your vehicle, think of 1AAuto.com. Thanks.
In this video, we're going to show you how to install tow mirrors on your Dodge Ram. This is a 2008, but the procedure is the same for 2002 to 2008 Dodge Ram. You'll need new tow mirrors from 1AAuto.com, 10 millimeter socket with ratchet and extensions, number two and #3 Phillips screwdrivers, flat blade screwdriver, electrical tape, needle nose pliers, wire stripping and crimping tool, a straight pick, and a pair of pliers.
Remove the 10mm bolt in the inside edge of the door handle. Remove the door handle from the opening. Remove the #3 Phillips behind the door handle, and in this top corner, two #2 Phillips on the bottom of the panel. Lift up on the door panel to release. Then we'll have to disconnect the two connectors from the window switch.
Disconnect the connector to the mirror by pressing down on the tab on the top. Remove these three 10 millimeter knots. Make sure to support the mirror before you finish removing the bolts.
We have to pry the bug deflector up on our car. Put it behind the mirror. Work the mirror out of the door.
Here, we have our old part from the vehicle and our upgraded tow mirror from 1AAuto.com. You could see this mirror sticks out a lot more, flips up, has a panoramic mirror already installed in it. It's going to be a really good upgrade. Going to give you a lot better view of what's going on behind you, especially when you have a big trailer on the back of your truck. Bolt right in just like the factory part. Comes with an easy-to-install two wire harness so we can use this lamp as either a turn signal or a parking light.
Be sure to take the two wire connector, feed it through first, wind up your bolts. Pop the new mirror in. Make sure you use the new hardware supplied with the kit. It has a larger flange on the knot to help support the extra weight of the bigger mirror. Tight the bolts back up with a 10 millimeter socket.
Reconnect the factory connector to the mirror. Connect the two wire harness included with your kit. Unravel all the wiring. Make sure there are no loops or kinks anywhere in it. Peel back the corner of your weather shield. Send the harness down into the door, being careful not to route it anywhere near a window regulator or any other moving part that may pinch the wire and cause damage. Make sure when you run the wiring down from the mirror, go through the round hole here and not to the square hole where the latch sits. Remove the rubber boot around the wiring harness inside the door jam.
You may need a flat blade screwdriver to pry this out. Reach through. Pull those all the way through. You want to make sure when you reinstall your weather seal that the wire stays clear that square hole. Pry the other side of the rubber loom off the truck side of the door jam. Twist the ends of the wire together. Keep the wires feeding in the same place. We're going to tape the end to a thin flat blade screwdriver. Use that to send our wire through the loom, careful not to puncture any other wires. Hold your wires and pull your screwdriver back through. Feed the rest of your wiring through the loom. Lift up on the seam of the kick panel. Lift up. Pull the panel out.
Just below the parking brake pedal is this weather shield. You'll have to pop that out of the way with a pair of needle-nose pliers behind the plastic clips. Just pry them out. Fold it back until you can see where the door harness comes through. Feed the wire one at a time between the retainer and the actual wiring clips. Find that wire when it comes through on the other side. Pull that through. Careful not to make too sharp an angle when you're pulling or to shape that against any other metals. Once that's through, start the other wire the same way.
Now that you have your mirror installed on the driver's side, repeat these steps on the passenger's side up until the wiring goes through the cab. Once the wiring has been run from the inside of the door through into the passenger compartment, peel your carpet up and remove this lower panel below the cup holder simply by prying it out and placing it to the side.
Peel your carpet up that your wire's underneath. You could see that our wires aren't going to be quite long enough, so we'll use the scraps from our old harness to extend these. You want to twist the ends of the wire together nice and tight, put it in a single barrel crimp connector. Crimp that end. A little tug, make sure it's on there nice and tight. Twist the other end of the wire. Put that end on the other side of the barrel connector. Crimp it down. Make sure that you have a good tight connection. We'll reach up under the driver's side of the carpet. Feed our wires through until they reach your hand under the carpet. Pull one through, then the other.
We have a ground bolt right here on the inside of the truck. You go ahead and take that out with a 10 millimeter socket and ratchet. Pick your ground wire, leave a little bit of slack. Cut the end off and strip the end of the wire. Twist the ends together.
Install our eyelet connector. The eyelet connector just crimps on so you got a nice tight crimp on there. Give it a little tug to make sure it's not coming off. Crimp the passenger side ground wire. Another eyelet crimp. Make sure that's not coming off.
Reinstall our ground bolt. We're going to take our wire, tape it to a sharp, straight pick. You don't want to make it too thick, but we want to make sure it's on there good and tight. I'm going to peel back the carpet a little bit, and just to the outside of our e-break cable. Send the wire down through the rubber boot. Move the pick and the rubber while holding the wire. Now, we can pull our wire through.
Make sure to leave enough slack that we can tuck it back under the carpet. Our crimp connector won't fit through, so we'll just lay it all back down under the carpet. In order to make the lights on our new tow mirrors work as running lamps or marker lights, we'll have to use the second of the white wires with the yellow tracer from the latched side of the connector. This is going to be the fourth one in from the left.
Install the double barrel crimp connector on to the wire with the leads from your mirror stacked one on top of the other. Install them into the other side of the double barrel connector. Crimp your connector with a pair of pliers. Close the safety latch over the top. After installing your wiring, turn the vehicle on and check for operation of your running lights. Push your carpet back into place. Reinstall the trim below the cup holder, the two clips in the front.
Reinstall the plastic connectors. Pull the weather shield in. Make sure your carpet is back in place. Install the front clips of the kick panel and then snap the lower portion into place. Repeat this step on the opposite side.
Reinstall the rubber wire loom on both sides. It’s maybe easier to install the loom on the inner edge if you use a hook pick. Push down on the clips and remove the connector from the cab of the truck. Even just removing it partially gives you enough room. Slide the boot back around the connector and snap it into place. Pop off the door lock bezel by pushing from the back.
Reinstall your two window switch connectors. Line up the tabs in the door panel. Slide your door panel into place. Pop the door lock bezel back into place. Reinstall your four door panel screws. Hold your screw in place for the interior handle, line it up and tighten it down.
Thanks for tuning in. We hope this video helped you out. Next time you need parts for your car, please visit 1AAuto.com. Also check out our other helpful how-to and diagnosis videos.
I love my new mirrors. I like the turn signal in it to give it an updated look. Installation was a little bit harder than what I thought but I would definitely recommend. I was going to get the 4the gen ones but a little more than what I wanted to spend. The mirror arms have a notch that they pop into when you swing them back out. The ones that were on there didn't have that. They are very sturdy and look nice on the truck.
Nice upgrade
L
September 12, 2018
Absolutely love my new mirrors with the turn signal , very nice upgrade.
Great fit
Paul
March 10, 2019
Highly recommend these mirrors.
Great fit,easy to install and they look great
Easy installation - for the most part
W
September 22, 2019
First, I was excited to find that one of your installation videos for these mirrors was exactly the same truck I have! That made things a lot easier. I needed tow mirrors for my 2008 Dodge Ram but these mirrors were also an upgrade - they included lights on the back of the mirror that can be wired as turn signals or running lights. If you dont care about those lights, you can have a very easy installation of about 15-20 minutes per mirror. If you want to wire the lights, figure on adding a good hour to each mirror install and a LOT of frustration. Reattaching that boot between the door and the truck body is a royal pain! I didnt take a star off for that - its just the way it is. The mirrors are well made and much better than my old ones. Looking forward to my next tow with my trailer (tomorrow!).
Very nice mirrors
Chris
May 20, 2021
These fit perfectly and work great. The ring terminals provided are too big for the gauge wire provided...the matching crimp tool will be insufficient. Its ok, I had ring terminals on hand. The suggested wiring is for running lights, but I wired into turn signals. But splice location is essentially the same. I'm extremely happy with these, and really glad they're available
Good looks but mediocre quality
Shannon
September 15, 2024
Nice mirrors. My factory mirrors were vibrating bad at highway speeds. These were a nice update with the turn signal or park light option that still maintained a factory look. The mounting studs on both mirrors were a lil bent so that the studs didn't fit perfect through the holes in the doors. So I removed the ones from my factory mirrors and installed into these new ones and they went right in. The other issue was that the passenger side mirror has the internal wiring reversed! The up and down controls from my door switch move the mirror sideways and the left and right adjustments from the switch move the mirrors up and down! I read about this on another review for Trail Ridge mirrors from another customer. A lil irritating but not a show stopper. Took 2 hours to install only because the mounting studs were bent and fishing the wires (turn signal or park light harness) through the dash to the proper power source.
Customer Q&A
Does the light on the unit also serve the purpose of a running light and not just a blinker?October 20, 2015
Terry H
10
Hello and thank you for contacting us. These mirror turn signals will not double as the running lights, they will just be the turn signals. When purchasing mirrors you will want to make sure you match the electrical options on your existing mirrors to make sure the mirrors are plug and play. Thank you and have a great day!
October 21, 2015
Derek C
10
It cannot be both. Just one or the other.
October 21, 2015
William R
10
You will have to decide if you want it as a blinker OR running lights. Will not work both unless you add in a resistor and a diode. That's how I installed mine.
October 21, 2015
Michael H
What kind of bulb does it use?December 25, 2015
Terry S
10
It uses led's for the lights.
December 27, 2015
Richard K
10
There are no bulb specs. I believe they are LED's used in this mirror.
December 28, 2015
Brian F
Can these be put on a Dodge Ram that didn't have power mirrors from the factory?September 23, 2016
Tyler M
10
I would think not unless you run power to them. They rely on the factory wiring harness for power.
September 23, 2016
William R
10
No they are power mirrors. You would have to install controls to move them.
September 23, 2016
Richard K
10
No
September 26, 2016
Brian F
I have heated and power tow mirrors from factory but I want power fold in mirrors, do these have that, and if so could I install them on my truck?September 23, 2016
Tyler M
10
No, the power fold is no longer a current "upgrade" feature
September 26, 2016
Brian F
10
These arent the power fold.
June 6, 2018
F I
I have powered towing mirrors. Will I be able to use the heated mirror aspect of these mirrors with my stock power mirrors switch...or how does that work?March 25, 2017
John K
10
The heat function will not work, this only comes with wiring to upgrade to turn signals.
March 26, 2017
Tim K
How bad is the vibration compared to MOPAR replacements? I have a set of non-Mopar OEM's and its terrible, even at idle. basically useless. OEM mirrors have 4 metal tabs that stabilize the mirror glass. Since my current mirrors are junk pulling aApril 4, 2017
Christopher Y
10
There will be some vibration, however it should not be unbearable. Our mirrors are designed to ensure that there is minimal vibration.
April 11, 2017
Alex P
Do I need to install a special resistor or relay to allow the LED to function properly off of the turn signals? (4th gen mirrors going on a 3rd gen truck)June 6, 2018
Justin R
10
We advise that you order mirrors with the same exact mirror options as your original mirrors.
Special Note:
These mirrors will only work for vehicles with these exact options. If you do not have the options listed, these mirrors will not function properly.
Our mirrors are intended to be a direct plug and play for the exact options listed.
June 6, 2018
Peter L
10
I didnt I just grounded both wires together inside truck and used 1 piece of wire from either turn signal and they work fine.
June 6, 2018
F I
10
No you just need to tap into the turn signal wire. now if you want the led to do both turn signal and marker light you will need resistors and diodes
June 6, 2018
Bryan D
10
No as long as u have regular halogen bulbs in front and rear signals. Otherwise it will just hyperflah like normal.
June 6, 2018
Q U
10
No
June 9, 2018
F I
Does anyone know the size of these mirrors folded and unfolded?April 12, 2021
Steven N
10
Actual Measurements are not listed or available. Our parts are exact replacements for your vehicle's OEM parts. As long as your year, make, and model match up with our listing, these parts will directly fit and function like the originals.
April 12, 2021
T I
Does the heat work off the factory button on my dash. If not how does the heat work?January 9, 2022
William S
10
The heat function was plug & play - they use oem connectors. If you had heated mirrors from factory, just unplug your old mirrors and plug in the new mirrors.
January 9, 2022
Chris S
10
The heater does plug right in to the factory harness if your truck had heated mirrors originally.
January 10, 2022
James M
Customer service
877-844-3393
Monday - Friday 8:00am - 9:30pm ET Saturday - Sunday 8:00am - 4:30pm ET
Dodge is a registered trademark of FCA US LLC. 1A Auto is not affiliated with or sponsored by Dodge or FCA US LLC.See all trademarks.
Enter Vehicle Year Make Model
Specify your vehicle's year, make and model to guarantee fit.
Year
Make
Model
Options
Drivetrain
This part doesn’t fit a . Select from parts that fit.