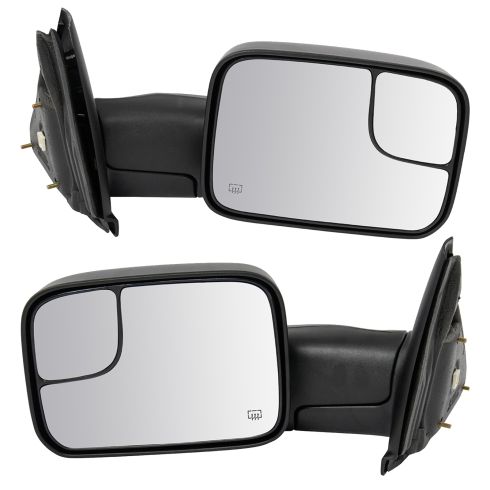
Kit Includes: (1) Passenger Side Mirror (1) Driver Side Mirror
Adjustment Type: Electric
Specification
Side Location
Driver & Passenger Side
Note: These mirrors will not flip up a complete 90 degrees. This is part of the design to ensure proper visibility.
Install Tip: Use caution when installing, pinching the wires can result in shorting.
Exact fit - To obtain proper fit and function confirm your vehicle has the exact mirror options listed.
Trusted Quality: Trail Ridge Truck Accessories are developed and built with a promise to provide high quality, durable parts for your truck; backed by the best warranty in the automotive industry. Manufactured from the highest quality materials and constructed to meet or exceed OEM standards. Every Trail Ridge part is rigorously tested ensuring superior fit, function, and durability. Quality, trusted value, and hassle-free installation backed by our 100% satisfaction guarantee.
Features and Benefits Set
Direct fit - No modifications for easy install
Heavy Duty - Built with high quality materials prevent rust, dust, and chipping
DOT certified
Matching set for a restored look
Item Condition:New
Attention California Customers:
WARNING: This product can expose you to chemicals including Chromium (Hexavalent Compounds), which is known to the State of California to cause cancer, and birth defects or other reproductive harm. For more information, go to www.P65Warnings.ca.gov
Lifetime Warranty
This item is backed by our limited lifetime warranty. In the event that this item should fail due to manufacturing defects during intended use, we will replace the part free of charge. This warranty covers the cost of the part only.
FREE Shipping is standard on orders shipped to the lower 48 States (Contiguous United States). Standard shipping charges apply to Hawaii and Alaska.
Shipping is not available to a P.O. Box, APO/FPO/DPO addresses, US Territories, or Canada for this item.
Expedited is available on checkout to the United States, excluding Alaska, Hawaii.
How to Install Tow Mirror 2002-2008 Dodge Ram 1500
1A Auto Product Review - Trail Ridge Tow Mirror TRMRP00017 TRMRP00069
Created on:
Tools used
No. 3 Phillips Screwdriver
Electrical Tape
Socket Extensions
Flat Blade Screwdriver
No. 2 Phillips Screwdriver
Crimper
10mm Socket
Ratchet
Needle nose pliers
Wire Cutters
Pick
1. Removing the Door Panel
Remove the 10mm bolt behind the door handle
Remove the door handle
Remove the #3 Phillips screw from the middle of the door panel
Remove the #3 Phillips screw from the sail panel
Remove the two #2 Phillips screws from the bottom of the door panel
Lift the door panel up and off
Disconnect the window switch wiring harnesses
2. Removing the Mirror
Disconnect the mirror connection
Remove the three 10mm nuts
Remove the mirror
3. Installing the New Tow Mirror
Insert the tow mirror into place
Tighten the 10mm bolts to the mirror
Connect the factory connector to the mirror
Unravel the wire on the new mirror
Pull back the corner of the watershield
Insert the wiring into the circular hole in the door without placing it near a moving part
Run the wiring down from the mirror
Pull the boot protecting the wiring harness inside the door jamb out
Run the wiring through the hole near the boot
Pry off the other side of the boot
Twist the end of the wires and tape them to a flat blade screwdriver
Pull the wires through the boot
Pull up the kick panel and pull it out
Pop the weather shield behind the kick panel by prying out the plastic clips
Fold the shield back and feed the wires through carefully
Repeat the steps for installing the mirror on the other side
Peel your passenger side carpet back
Pull out the center console trim panel
Run the passenger side wires underneath
Use the straps from the old harness to extend the passenger side wiring
Twist the ends of the wire and place them in a single-barrel crimp connector
Repeat the process for the other end of the crimp
Reach up under the driver's side of the carpet
Pull the wire through
Remove the 10mm ground bolt
Cut the end of the ground wire with a little bit of slack
Install the eyelit connector to the ground wire (black)
Crime the passenger side ground wire with a crimp
Tighten the 10mm bolt to the ground
Tape the red wire to a sharp pick
Peel back the carpet
Send the wire down through the rubber boot underneath the driver side carpet
Pull the wire through the boot
Leave enough slack to tuck the wiring underneath the carpet
The second of the white wire with the yellow tracer from the latch side of the connector
AKA 4th one in from the left
Install a double barrel crimp onto the yellow tracer wire
Stack the leads from the mirror on top of eachother
Insert the leads into the crimp, crimp them, and close the safety latch
Turn the vehicle on and check for running light operation
Push the passenger side carpet back into place
Press the center console trim into place
Press the plastic weather shield connectors in on the driver side
Press the kick panel into place
Reinstall the rubber boot in the door jamb on both sides
4. Reinstalling the Door Panel
Remove the door lock bezel
Connect the window switch wiring harness
Insert the door panel into place
Insert the door lock bezel into place
Tighten the #3 Phillips screw from the middle of the door panel
Tighten the #3 Phillips screw from the sail panel
Tighten the two #2 Phillips screws from the bottom of the door panel
Insert the door handle into place
Tighten the 10mm screw to the door handle
Brought to you by 1AAuto.com, your source for quality replacement parts and the best service on the Internet.
Hi, I'm Mike from 1A Auto. I hope this how-to video helps you out, and next time you need parts for your vehicle, think of 1AAuto.com. Thanks.
In this video, we're going to show you how to install tow mirrors on your Dodge Ram. This is a 2008, but the procedure is the same for 2002 to 2008 Dodge Ram. You'll need new tow mirrors from 1AAuto.com, 10 millimeter socket with ratchet and extensions, number two and #3 Phillips screwdrivers, flat blade screwdriver, electrical tape, needle nose pliers, wire stripping and crimping tool, a straight pick, and a pair of pliers.
Remove the 10mm bolt in the inside edge of the door handle. Remove the door handle from the opening. Remove the #3 Phillips behind the door handle, and in this top corner, two #2 Phillips on the bottom of the panel. Lift up on the door panel to release. Then we'll have to disconnect the two connectors from the window switch.
Disconnect the connector to the mirror by pressing down on the tab on the top. Remove these three 10 millimeter knots. Make sure to support the mirror before you finish removing the bolts.
We have to pry the bug deflector up on our car. Put it behind the mirror. Work the mirror out of the door.
Here, we have our old part from the vehicle and our upgraded tow mirror from 1AAuto.com. You could see this mirror sticks out a lot more, flips up, has a panoramic mirror already installed in it. It's going to be a really good upgrade. Going to give you a lot better view of what's going on behind you, especially when you have a big trailer on the back of your truck. Bolt right in just like the factory part. Comes with an easy-to-install two wire harness so we can use this lamp as either a turn signal or a parking light.
Be sure to take the two wire connector, feed it through first, wind up your bolts. Pop the new mirror in. Make sure you use the new hardware supplied with the kit. It has a larger flange on the knot to help support the extra weight of the bigger mirror. Tight the bolts back up with a 10 millimeter socket.
Reconnect the factory connector to the mirror. Connect the two wire harness included with your kit. Unravel all the wiring. Make sure there are no loops or kinks anywhere in it. Peel back the corner of your weather shield. Send the harness down into the door, being careful not to route it anywhere near a window regulator or any other moving part that may pinch the wire and cause damage. Make sure when you run the wiring down from the mirror, go through the round hole here and not to the square hole where the latch sits. Remove the rubber boot around the wiring harness inside the door jam.
You may need a flat blade screwdriver to pry this out. Reach through. Pull those all the way through. You want to make sure when you reinstall your weather seal that the wire stays clear that square hole. Pry the other side of the rubber loom off the truck side of the door jam. Twist the ends of the wire together. Keep the wires feeding in the same place. We're going to tape the end to a thin flat blade screwdriver. Use that to send our wire through the loom, careful not to puncture any other wires. Hold your wires and pull your screwdriver back through. Feed the rest of your wiring through the loom. Lift up on the seam of the kick panel. Lift up. Pull the panel out.
Just below the parking brake pedal is this weather shield. You'll have to pop that out of the way with a pair of needle-nose pliers behind the plastic clips. Just pry them out. Fold it back until you can see where the door harness comes through. Feed the wire one at a time between the retainer and the actual wiring clips. Find that wire when it comes through on the other side. Pull that through. Careful not to make too sharp an angle when you're pulling or to shape that against any other metals. Once that's through, start the other wire the same way.
Now that you have your mirror installed on the driver's side, repeat these steps on the passenger's side up until the wiring goes through the cab. Once the wiring has been run from the inside of the door through into the passenger compartment, peel your carpet up and remove this lower panel below the cup holder simply by prying it out and placing it to the side.
Peel your carpet up that your wire's underneath. You could see that our wires aren't going to be quite long enough, so we'll use the scraps from our old harness to extend these. You want to twist the ends of the wire together nice and tight, put it in a single barrel crimp connector. Crimp that end. A little tug, make sure it's on there nice and tight. Twist the other end of the wire. Put that end on the other side of the barrel connector. Crimp it down. Make sure that you have a good tight connection. We'll reach up under the driver's side of the carpet. Feed our wires through until they reach your hand under the carpet. Pull one through, then the other.
We have a ground bolt right here on the inside of the truck. You go ahead and take that out with a 10 millimeter socket and ratchet. Pick your ground wire, leave a little bit of slack. Cut the end off and strip the end of the wire. Twist the ends together.
Install our eyelet connector. The eyelet connector just crimps on so you got a nice tight crimp on there. Give it a little tug to make sure it's not coming off. Crimp the passenger side ground wire. Another eyelet crimp. Make sure that's not coming off.
Reinstall our ground bolt. We're going to take our wire, tape it to a sharp, straight pick. You don't want to make it too thick, but we want to make sure it's on there good and tight. I'm going to peel back the carpet a little bit, and just to the outside of our e-break cable. Send the wire down through the rubber boot. Move the pick and the rubber while holding the wire. Now, we can pull our wire through.
Make sure to leave enough slack that we can tuck it back under the carpet. Our crimp connector won't fit through, so we'll just lay it all back down under the carpet. In order to make the lights on our new tow mirrors work as running lamps or marker lights, we'll have to use the second of the white wires with the yellow tracer from the latched side of the connector. This is going to be the fourth one in from the left.
Install the double barrel crimp connector on to the wire with the leads from your mirror stacked one on top of the other. Install them into the other side of the double barrel connector. Crimp your connector with a pair of pliers. Close the safety latch over the top. After installing your wiring, turn the vehicle on and check for operation of your running lights. Push your carpet back into place. Reinstall the trim below the cup holder, the two clips in the front.
Reinstall the plastic connectors. Pull the weather shield in. Make sure your carpet is back in place. Install the front clips of the kick panel and then snap the lower portion into place. Repeat this step on the opposite side.
Reinstall the rubber wire loom on both sides. It’s maybe easier to install the loom on the inner edge if you use a hook pick. Push down on the clips and remove the connector from the cab of the truck. Even just removing it partially gives you enough room. Slide the boot back around the connector and snap it into place. Pop off the door lock bezel by pushing from the back.
Reinstall your two window switch connectors. Line up the tabs in the door panel. Slide your door panel into place. Pop the door lock bezel back into place. Reinstall your four door panel screws. Hold your screw in place for the interior handle, line it up and tighten it down.
Thanks for tuning in. We hope this video helped you out. Next time you need parts for your car, please visit 1AAuto.com. Also check out our other helpful how-to and diagnosis videos.
Tools used
Socket Extensions
Phillips Head Screwdriver
10mm Socket
Ratchet
Pick
1. Removing the Door Panel
Remove the window crank clip with a pick
Pull off the window crank
Remove the four Phillips screws from the door panel
Remove the 10mm bolt from the door handle
Pull off the door handle
Lift the door panel up and off
2. Removing the Mirror
Disconnect the wiring harness if present
Remove the three 10mm nuts from the mirror
Pull the mirror off the door
3. Installing the Mirror
Lift the mirror into place
Start the three 10mm nuts by hand
Tighten the 10mm nuts with a socket and ratchet
Connect the wiring harness if present
4. Installing the Door Panel
Lift the door panel into place
Push in the door panel clips
Insert the four Phillips screws into the door panel
Put the door handle into place
Insert the 10mm bolt into the door handle
Insert the metal clip into the window crank
Press on the window crank
Start by removing your old OEM mirror. Pull out on the window crank handle. Then use a hooked pick to remove the metal clip. Remove the window crank handle. Remove the four Phillips head screws with a Phillips screwdriver. Use a 10 millimeter socket, ratchet and extension to loosen the door handle bolt and you can remove your door handle. Lift up and remove the door panel.
Remove the three 10 millimeter nuts holding the mirror onto the door. Use your 10 millimeter socket, ratchet and extension. Support the mirror while removing the last nut and you can remove your mirror.
Install your new Trail Ridge mirror into the door. Start the 10 millimeter nuts by hand. Tighten down the 10 millimeter nuts with your socket, ratchet and extension. If your truck came with power options, you can now connect the electrical connector. Align your hooks on the door panel with the corresponding holes on your door and reinstall the door panel. With the hooks into place, push down on the door panel. Reinstall the four Phillips screws. Reinstall your door handle. Tighten down with a 10 millimeter socket, ratchet and extension. Reinstall the metal clip onto your window crank handle and simply push the crank handle back into place.
Tools used
Gloves
Flat Blade Screwdriver
Phillips Head Screwdriver
T40 Bit
10mm Socket
Ratchet
Complete Torx Bit Set
Trim Tool Set
Safety Glasses
Pocket Screwdriver
Tools used
TR00667
In Stock
Product Reviews
Loading reviews
4.84/ 5.043
43 reviews
5 Stars
4 Stars
3 Stars
2 Stars
1 Star
38
4
0
1
0
Mirror set
Mark
March 26, 2021
Great set fit perfectly and the electronics work on them too
Higher Quality than I expected
W
March 30, 2021
As stated in the title I was suprised at the quality of these mirrors. Shipping was Fast, Installation was simple (I've heard of exact fit before but these truly are) and I would recommend these if you are looking to upgrade to some actual tow mirrors.
Lynn
Great product
D
April 6, 2021
I received my order in two days and it only took 30 minutes to install them. These extended mirrors are really nice and really do their job nicely. I can see all the things I need to see and they make backing my camper a breaded.
Definitely recommend
Matt
June 6, 2021
I had ordered some from another site that sells everything and starts with an A. They arrived and didnt have the right studs. I got the old studs out as best I could but still had to track down some set screws and nuts to make new ones. Got the drivers side on. Would not adjust high enough for me. Then unwrapped the passenger side and the glass was broken. Sent those back and ordered these. They are 100x better
Mirror
Richard
June 9, 2021
The mirror set fit perfect easy install
Heated power fold up tow mirrors
Teresa
June 12, 2021
I never thought I would go with aftermarket parts but finally when I did A1?? is the best I've bought from you twice now and I'm stoked !
New mirrors
Patrick
June 17, 2021
Just like new mirrors from the factory.
Nathan
August 15, 2021
Great mirrors!
LUIS
August 23, 2021
Fits pretty good
Not the best quality
Frank
September 1, 2021
Quality isnt the best, one mirror mounted level and the other is pointed up, but should be expected for the price I guess. Will get the job done
Nikolaos
September 3, 2021
not as OEM...but very close..
Shawn
September 27, 2021
The mirrors where great fut good on driver side passebger black plastic didnt fit as tite but deff a1 product
Quality mirrors at a reasonable price. Instructions were easy to understand and complete
Parts Manager
W-K
October 14, 2021
Awesome Customer Service!!!!!
Ram 1500 towmirrors
Isaac
November 8, 2021
Great quality- but I'm not surprised all the trailridge stuff is top notch. Packaged nicely and arrived quick. Mounted to my 08 ram 1500 and they look sweet. Much better view that stock. I was afraid if they would stick out too far and look out of place but they look great.
Alternative
November 22, 2021
Great product at a fair price!
2007 Dodge Ram 3500 tow mirrors
John
November 23, 2021
The mirrors showed up quick. I watched one of 1A autos installation videos and I was able to installs my mirrors with ease. The mirrors look OEM and all in all Im am happy. Will definitely buy more products from 1A auto in the future.
Ram trailer mirror set
Ted
January 25, 2022
The mirrors are awesome! Easy to install. They look like OEM equipment and work fantastic. We pull a camper trailer and these mirrors are wide enough to give a great view of beside and behind us. We love them!
2006 Dodge Ram Mega Cab - Perfectly packed but tough to remove bolts (look great and work!)
Kent
February 3, 2022
They look great and WORK! :) The mirrors were packaged perfectly and carefully. It came with a little note that said I needed to actually remove the existing bolts in the corner that go into the metal part of the truck for my 2006 Dodge Ram and sue the replacements as they are a bit longer. Two of the 6 were VERY TIGHT. I tried channel locks, pipe wrench, pliars, sockets, ANYTHING I could to try to get them off and not break the plastic housing. As I began actually STRIPPING the bolts, I almost called to have them replaced. I then remembered I had a set of sockets for stripped bolts. I was able to find the right size, put it on and REALLY give it some torque and FINALLY was able to get them loosened. It was a BIG pain and I was close to calling, but it worked out in the end, and the mirrors look and work great!
Larry
February 16, 2022
Perfect fit
Great
James
March 6, 2022
They look factory and work great!
Dodge 2006 ram 3500 mega cab.
James
March 23, 2022
These mirrors installed just fine. The directions left out the part about having the extra hardware you need to use for a 2006 mega cab. It does tell you that you need to use said hardware but it doesn't tell you which two studs need to be replaced. I replaced the two studs that are closest to the rear of the truck. That seemed to do just fine.
Doug
April 7, 2022
Feel and look just like oem no rattling like the cheap Amazon ones
Just Like Factory Mirrors
860
May 6, 2022
Went on easy, factory-like fit and finish through and through. These look, operate and install exactly like the factory mirrors. Been on a few weeks, well see on longevity.
Very good mirrors at an affordable price and well packaged!
R.W.Larson
May 16, 2022
I ordered these mirrors when I bought my "new " truck for trailer towing. They are about 30% bigger than the originals and are much farther out for better view. They were very easy to install. The original Dodge mirrors were power and heated. These plugged right into the wire harness exactly like the stock ones. The hardware was all included, but I even reused the original nuts. I love the way the power works and I was pleasantly surprised that when they are turned up the power is still in the proper orientation. The quality is every bit as good as the originals and I can recommend them without hesitation.
New mirrors look good
David
May 24, 2022
Mirrors were easy to install and look good.
Would definitely buy from 1A Auto again!
Valerie
July 21, 2022
Great mirrors! Great Price! A Perfect Fit!
Great mirrors
Richard
August 28, 2022
Perfect fit. Very sturdy no vibrations. Great upgrade for the money. Just taking my time and had them both swapped out in about 45 mins.
Victor
October 24, 2022
Great...
BEST MIRROR
Willard
October 28, 2022
INSTALLED GREAT, FIT PERFECT
Jonathon
January 15, 2023
Easy to install and looks like a quality product!!
Great Mirrors fast shipping great packing and handling great company
jeffrey
January 21, 2023
The Mirrors work amazing look and function just like originals and the way their shipped is excellent double boxed with foam fit with a cover and bubble wrap and then in another big box theres no way they can get damaged unless the box was run over by a truck super impressed with the mirrors and packing and shipping I got them with in one day A++++ great company will be buying more from them Thank you
Great mirror set
Michael
January 25, 2023
The mirror set I really liked. Quality seemed great
Brian
February 10, 2023
Good fit, good finish. Electric adjustment functions properly in both mirror orientations, which is really nice. Not all aftermarket mirrors do this.
Buy them. Seriously, just buy them.
Joey
April 11, 2023
If you need affordable replacement mirrors then these do the job. Great product and easy install. I love 1A auto.
Tow mirrors need replaced? Look no further...
Joshua
June 18, 2023
The phrase "you get what you pay for" certainly comes into play here. Unlike the cheap knock offs you try to get from Amazon, I was impressed with this order from the start. Shipping was quick, and the packing was the best I've seen from any service in a long while. Plenty of foam for protection during transit, each mirror individually wrapped and even had cloth sleeves over the glass to prevent scratches. Something so small made me so happy because of how well the shipping was done. The mirrors are just like OEM in both appearance and quality. They lined right up and mounted with ease given the pre assembled bolts matching factory specs. But just in case they didn't for you, this order included a few extra sets of different length bolts to make sure you got the right fit. Again, looking at you Amazon where I read so many reviews of poor alignment or customers having to shave bolts down. Definitely worth the purchase. If you need your towing mirros replaced, you will not be disappointe
Great product
Gerald
June 29, 2023
Install was very easy
They work great
Would recommend
2006 Dodge Ram 1500 Mega Cab
Kenneth
July 14, 2023
Great aftermarket replacement mirrors. They look and work good.
Jess
October 6, 2023
Great quality and easy install at an affordable price. I would recommend this to anyone.
Stephanie
December 8, 2023
Ordered this for a 2007 Cummins 6.7. Fits perfectly, easy installation. Only took about a half hour for each side with most of the time spent removing the old ones. Would definitely recommend.
Good place to get auto parts
Fred
February 7, 2024
Exactly as advertised and quickly shipped. Very pleased with results
Joe
April 16, 2024
Priced fair and feels and looks like OEM.
Customer Q&A
Do mirrors have issues with shaking?April 8, 2021
Robert C
10
There should not be any issue with the mirrors shaking. If you experience this issue, it would be considered to be a defect.
April 8, 2021
Emma F
10
No not at all
April 8, 2021
L I
Part #TRMRP00069
Pictures show no turn signal on assembly but install video does. Does this part number have turn signals?September 2, 2021
Gene H
10
They do not
September 2, 2021
Damon F
10
no
September 3, 2021
Nikolaos V
10
No
October 1, 2021
Miguel J
Will these mirrors replace the power power mirrors on my Ram 3500 SLT drw?February 22, 2022
Dick H
10
Mirrors should be replaced in an "option for option" fashion. If your mirrors do not have the same options that are listed in our listing, there is a possibility that this mirror may not function properly.
February 22, 2022
Kelly S
10
I installed them on 2008 Dodge Ram 3500 Larmie drw.
February 23, 2022
J O
do these have the ball type adjustment mech behind the mirrors or the cheap kind that click when you move them by hand?March 31, 2022
Jack J
10
These are power mirrors, so they will work with the mirror switch.
March 31, 2022
T I
are these mirrors heated?January 8, 2024
John D
10
Yes
January 8, 2024
James S
10
Yes. You can see in the picture that it shows a heated mirror sign on the glass
January 8, 2024
Adam T
10
yes they work pretty decent
January 8, 2024
G R
10
Yes they are
January 9, 2024
Janet B
Do this flip up? Video says yes web pages says noMarch 9, 2024
Gracie V
10
Yes! They are great better then any you can buy on Amazon.
March 9, 2024
Richard A
10
I bought them for my 2006 Dodge Ram 1500 Mega Cab and yes, they do flip up.
March 9, 2024
Kenneth P
10
Yes they do
March 11, 2024
Jose R
10
Yes! They are great better then any you can buy on Amazon.
March 22, 2024
Richard A
Customer service
877-844-3393
Monday - Friday 8:00am - 9:30pm ET Saturday - Sunday 8:00am - 4:30pm ET
Dodge is a registered trademark of FCA US LLC. 1A Auto is not affiliated with or sponsored by Dodge or FCA US LLC.See all trademarks.
Enter Vehicle Year Make Model
Specify your vehicle's year, make and model to guarantee fit.
Year
Make
Model
Options
Drivetrain
This part doesn’t fit a . Select from parts that fit.