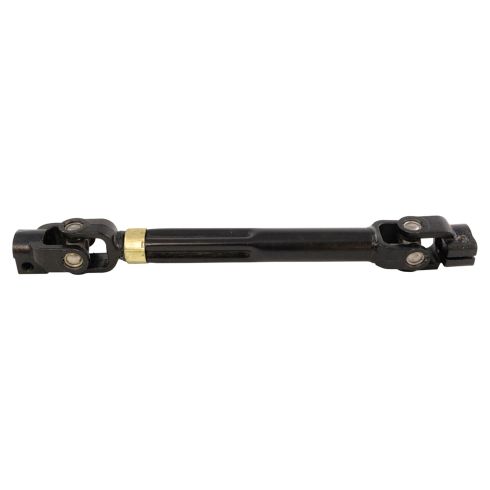
1ASTC00189-Ford Lincoln Lower Intermediate Steering Shaft TRQ PSA67599

Replaces
Ford Lincoln Lower Intermediate Steering Shaft TRQ PSA67599

Frequently bought together
Product Reviews
Loading reviews
4.20/ 5.0
35
35 reviews
Easy as 1,2,3
January 11, 2019
Excellent price, parts and service! Nothing but the best !
Intermediate Shaft 2010 Ford F-150
January 14, 2019
Great Price and fast delivery. Mechanic installed and is working perfectly. No issues to date. I definitely recommend 1aauto. I will order from them again.
Intermediate steering shaft
January 15, 2019
Well it fit great and looked exactly like old one but one end was not installed correctly! What Im saying is after installing shaft the steering wheel was of center by 15 degrees! Had to have truck aligned to center wheel! Should have been a direct fit! Shaft ends do not have spine ends. They are a d-shape at upper end and a triangular shape at bottom end! So you couldnt install them wrong! Bolt pinching lock!
Steering shaft
February 5, 2019
This is a good product for the price. About half the cost of OEM. The only problem is that after the install, steering wheel was not centered like it should be. Will have to get an alignment to correct this. Cost of alignment plus cost of part will cost as much if not more than buying OEM.
Great Price Free Delivery
March 22, 2019
My 2 local Part Stores did not have it in stock and could not get it for over 2 weeks and the part in each store was over $220 more than what was charged by your store. I will be back next time I need any parts.
perfect fit
July 12, 2019
I received my part the day it was scheduled and installed it according to the video I watched from 1a no problems I will absolutely be using 1a in the future.
September 18, 2019
Reviewed both parts in other review very happy
same results.
October 19, 2019
I purchased this lower intermediate steering shaft because i bought one 6 months earlier from another supplier and when i installed it the steering wheel is at a 15 degree angle, thought it was poor quality so sent back and bought one from A1 Auto and the steering is still at a 15 degree angle. Only way i see to get steering wheel straight is to take it in and have a alignment done and have them adjust wheels to make steering wheel straight.
2009 F150 Steering Shaft
December 17, 2019
Works well, fits well
Navigator steering shaft w/universal joints
January 28, 2020
The re-placement steering shaft assembly was a direct fit!
The steering effort required was reduced to like new feel.
Thank you, Ron Dawes
Ford F150 Lower Steering Shaft
March 30, 2020
The Prize was a lot better than from Ford.
Installation was as easy as shown on the Video.
But after installation noticed that Steering Wheel is of center by about 5 degrees. Reinstalled it but no avail. I guess that how it is.
F150 steering shaft
July 2, 2020
Part arrived quick. Now I have smooth steering again. My steering is slightly off center, but I expected that from reading other reviews. I followed the video instructions exactly but had a terrible time getting the lower shaft bolt threading started. The bolt supplied with this purchase is not tapered like the original one. After several attempts and removals I was able to do it with the original bolt from the truck, I'm happy the threading was the same. I'm done, it's over and it works, hopefully it lasts. Keep up with the Videos, Thanks,
good fit, good ride!
August 25, 2020
Went in easy, steering is now nice and tight!
Perfect fit
August 26, 2020
Bought this for my 2011 f150 with electric power steering. Build quality seemed to be even better than OEM but thats compared to a part with 150k miles on it. This is an over looked part that should be replaced if you want to maintain a like new driving experience. Highly recommend!
Fit perfect and great price
September 26, 2020
Fit my F150 perfectly, look like higher quality than the original one. Great price and fast shipping.
part was exact to the OEM
October 13, 2020
I followed the installation video from your website and it was very helpful. i would just suggest using a fine sandpaper to clean the rust and it slides right on.
Great prices and quick shipping
March 22, 2021
Every time I purchase an item it is always the best price good quality and their shipping is extremely fast.
Thank you will be ordering my new brakes very soon.
June 25, 2021
Fit a 2007 Ford Expedition 5.4 3V. Easy install.
Easy install
July 5, 2021
Fast delivery, easy install and great quality. Steering is perfect now. Some said that their steering wheel was off a fee degrees but I fidnt have that issue. I just strapped the wheel so it wouldn't move. Overall this was a great purchase!
As advertised
July 20, 2021
Part arrived on time and fit perfectly. The video from 1aAuto was very helpful and informative.
August 5, 2021
Had what I needed in stock , reasonable price
Good product good price quality part replacement.
September 1, 2021
Fits right in.. very good quality... days prior to replace the part I spray wd40 and the old part came right off... you don't need to strap the steering wheel... as long as you park straight and mark and pay attention on the part alignment that's all and if you steering wheel is off few degrees probably your truck needs alignment... overall good product,good price ????????????
Steering shaft felt cheaply made compared to the original one I took off my truck
September 26, 2021
It looked and felt like it was a cheaply made product compared to the original shaft I took off my truck.
Good part easy fix
November 24, 2021
Great part. Was and easy fit. The instructional video made it super easy to install.
Would recommend.
Great service, mediocre part.
[{"url": "https://wac.edgecastcdn.net/001A39/prod/media/pNISJll75W64CYGsite/7626010c0330b87cd1e022ec1436d9fc_1642386173388_0.jpeg", "caption": "The squeaky tight joint and surface rust."}]
January 16, 2022
Ordering was very easily and accurate. Shipping was extremely quick so I give 1A Auto a higher rating than the 3 stars I'm giving the actual product. The shaft itself seems ok but upon receiving it, the top joint seems tight and squeaks when rotating. Also, I did the correct procedure for the steering wheel prior to install but after completion, my steering wheel was well off center as others have stated. Pleased with 1A Auto's service but not too pleased with the part. This is just my initial thoughts as I just installed it about 15 minutes ago so I can't comment on durability.
Defective part
January 24, 2022
Had it installed by a reputable mechanic and within a day I noticed some play in the steering. Brought it back to the shop and they said the new part was the problem and should be replaced.
f150 intermediate shaft fix
February 14, 2022
This part fit great. Only issue, if you could call it that, was the bolts were Metric and the original were SAE. They came with new bolts so this isn't much of an issue, except I had to crawl out from under the truck to get the right size wrench.LOL.
Poor Quality Part
June 10, 2022
After installing this, the steering wheel was off by roughly 15 degrees. Not a huge deal as I was going to have an alignment done anyways. The real issue is the dead space or play in the steering now. When centered I get roughly an inch in both directions that the where the steering wheel does not engage. Due to this I can not recommend this part. I have both other items from here and they have all been top notch, so this is very disappointing,
Buying and installing intermediate power steering shaft
August 3, 2022
Part arrived in 3 days by ups just like a1auto said,Part was of high quality and American thread,went back together fast and without any problems,a1auto has a great program with a video of what it takes to take apart and installing!will buy parts from a a1auto again!!!
September 3, 2022
Exelente producto
Not good
October 10, 2022
Its not good
There is okay in the knuckle and therefore there is play in the steering wheel
About an inch of play steering left to right
February 23, 2023
Fit great no problems
Better than original part
February 22, 2024
Have ordered many parts from 1aauto, always arrive quickly and parts all high quality. This steering shaft seemed much beefier and bigger than the fomoco original part, installed easily, works perfectly. Will buy more parts from 1aauto in the future.
Hoped for better
June 18, 2024
It can only be installed one way, so its not an installation error, the steering is now a few degrees off center!!
Excellent
August 27, 2024
It was easy to install and works just fine, thank you for sending it in a timely fashion. I will buy other products from you again. Excellent
Customer Q&A
Does this fit a 2010 f150 4wd xlt?
February 16, 2019
10
Yes, according to the information you provided, this part will fit your vehicle.
February 16, 2019
Adam G
I just installed this part and the steering is smooth except I have about a 1/4 inch of play in the steering wheel now when turning back and forth. Can this be corrected?
September 8, 2019
Does this have grease fittings?
August 14, 2020
10
Thank you for the inquiry. This will not have any grease fittings.
August 14, 2020
Curtis L
Does this come with new bolts?
September 11, 2020
10
Hello,
Hardware is not included.
September 11, 2020
Corey M
Does it come with two or just one?
May 19, 2021
10
This is one intermediate steering shaft.
May 19, 2021
Christa R
Does anyone know the length of this shaft?
October 23, 2021
What metal is this made out of?
December 12, 2021
10
This steering shaft is designed like the original with a mix of stamped and cast steel components
December 14, 2021
Daniel F


