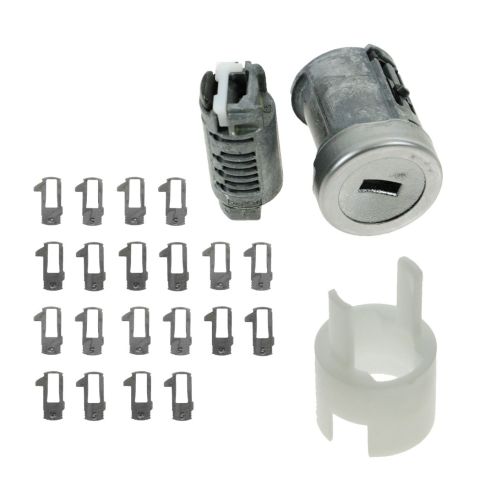
1AIMX00181-Ford Lincoln Mercury Ignition Lock Cylinder Dorman OE Solutions 924-717

Replaces
2009 Ford Mustang Ignition Lock Cylinder Dorman OE Solutions 924-717

Frequently bought together
Product Reviews
Loading reviews
5.00/ 5.0
14
14 reviews
Easy installation!
January 16, 2018
The videos and instructions for this product were spot on; the repair timeframe was about 40 minutes, and it fixed the issue with my wife's Mercury Mountaineer. Great service / delivery and great support, thanks!
Perfect fit
February 7, 2018
Perfect fit, and came with all parts and then some. Got put together under 30 min and installed under an hour. Highly recommended to anyone
Directions were perfect.
March 25, 2018
Had a issue with my drivers seat moving when I hit a bump. I thought I was going to have to change the whole thing and have a different key but after watching the video and getting the directions with the parts everything went smooth. Very small pieces with little number on them. So far no issues and old keys work fine. Thank you
Fairly simple
April 8, 2018
Watched a video on You Tube and followed the included instructions and project was fairly simple. New lock cylinder fixed all my problems.
Easy repair
August 24, 2018
Ordered this for a 2008 Ford Explorer (Eddie Bauer). The part was a perfect fit. The video instructions made this an easy repair. Took less than an hour. Thanks!!!!
November 13, 2018
Arrived on time, exactly as described, works great! Thanks A1 Auto, your videos are informative and helped me complete the job in record time.
Keep Your Original Key
January 26, 2020
Replacing the ignition switch and matching the original tumblers was cut & dry. The hardest part was removing the switch. It seems I couldn't depress the locking latch properly. Poking a pick into a small hole & not being able to see what you're doing didn't help. Still, I'm very happy with the results.
Works great, not hard to install.
May 6, 2020
I installed this in a 2010 f-150 in less than an hour from start to finish, the instructions were easy to follow and it has worked great so far (it has been installed for about a month). Love that I didnt have to get new keys. I would recommend this to anyone.
Worth it!
June 18, 2020
Ive never replaced a a key cylinder before and felt like I was in unknown territory but the how to video made it easy and I save a ton of money after every place I took it said they it was $125 walk in the door or it would need a new key. 45min later and same key later I was on my way. Thanks 1A Auto
Ford Explorer ignition lock cylinder
September 17, 2020
1A Auto has saved me a lot of money especially with their low prices and how to video
Fixed my dome light coming on issue
January 12, 2021
1aauto,
You guys knocked it out of the park again with a great product that was easy to install. Having a video for us weekend mechanics to follow, made this installation as smooth as possible! This new ignition lock cylinder fixed the issue I was having with my daily driver 2007 Ford Explorer Eddie Bauer's dome light coming on when going over bumps etc.
Your shipping speed was good and I'll definitely be a repeat customer!!
Thanks guys
Great company
July 18, 2021
Great product,great pricing fast delivery
Amazingly easy to replace on 2008 Ford Mustang!
August 11, 2021
A tab on the old key cylinder broke and the cylinder kept coming out of the steering column with the key. Not good. Saw this product on the 1A Auto website and ordered it. The video showing how to set the cylinder up to work with your existing key was perfect. Saved hundreds of dollars!
Perfect
November 20, 2023
Perfect replacement for a 2006 Ford Explorer. The installation video from 1A Auto made it easy as I thought the written instructions weren't as clear as the video.
Customer Q&A
Does it come with the tiny springs?
August 23, 2022
10
This will not come with any tiny springs or include any additional hardware.
August 23, 2022
Emma F
The video shows a bag of springs for the kit and also packet of grease, so none of this is included? Is the kit used in the video the same one you are selling?
April 11, 2023
10
The kit has been changed since the video was made and the bag of springs and grease will not be included. The kit will come as pictured.
April 12, 2023
Emma F
Do I need to buy the springs and grease separate? Do I just use the old springs? What type of grease should be used?
November 29, 2023
10
New springs and grease are included in the kit
November 29, 2023
Cornelius A
Ford is a registered trademark of Ford Motor Company. 1A Auto is not affiliated with or sponsored by Ford or Ford Motor Company.
See all trademarks.


