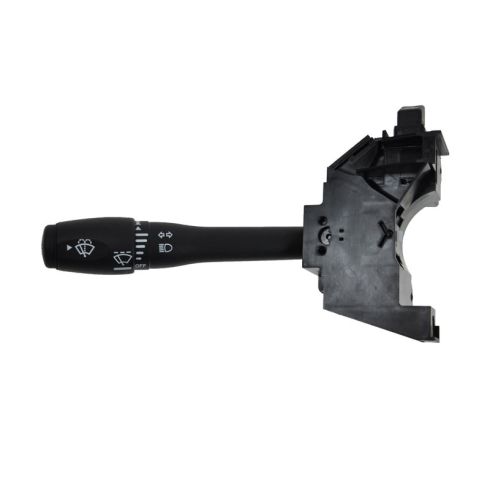
1AZTS00095-Ford Lincoln Mercury Turn Signal Combination Lever TRQ SWA41794

Replaces
2011 Lincoln Town Car with Delay Wipers Turn Signal Combination Lever TRQ SWA41794

Frequently bought together
Product Reviews
Loading reviews
4.54/ 5.0
24
24 reviews
Crown Vic turn signal switch
March 19, 2017
The part arrived really quick. Price was about 1/3 of what other sellers were charging. Watched your installation video 3 or 4 times and was able to replace the defective switch in 45 minutes. Everything on the lever is working great. Really helps to know where and how to take things apart. I had a couple of minor differences, but otherwise, great video and part.
DYI Saved me hundreds of dollars
June 20, 2017
The turn signal switch I found on line save me hundreds of dollars by doing it myself. The video that was provided made it simple with very little variations. Other than my ignition switch Tumblr was not quite as shown in the video, only because mine was somewhat different but was still easily removed with a little thinking. I was pleasantly surprised with the low price of the quality made part I ordered along with their customer service when I ran into a problem. I sent them pictures of the switch so they could see the situation and they contacted me back and discuss the matter with me. Come to find out it was my fall in overlooking a certain area. Also they warned me to be sure to disconnect the battery which I did. Success, the turn signal and wiper switch worked perfect. A good thing because the rain X on my windshield was starting to not quite work so well after two months without this part. Thank you 1AAuto.com
Unsure
October 21, 2017
Installed this and the wipers dont work unless on highest setting so at the moment not sure if its this part or something else
Defective Part
July 6, 2018
Order came on-time. No issue with the processing. However, I spent 3 hours taking everything apart and then another 2 hours to install. After all that, noticed that the flasher button is defective. Keep turning on by itself and even if the car is parked overnight. I noticed this when my car battery was empty. Anyways, I ordered the part from the dealer and reinstalled everything. Planning to return this next week.
1A is a great company, I know that they are not the ones making the parts, but for me it was a very bad experience. Too much time was wasted.
I guess, you don't expect much from parts not made in America. Chinese parts are all not reliable.
Great Product
July 7, 2018
This unit is a great product, great price and quick delivery. 1A Auto videos are extremely helpful.
Good part
July 12, 2018
This is a good part overall and I received it exactly as described. The only reason why I gave this 4 stars instead of 5 is because this replacement part doesn't function as smoothly as the original.
August 18, 2018
Had a mix up on order that was my fault called they fixed it for me and had no problem with getting right parts and delivered in time
Highly recommend
November 15, 2018
My part came Early was a exact fit . Also was very easy to order
great prices , fantastic video
December 23, 2018
the switch was a good buy and I was very pleased with the quality. your delivery service was very fast, but what I really appreciated was the great how to video. I was going to pay someone to do my work but your video and price swayed me to give it a try. it was a snap and I saved a bundle. Thanks Guys
Fast shipping
December 30, 2018
Great product and price came fast! Thanks! Will order from 1a auto again!
2006 Mercury Combination Switch
January 7, 2019
Right part, right fit, low price, received it ahead of schedule.
Easy to install thanks to YouTube video. Awesome!
January 10, 2019
My turn signal canceler broke and it was super annoying. I did some research on-line and discovered that the replacement part was available for a reasonable amount through A1. I bought the part and when it arrived, I watched A1's video. Having watched the video, I was able to replace the part easily. I saved around $100.00 in my estimation by replacing the part myself. Good deal and great video!
Right part att he right time
July 28, 2019
The best part about ordering most anything from A1 Auto are the instructional videos. I have a great idea about what I am getting myself into before ordering the part. This alone has saved me hundreds in labor costs by showing me that I can do it myself.
My New Part
September 8, 2019
The switch did what it was designed to do. It went in just as the instruction video. This isn't my first rodeo with 1aauto, and it won't be my last.
Works great
October 7, 2019
As advertised, great price, fast shipping works great; no issues. Second Item I have purchased from 1A Auto.
August 25, 2020
Great part thank was shipped is a reasonable time
1A Auto best or nothing
September 14, 2020
Thank you to the 1A Auto team. With the amount of research that you can find, how to do videos, it went super smooth and the products are speechless. Again thank you all very much for your service and time.
Great part and installation!
July 4, 2021
Easy to install and works fine!
Just right.
September 9, 2021
Fit perfect
Crown vic combination switch.
May 16, 2022
Very easy to install. With 1A Auto video reference.
Highly pleased with this company.
January 1, 2023
Thanks for the video you guy are awesome company. I replaced it thinking it would fix the issue of the wipers going on by its self but its still doing it while the wiper is off in order for me to stop it I have to remove the fuse and then in a rainy day I have to put the fuse back in and information on why this is happening text me 4014009863
Part good, video bad
March 10, 2023
The part was fine. The accompanying video was incorrect and would have caused damage if it had been followed. The video that was made by 1AAuto's owner for Crown Victorias {I have a Grand Marquis} was much more accurate and helpful. It turns out my problem was with the wiper motor and not the switch but I'm glad I installed the switch anyway since mine was looking a little shabby.
Perfect Fit
August 17, 2023
Drop in fit.
Nice price.
Quick shipping.
Fits like OE switch
June 8, 2024
This part was an exact replacement part that fit the car like the OE switch and the installation went just like the video. biggest issue was removing ignition switch (finding the release button) so we dropped bottom panel of column to make easier to release ignition button.
Customer Q&A
Does this also control the brake lights?
February 13, 2019
10
This combination switch would not control the brake lights.
February 13, 2019
Jessica D
10
Controls the following functions:
Turn Signal
High Beam
Windshield Wipers with Delay
Windshield Wiper Washer
Black finish on handle
Design improved for more durability
February 13, 2019
R J
10
Hi Ronnie.. that switch has NOTHING to do with brake lights..
February 13, 2019
Joseph-d W
10
I do not know how to answer this direct question. I am just Shadetree mechanic. But I do know that the brake pedal has a switch on it that turns on/off the brake light. That signal then goes through the turn signal switch to alternate the designated tail light bulb. Your tail light bulbs have only two filiments. one for running lights (low intensity), or brake/turn (high intensity) At least, that is how the old ones work...
February 14, 2019
Sam M
10
No
February 15, 2019
Michael S
10
No it does not control the brake lights at all just the front and back blinkers, winshieldwipers and high beams
February 15, 2019
M A
How do I install the 6 way connector adapter? Do I use tweezers and remove each wire from the old connector?
September 10, 2022
10
Yes, we do have installation instructions available for this part. Here's a link for that:
https://youtu.be/WqWeB_6BOm4
September 12, 2022
Kelly S
where is this part made????
December 1, 2022
10
DIY solutions brand parts are manufactured by various aftermarket companies specifically for us and built to your vehicle's exact OEM specifications.
December 1, 2022
Ricale A
Would replacing the multifunction indicator switch with a new correct an issue where the indicator lever itself does not return to normal position after turning the wheel?
August 16, 2023
10
Yes, unless there are other issues in your steering column. Most likely the little white plastic tab broke so the steering column has nothing to press against to return the lever to the center position.
August 16, 2023
Edwin L
10
There could be multiple reasons why you're having this particular problem. We suggest taking your vehicle to a nearby reputable shop to identify the cause. Once you know the cause, we'll be happy to see if we carry the parts and how-to videos needed for your repair.
August 16, 2023
Meghan R
10
Yes, this will correct the situation...It is a total pita to change but can be done, I needed to buy a long torx screw driver for one fastener. Good luck.YouTube videos were very helpful.
August 17, 2023
Robert M
Lincoln is a registered trademark of Ford Motor Company. 1A Auto is not affiliated with or sponsored by Lincoln or Ford Motor Company.
See all trademarks.


