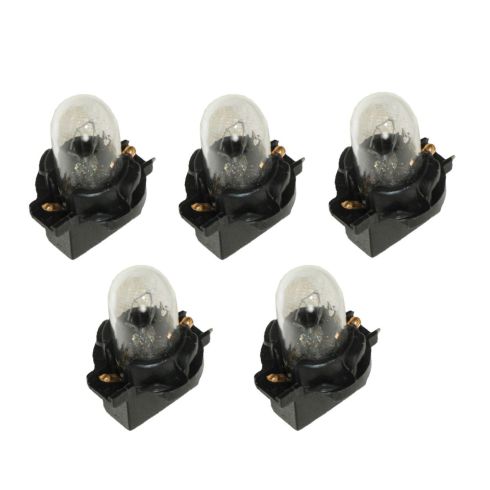
1AIMX00187-Ford Mercury Instrument Cluster Bulb 5 Piece Set Dorman OE Solutions 639-009

Replaces
2000 Mercury Sable Instrument Cluster Bulb 5 Piece Set Dorman OE Solutions 639-009

Frequently bought together
Product Reviews
Loading reviews
4.35/ 5.0
26
26 reviews
Great!
March 4, 2017
Replaced every bulb...instrument panel looks like new! Thanks!
Instrument cluster bulbs
November 17, 2017
It is wonderful to not drive in the dark without dash lights anymore. The bulbs bring the dash back to it's original brightness, they arrived in a timely manor, and the video was very helpful. Thanks 1A Auto
Ok, but double check
July 6, 2018
The video showing how to remove the instrument panel is extremely helpful and was greatly appreciated. There are a couple other videos online but this was the best, in my opinion. But, my 2002 ford ranger has 6 instrument lights and the kit only contained 5. And, one of the five new bulbs didn't work. It is better than it was since I had 3 out before.
Dashboard Instrument Cluster bulbs
October 31, 2018
I have a new-to me 98 Mazda B3000 and have begun to perform all accessible fixes on my own.
Between the 1AAuto How-To video that I literally watched 20x and the ease and cost easy pricing of the bulbs. I performed this change out and in 1hr completed with no issues.
Bulbs fit in like OEM with no issues.
Shipping and Packaging were received with no issues.
one lite not working all the time
December 4, 2018
one lite is intermitting then went out than came on,than went out.
Not a full set, poor fit
December 17, 2018
Although these are sold in a set of 5, both my 95 Ranger and the example truck in the video have 6 bulbs behind the instrument cluster. Luckily they weren't all burnt out. The fit was also very lose even tightened down all the way, and I had to go back and pad the housing around each bulb with electrical tape to get a solid connection. They do work now though.
1AIMX00187-Instrument Cluster Bulb
February 17, 2019
I purchased these bulbs and they didn't work at all for the price I paid for them 27.95 for a set of 5 bulbs. I turned back around and shopped on EBay and purchased 3 sets of 5 bulbs totaling 15 bulbs of the same part number, packaging for a price of 27.82. And yes it's from an Auto parts store. Don't think I'll be shopping at 1A Auto Parts anymore.
The right product at the right price
March 30, 2019
These bulbs were a perfect fit, the price was good and delivery was quick. The install video provided by 1A was just the thing to get the project done in 1 hour. Thanks, 1A Auto
5 piece bulb set.
June 29, 2019
I should’ve read it and saw that there was only 5 bulbs, I actually needed 7. My fault!!
great buy
April 6, 2020
I like that the bulbs came with the socket so I don't have to worry about removing and breaking the sockets in my 18 year old Ford Ranger truck. The bulbs are exact replacement and fit perfectly.
Excellent supplier
May 2, 2020
Completely satisfied with parts ordered and shipping options. Also appreciate the D.I.Y. videos.
I Highly recommend 1A auto and will continue to order my replacement parts from them.
Product as described
August 3, 2020
Received my 1AIMX00187-Ford Mercury Instrument Cluster Bulb 5 Piece Set in a timely manner and they fit perfectly in my Ford Ranger.
Great Service and excellent product
September 22, 2020
When I placed the order, they were out of stock. Notified me when they got replenished and I ordered them. Shipping was very quick and this allowed the repair to be made quickly. Thanks for the great job guys!
Perfect replacement
April 26, 2021
Perfect fit. Identical to OE. So nice to see my instrumentation at night again. Your videos are the best available. Thanks!
Fantastic
September 26, 2021
Your video is invaluable in order to do the work. Exactly what one needs to get to the problem and all worked well. The bulbs were received in 4 days.
Thanks
Ranger Instrument back-lights
December 7, 2021
Product came in a reasonable time and looked good but not installed yet. Will use your detailed 2002 Ford Ranger video to complete on a weekend upcoming.
February 17, 2022
They work as expected.
September 5, 2022
2 of the 5 bulbs did not work.
Good bulbs but didn't solve the problem
October 23, 2022
I received the order in quick time and packaged well (but not over-packaged!). The bulbs were as described and were in good condition. However, I can't speak to how well they work yet, because when I took apart the dash and swapped out the old bulbs with these, I realized that I should have ordered a six-pack of bulbs, as that's how many needed replacing. I did switch out the bulbs, but my dash is still dark, so I'm not sure if it's bc there's one old bulb, or the problem lies somewhere else.
Good product
December 13, 2022
The light arrived quickly. The instruction video was informative. The lights installed easily, no problems, they all worked first time. After completing, the dash lights work like new. I can highly recommend this product.
Bulbs worked fine But 1 was broken
January 25, 2023
Received all 5 bulbs but unfortunately ONE of the bulbs was broken. It didn't have the glass. It was just the plastic. Luckily I only needed 2 bulbs but I'd prefer to have replaced them all since it's a little bit of a pain getting to the dash bulbs & seeing how I paid full price for 5 bulbs.
Other than that the bulbs work fine. The video was very informative & helpful. Although you don't have to unplug everything raisin wise. You just need some slack to get the dash Bessel out of the way. Despite this minor inconvenience I'd definitely do business again with 1A.
Happy, but still searching!
March 21, 2023
Good bulbs, fit fine. Something to remember though, these are cluster illumination bulbs. There is another size bulb that fits engine warning light, battery light, air bag light, etc. I haven't been able to find these warning light bulbs. I may have to go find some at a wrecking yard or something.
1997 Ford Ranger Instrument Cluster Bulb Replacement
December 3, 2023
Bulbs work as expected (1 bulb did not work). For a full instrumentation cluster replacement you will need more than 5 bulbs.
December 3, 2023
Bulbs worked as advertised.
Ranger Cluster Bulb set
February 24, 2024
It is a great set!
My only complaint is the cluster has 6 bulbs. Even in their youtube video you can see 6.
All 6 of mine were burned out so I had to buy a 2nd set just to get 1 bulb. So im 80$ deep in 6 bulbs.
Other than that, the bulbs themselves are fantastic, nice and bright, highly recommend.
Looks like New
September 8, 2024
All of the original instrument light bulbs on my 2003 Ford Ranger were smoked on the inside, and 2 of the 6 bulbs had burned out.
The replacements I purchased from A1 AUTO were a perfect fit, although there were only 5 bulbs. I was left with 1 shy of totally replacing all 6. I was able to reuse 1 of the original sockets, and was able to replace that smoked bulb with a new one. My instrument lights are now shining brightly, and look like new. I'm very pleased. Thank you A1 AUTO!
Customer Q&A
Dash lights for 2003 ranger xlt going dim rpm Gage???
July 10, 2018
10
Replacing bulbs solved all my dash light problems. Buy the cluster....replace them all. You won't regret it.
July 10, 2018
Gary G
10
I have a Ranger the dash lights were dim. So I replaced them with new ones and solved the problem
July 11, 2018
Fusco Upholstery & Auto F
10
Yes thats common. My mechanic changed them out. Its a bit tedious but a good mechanic like mine can do it in 30 minutes or less. I recommend the how to video that 1aauto has. Its a great tool
July 11, 2018
Ociel S
10
I had good luck changing my lamps, if you follow their videos they are extremely helpful. I think the cluster is short a lamp or so, make sure you have enough don't want to open it twice.
July 11, 2018
Timothy M
I have two different size lights in my 1997 Ford Expedition cluster what size are these ?
June 9, 2019
10
194
June 9, 2019
Andra M
WILL THESE BULBS FIT A 2002 MAZDA B4000?
March 5, 2021
10
Currently, we do not carry this part for your vehicle. We're always updating our inventory so please check back soon!
March 5, 2021
T I
Can I get them in blue or red?
August 23, 2021
10
At this time we are not offering these parts in other colors.
August 23, 2021
Emma F
10
These are OE fit bulbs for the vehicle and are incandescent lights that only emit the one color. If you want to change the color of the lights then you will have to find an aftermarket led replacement. You can't put an led in these housings either because they work off 12v power and led's typically run of 5v power supplies. You're best off finding an aftermarket LED solution.
August 24, 2021
Myles M
Mercury is a registered trademark of Ford Motor Company. 1A Auto is not affiliated with or sponsored by Mercury or Ford Motor Company.
See all trademarks.


