Brought to you by 1AAuto.com, your source for quality replacement parts and the best service on the Internet.
Hi, I'm Mike from 1A Auto. I hope this how-to video helps you out, and next time you need parts for your vehicle, think of 1AAuto.com. Thanks.
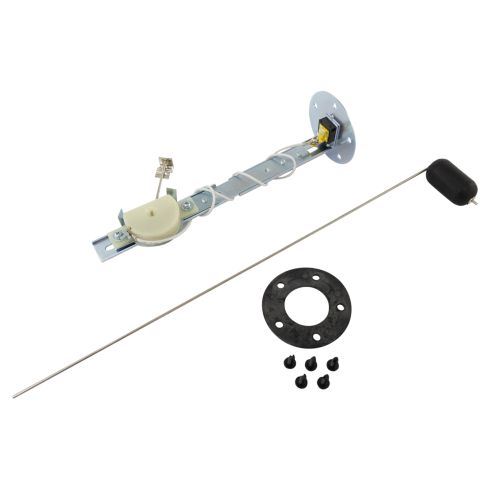
In this video, we're going to show you how to drop the tank and replace the fuel tank sending unit. This is a 1974 Pontiac Grandville. This process will be the same basically from '71 to '76 full-size Pontiacs, which include the Grandville, Bonneville, Catalina, Caprice, Delta 88, Buick, Centurion a bunch of different cars. It's also pretty much the same for most GM vehicles from the '50s and '60s up to the '70s.
Items you'll need, you'll need new sending unit from 1AAuto.com, jack and jack stands, 5/16s and 9/16 sockets with ratchets and extension (this could be different for your vehicle), flat blade screwdrivers, pair of pliers, a hammer and vacuum, flashlight, and a person to help you out is usually very helpful.
Start by disconnecting the lead on our Grandville. It's behind the trim panel and this is in the trunk right near where the trunk latches down. They're just a little brown wire. It has a black clip pry up on the tab and then pull the wire. Then push the wire down through the body. There's a little rubber plug and then the wire will push down through the body. You can see there's another clip underneath. Small flat blader screwdriver, pry open that clip. Pull the wire down.
Now you want to raise and support your vehicles. You want to put the jack stands in front of where the rear control arms connect, and you want to raise it up high enough that you can bring the tank down and out. Usually, you need about 6-inch, the wheels hanging down, and then 6 inches off the ground or so, which the car is about 18 to 2 feet up. Then underneath, you want to remove this 5/16s bolt which holds the ground strap. Didn't film doing that, but we did remove the ground strap and now we're going to disconnect the two lines. Some cars may only have two lines. Ours has air conditioning, so there are three lines. Just squeezed each clip and slide out of the way, then use your pliers, break the seal between the rubber hose and the metal line, and then pull off the line. Okay. Then I'll repeat that same thing for the other two.
You want to generally start with as little fuel in the tank as you can. If there is fuel in the tank, take the largest line, which is your main line, and use something to create a vacuum and get the fuel flowing. If you hold that line below the tank, then the fuel will just drain right into whatever vessel you might want to put in. You can see right here, I just drained it into a 5 gallon tank. You can pretty much go until it stops. If you have your vehicle up on the jack and jack stands, take your jack and just lightly support the tank.
Then two 9/16s bolt hold the straps in at the front, then we'll remove those. With the straps removed, you can let your jack down slowly. Actually, this is a lot easier with the vehicle closer to the ground because you're just using it for jack. You just pull it down. The tank is light because I've taken the fuel out of it, so I'll just have our helper take the jack out away and then we both lower it right down.
Use a wire brush and vacuum and just vacuum of any of the dirt and debris that's around the sending unit area of the tank. We'll fast-forward as I do that. Now use a hammer and a large screwdriver, and you want to force the ring counterclockwise. There are three tabs on it. Just use your screwdriver and our ring actually comes off fairly easily. Four set retainer ring counterclockwise and then the sending unit comes up and out.
Remove the rubber O-ring, and then you want to inspect the inside of the tank. Ours is pretty clean. It's a midwestern vehicle. If there's a lot of debris or rust and scale that you can see in the tank, you want to replace your tank.
At 1A Auto, we do sell a complete line of fuel tanks for a variety of different vehicles. Replace the rubber O-ring and the new O-ring that comes with the sending unit.
Now put the sending unit down on. Just make sure it fits correctly. There are three tabs that help to locate in place. This one with the lines on, it's pretty easy to locate. Put the retainer ring in around the lines, as well as make sure that the ground strap pulls through. Then make sure the ring goes in correctly. You have to push down on the ring and start turning it clockwise. Make sure all three tabs are going underneath the tank retaining ring. Then you can use your hammer and screwdriver to start evenly twisting the ring to the clockwise position or the clockwise motion. Then you can see I'm not hitting it hard. I'm just tapping it and switching between the three different positions evenly. You want to make sure that these bumps go into those impressions in the tank retainer ring. Keep driving it all the way until they are there.
Transfer the rubber lines. If you have older rubber lines, you want to make sure that they are rated for the newer fuel. The ethanol and other things in fuel can eat away all the rubber lines. The lines on this vehicle replaced within the last couple of years, so they'll still work fine. We're just switching them from the old unit to the new one. Again, it's just squeezing those clamps, then pulling them off. Some vehicles may have clamps that have been replaced. You may have to use a screwdriver or a socket and ratchet, but then just place all three of the hoses on and reset the hose clamps.
Okay, I'm just going to route the route the ground wire underneath and then use a couple of wire ties. There's a little lip on the retainer ring of the tank, and I just want to make sure that that ground wire doesn't rub against the lip of the tank. I just wire tie it to the line there and keep it out of the way. It just helps to make sure that it routes correctly and doesn't get chiefed. Then just put your line, which I think I forgot to show taking that off the old one, but you do remove the line that just pulls off of the old one, and make sure you push it back onto the new one. Then fast-forward here, as I just used the vacuum again and a screwdriver, clean off the top of tank. I used the screwdriver to just scrape out of the weld and loosen up the dirt and then vacuum it out.
Okay. Raise the tank back up into place. Make sure that the harness or the wire for the sending unit goes towards the back, and then have your helper get a jack up underneath the tank to hold into place. Before you get the tank all into place, make sure that the sending unit wire pulls through and push it up into the body. Then make sure you pull it through, so it runs between the tank and the body, and make sure it pushes up all the way through. Set that plug and then you can raise the jack up. Get the tank fairly tight to the body. Make sure it's lined up correctly, especially working on an older car. You can just line up the dirt marks on the tank with the dirt marks on the body.
Start your 9/16s bolts on. You may have to push up on them and turn them at the same time. See, they go right up in. We are using an air ratchet, that's okay. You can use just a regular socket and ratchet. I always tighten up the final amount with hand tools just to make sure that you don't break a bolt or overtighten anything. When you tighten them up, you want to tight them up nice and firm. Probably 45 to 50 foot-pounds. Then we'll keep the fast-forward going here as we route the hoses through the clamp. It's on the body, and then connect them and set the clamps.
Again, always replace the hoses with new hoses that will work with the new gas. Here, I'm going to reconnect the ground strap, but, before I do that, unfortunately, you can't see it very well, but I'm using a wire brush. Just wire brushing a spot to bare metal on the body, so that the ground strap gets a good connection and then use that 5/16s bolt and tighten it up. Reconnect the sending unit wire and make sure that the rubber plug is pulled all the way up through. Then you can see we turn the key on. It used to read full all the time, but now it's correctly reading very low fuel.
Thanks for tuning in. We hope this video helped you out. Next time you need parts for your car, please visit 1AAuto.com. Also check out our other helpful how-to and diagnosis videos.