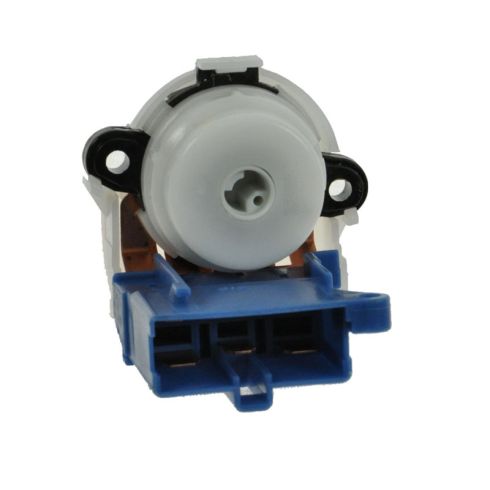
1AZIS00012-Honda Accord Prelude Acura CL TL Ignition Switch TRQ SWA41728

Replaces
Honda Accord Prelude Acura CL TL Ignition Switch TRQ SWA41728

Frequently bought together
Product Reviews
Loading reviews
5.00/ 5.0
12
12 reviews
Great
July 18, 2017
Great service, price and delivery Great service, price and delivery Great service, price and delivery Great service, price and delivery!
Fits 1998 Honda Prelude type SH
December 7, 2017
It fits my Honda Prelude PERFECTLY!
I was having issues with the car stalling on startup, and stalling without warning while I was driving. This was due to the electrical contacts being worn out on the original ignition switch, thus causing the electrical current to cut out and, subsequently stalling my car without warning... While I'm driving, on the throttle, just cruising. Very dangerous if it happened while I was turning out into a gap in traffic.
I called Honda, we ran my VIN and they said that the ignition switch had been replaced already... hah, bullsh*t. Well, maybe the one they replaced it with wore out.
For a total cost after shipping and taxes of $50 CAD, I took things into my own hands. It was worth every cent.
Don't be afraid of installing this people, it's dead easy. I know nothing about cars and I still did it.
Just make sure you have an L-shaped Phillips screwdriver on hand or something of the sort if your car is a Prelude -- I had one HELL of a screw to deal with.
Awesome!!!!
January 12, 2018
Perfect direct fit ,high quality part, very fast shipping, very Best priced....
fit like the old part
March 22, 2018
shipping was fast and part fit just like the old one. Replacement video was a little off. In video it shows a 99 model. Mine was a 97 model and did not have the bolts on top of steering column. Had to break old part to get it out and remove cover on new part to get it to fit back in.
Excellent Ignition Switch
August 16, 2018
Delivery was prompt, installation a breeze (thanks to the "how to" video).
December 29, 2019
Exactly what it was supposed to be. Perfect fit perfect size perfect timing it even came in a few days early I would definitely recommend that part and definitely 1A Auto
Amazing
January 6, 2021
My idiot previous owner installed two shear bolts on the too of my steering column... so i had to remove switch from the side. Took strength long nose pliers and the grace of god to get the new switch in there but i did. And it runs PERFECT I LOVE IT . LOVE 1aauto
1aauto
May 8, 2021
Easy to find on website, walked me through choosing the part, paying for the part, and delivery if the part, can't ask for anymore then that.
Exactly fit.
June 27, 2021
Switch was an exact fit and works well. It didn't solve the problem but that isn't the fault of the switch.
Review if ignition switch
September 10, 2021
Worked just like it's suppose to. Easy installation, and great price
Back on the road
January 1, 2023
Fit and worked perfectly
fits type sh prelude
February 6, 2023
fit great, works great
Customer Q&A
My 96 accord dosent have the 8mm head on the screws hoe do I take them off?
March 5, 2017
10
If there are no screws holding this piece on, we would ask if there is a separate screw, or rivet. This will be required to remove the switch from your vehicle.
March 7, 2017
Alex P
My car starts but when I let go of the key my car dies but will stay running if I hold the key is this the part I need?
March 9, 2019
10
Yes that's exactly what mines did I and I got the switch and that solved my problem of that.
March 9, 2019
Jessie S
10
Since there could be multiple reasons why youre experiencing this difficulty with your vehicle, I strongly recommend that you have a reputable mechanic inspect it. Theyll be able to troubleshoot the problem and tell you what part or parts youll need for the repair. This is definitely a good place to start however.
March 9, 2019
Curtis L
10
Yes, we had the same issue on a 1996 Honda Accord. Only ran in the "start" position (hard on the starter). This fixed it.
March 10, 2019
Max S
10
Potentiallysame problem as I had. My car would start and drive away.. then stall after hitting a bump. I found that if I manipulated the key while driving I could make it cut in and out. New switch fixed it.
March 13, 2019
Darius K
Were these made before or after the recall?
September 10, 2021
10
I am not sure of the recall but it was a 95 Honda wagon it ended up not being that switch but the key fob change your battery make sure you keep fob works it might not be the switch. The key fob when it doesnt work properly activates the antitheft system. You can turn the key but the car wont respond.
September 10, 2021
D U
If I get this will I need new keys or will I be able to use my old keys?
December 27, 2022
10
This attaches to the back of the ignition tumbler so your old keys still work.
December 27, 2022
Greg L
10
No, you can use your old keys. This is just the electrical switch component in the ignition.
December 27, 2022
T H
10
Old keys work
January 1, 2023
Darius K
Will I be able to use my old keys with this?
December 27, 2022
10
Is there a video?
December 29, 2022
Robert R
10
Yes
January 1, 2023
Darius K


