Hi, I'm Mike from 1A Auto. We've been selling auto parts for over 30 years.
Hi, everyone. Sue from 1A Auto. Today, on this 2011 Honda Pilot with a 3.5 liter we're going to do a timing belt with a water pump. If you need those parts or, any other parts for your car, click on the link below and head on over to 1AAuto.com.
Now, to access the timing belt and water pump, obviously, you go under the hood. It's located on the passenger side of the engine. I like to put the hood prop in this lowest little square right there. There's no arrow going to it, but I like to have as much visual and room I can. You'll notice that there's an engine cover. We're going to take that off. We also have to drain the coolant.
22 millimeter socket, and I'm going to break the lug nuts free. Then, I'll raise it up in the air and take the tire off. I'm going to use a two post. At home you can use jack and jack stands if you don't have a lift. I'm going to raise it, support it, and drain the coolant.
So, to drain the coolant, once you raise it up you can see that they have an access window right here. In this little cutout hole is where the pit cock is. So, it should hopefully, with any good luck, drain straight out and not hit the shield. So, to remove the access panel so I can get to the pit cock I'm going to take a small screwdriver, pull down on these tabs. There's two of them. Wow. So, they give you these little tabs so, I can go like this and let it hang down if I wanted to. Now, I've got a catch pan to catch my coolant. You can put your hands up--one hand up through that little window and turn the pit cock until the coolant comes out.
Now, I've lowered the vehicle and I have the catch basin directly below the train plug. I'm going to take the radiator cap off because it's going to allow the rest of the coolant to just flow straight out without any vacuum back pressure. Gives air to it so, now it'll just flow right out.
While the coolant is draining I'm going to take advantage of that. I'm going to remove the engine cover. A flat head screwdriver and there's two locations of little plastic tabs right here in the front. I'll turn that and you can lift up on it, and pull it right out.
Now, the next step I'm going to do is take off the negative battery cable. That's a 10 millimeter socket. I would strongly recommend whenever doing timing belts you disconnect the negative because you don't want anything, when you're doing internal engine, any accidents to happen. I like to tuck it down away. Make sure that it's not any chance of touching that negative cable post on the battery.
I've taken the tires off so that I can lower this so I can work on it a lot easier, but you do need to take the passenger side front tire off at minimal so that you can access inside the fender well here. So, now I'm going to start taking away the shard fender well skirt internal wall. Let's see if we can access that this way. Yep. So, I think I have to take this one off of the corner. The other two--this bolt broke and that clip is spinning. All right, perfect. Let's see if we can get this out of here. Well, looks like I've got a Phillips, another Phillips in here. I might just fold it out of the way this way.
I'm going to remove the drive belt, and the way to do that is see this self cut out nut? It's like a nut that's welded. It's part of that cert belt tensioner. Then, you have the shock underneath it. So you're going to decompress that shock. It's a 19 millimeter socket. Then I'm going to pull down on that shock, and decompress it. That will take the tension off that drive belt. You can see it slowly. It's a hydraulic shock, so it's just going to go nice and slow until I get to a point where I can slide the belt off. There you go. I can bring that back. Now, I can remove the drive belt the rest of the way. Get it from the top.
Removing the cert belt tensioner, there's two mounting bolts. There's one on the bottom right here, that's a 12 millimeter socket. There's one in the center, the main bolt. That is a 17 millimeter socket. I'm going to loosen and remove the lower one first. That's on the bottom part of that shock, that hydraulic shock. You can see how it pivots on that main bolt. Now, I'm going to take a 17 millimeter socket and I'm going to remove the little mounting bolt. There we go. You can take the whole assembly out through the bottom here. There is your cert belt tensioner assembly.
To remove the power steering pump, there's two mounting bolts: there's one here, and then there's one directly down underneath the pulley. They're both 12 millimeter socket. The top one is pretty easy to get to. I'm just going to break that off. The bottom one, I'm going to use a one inch extension with my deep socket. Then you can see it from the top here. You can line it right up, break it free. Now, with them all both loosened, I'm just going to put the socket on it and take them off by hand. Let's see if we can get in here this way. Now, that bolt is ready to come out. Note that the top, the two bolts, are the same size. So, we don't have to mark it. Now, I can pull this pump and over here, and out of the way.
I'm going to remove the reservoir under the plate here. Pushing back on this middle tab--take a screwdriver and push that tab back. There we go. Now, let's see if we can flex this out of the way. Whenever you remove the coolant reservoir overflow tank, and I'm going to have access to this cam to take the timing belt off. So I've got to access this cover. That's the whole point of taking the power steering pump out of the way. I don't want to take hoses off unnecessarily. So, I really want to get this up and out of the way just so I can access that front cam. It doesn't seem like this Honda wants to let me. Oh, let's do that, see if we can put it right back in its place. There we go. So, undoing that gave me flex to get the pump up here, and now I can set that back down there.
Next thing I'm going to do is I'm going to take this little clip right here, and push on it, and pull this harness up off the mounting break, just because I want this to be able to flex right up in here so I can take that cover off. So, with a 10 millimeter socket, I'm going to remove the top cam covers on the front and the back. So, now you can see all the four mounting bolts for this top front cam cover. 10 millimeter socket, I've just moved on to quarter inch size so I can work smoother. I've got a tray I'm going to catch and hold all these bolts in.
If you need to, on this front one, you might need to loosen up the harness if you can't get to it. It's just another 10 millimeter socket size nut or bolt. Then, the last backside. Now, we can pull this cover up. Just got a rubber seal in the backside. So, it sticks a little bit. No, they've got one inside there. One more on the inside. Now, we're ready to remove the cover. There we go. You'll see the little seal, how it sticks. So, it feels like it won't come off of the car, but you just got to force it a little bit once all the bolts are out, and that seal will come undone. Just place it back in place like that.
Now, what I do is I like to place the bolts that go with the cover. Now, I can set that aside. Now, I'm going to move to the back cam cover, and remove these bolts. I just want to break them all free before I move on to my small quarter inch ratchet. We're also going to take the harness that has that mounting space on the top of it. I'm going to take that right out of there before we take the last couple bolts out. What I'm talking about is this harness right here, how it just pops in there. We're going to take that out. Before I do that last bolt I'm going to take this harness completely out. All right, so that's out of the cover now. I'm just going to take the last bolt out. Now, with all those bolts out I can remove the cover.
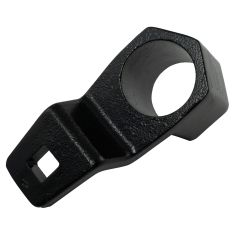
Now, with this tool that 1A sells online it's for Hondas with this hexagon space on the harmonic balancer. What it does is it holds that harmonic balancer from spinning while you use an airgun to dismount the center bolt. So, the bolt is a 19 millimeter. The bolt won't come out of the harmonic balancer into the crank because this is still the original bolt. It's never been taken out basically. The car has only 100,000 miles on. The manufacturer puts thread lock up on that bolt into that crank. Now, we used an airgun. We used the Honda socket to hold the harmonic balancer, and if you look at YouTube or online there's a lot of conditions. They do make a socket.
The other option is to heat it up. So I'm going to heat it up as if I was working at my house like you guys. I'm going to use a heat gun so I can limit the flame and, hopefully not heat up--you don't want to heat it too much. You just want it to heat enough to melt that thread lock on the threads. So, let's use a heat gun and see if it will work.
I'm just going to direct it right at that bolt. I don't want to heat up that seal because I'm not going to replace the oil seal unless it's leaking. You see I'm only at like a 70 degrees average. I'm going to heat that up. I'd like to get it to at least 100. Let's see where we're at. 102, let's give it a shot.
Well, the heat gun only got it up to 100 and that wouldn't break the bolt free. So I'm going to move on down to map gas. Something else you can get from the hardware store. 272 in like seconds. Let's see where we're at. Nope. And, you can see with map gas, because the flame is so out of control, it started heating up the timing cover. So you got to pay attention and make sure you direct that in a different angle. I'm going to do it one more time.
Okay. So, I have got this amazing large pry bar or wrench. It's for a truck. Weighs about 20 pounds and it's ... well, probably what? Three feet tall. I'm going to hold the harmonic balancer, and now that it's heated up try to get this in here. I have to use the body to hold this. It's a lot. I'm going to be doing a lot of pressure on this. There's no way I'm going to be able to hold both of them. There we go. Let's bottom that out on the actual car.
Okay, I've got to get this piece out of here. Unbelievable. I don't even see any tape on there, or thread locker. Hmm. I'm going to take the pulley off now. It's a little warm, so if you had to heat yours up pay attention to that. I want to make sure I didn't do any damage with the heat. The rubber still looks in good shape. That's just paint peeling.
Now that we have the harmonic balancer out of the way, we're going to remove the lower timing belt cover. There's six bolts holding them in and it's a 10 millimeter socket. The furthest one up on this left side is over here. There's one, and then the one on the front is right behind the alternator. Then you have two in the middle of the cover. Then one half way down the front, and then two on the bottom. There you go. I'm just going to grab it from the bottom here. Walk it right out.
Now, I'm going to take this little shield off that's on the bottom crank pulley and set that aside. Now I can re-put the crank bolt in because I have to turn this to line up the timing locks so the cams line up and the crank lines up. Now, I know that when I was taking it apart I had to reverse and go left a little bit. Try to do that at a minimal, if not ever. Don't ever want to reverse the timing belt and turn it counterclockwise. In this case, I had to keep lining the harmonic balancer up, but now, from here on out, you're always going to turn that clockwise. You can do valve damage every time you turn that counterclockwise. It can release the pressure and skip a tooth. Then, you'll do valve damage.
19 millimeter socket, and then we're going to see the mark is right here. You can see that Honda puts an arrow right there. You can see it from that angle. So, I'm going to line this up with that. Then, look at my cams on the top, and hope the loops all line up. If not, then I have to turn it an additional 360. How's it look? So, I was 360 off on the compression stroke. So, we're going to turn this around now. Line that dart, that arrow, again. Then, the cams should be lined up properly. This is a must do before you take that tensioner off. If you've never done a timing belt before, just take it slow, and do it right. You can end up with internal damage, which is not the goal. The goal is to save money and, to do it correctly. Okay, right there.
Now, I'm going to lower it and check my marks on the cam sprocket, and they should be lined up. So, this is the back cam, located on the firewall. You can see the mark, and you can see it lined up. That's where you want to be on that. Then the front cam has the same marking. As you can see, the painted mark, and it's lined up on the cover.
Now we're going to lower the vehicle, and next step is to take the engine mount off. So, you have to take that off, but you have to support the engine over here. The only thing really supporting this engine is an aluminum oil pan. So, we're going to put the floor jack right here on the curve of it. Not the center, we want it on the curve. That's stronger right there, and I have a piece of wood on the actual jack.
Now, with the engine supported by the jack with a piece of wood on it, I'm going to loosen up these two mount bolts. It's a 14 millimeter socket. We're going to need to take this little bolt out too. It's going to be a 10 millimeter socket. We're going to take that out. You can feel that there's a little bit of pressure on the engine still. And, where this is all aluminum I'd rather lift up the engine than have pressure be on that bolt where it goes through the housing bracket. When I remove these two bolts I'm going to take that little small bolt out.
Now we're going to remove that aluminum piece that holds the nose of the engine to the engine mount. There's bolts underneath that we have to get to. So, I can already see one right here. And, there's one on the side I can feel. So, now I'm going to lower the engine so that I can get it through the fender well.
So now we have three mounting bolts. One here and there's one inside this crevice. You can feel it with your finger, and then one up there. They're 14 millimeter sockets. So, I'm just going to use a little shallow socket, three inch drive. And the last one is that one in that crevice. I can not get my ratchet in there, and socket. So, I'm going to put the socket in first. It sits flush. Now I might be able to get the ratchet in there. The problem is breaking it free and getting it back out. I think I'm going to use a breaker bar. I had to use a breaker bar, three eighths drive. Break it free. I switched it over to quarter inch drive so I can work a little faster, and it's got more room in there. Now, on these three bolts I'm definitely going to match them up for length, and make sure they go back in the right spot.
So this is the top left bolt. See the length difference? So, I'm going to just place them down in the design that I took them out. Bottom, top left, and now the top right. They don't make this one easy. So that one that's in that inverted part of that bracket I have to use a three quarter deep. Shallow is too shallow, and the deep socket is too deep. So, I've got this in there but, now I'm backing the bolt out and I can see that it feels like it's not much room before it hits the firewall. I don't want to leave myself with a socket stuck in there. You can't put your fingers on the head of the bolt to turn it. I'm going to move to a shallow socket now. Okay, now it's out. I think we're going to have to take the bolt out with that bracket. There we go. There we go. Okay, so this is the bracket, this is the top piece that the two bolts on the top mount in, in that little plastic blot for the plastic cover.
So, we have two of the same bolts on the length on the top. So, I'll just put them together like they come out. As you can see, for some reason, the bottom bolt has thread lock on it. So, I'm going to end up cleaning that up and reapplying some. So it tells me it goes through the water pump, so that's why it probably has that on there, additional tightening.
So, now that we have the timing belt exposed and you can see all the components, you've got your two cams on the top, sprockets, you've got your water pump pulling the center. You have the timing belt tensioner pulley, pulley and then the crank. So, this is the timing belt tensioner right here. So, the idea is to compress this hydraulic piston and by doing that, Honda has this beautiful little eyelet right here. It's a bolt hole that is a six by 1.0 thread count. So, I'm going to get a long bolt that I know will fit in there. I'm going to put pressure on this tensioner, and it's going to push that piston down, hydraulic piston down, back into the hydraulic holder. Then, I can put a pin in. Then, I can safely remove the timing belt. If you just undo these bolts, it's aluminum, you have a chance of stripping it. Then, the tension on this belt just snaps down. One of the cams could actually move, and that's not the goal here. The goal is to do this the best way for the car and, for yourself.
So, it's a 10 millimeter socket, and you just have to turn it slow because you're pushing down on that hydraulic piston. In this case, I don't have a pen, so I'm going to end up using a drill bit, just to hold that in so I can undo that, and dismount it. Now, I'm going to take the belt off because the pressure is off of the belt. You can see I can slide it off. And, you can see the bolt is bending do to the grade of that bolt. It's just a little cheesy six bolt. So, I'm going to take the belt off so then, I can unbolt the tensioner and there will be no snapping of the belt.
So, now the belt is off that tensioner. I'm going to loosen up the mounting bolts here, which are 10 millimeter socket. I'm going to take some of the pressure off that tension. Hope that this bolt will come out backwards and not break. Yeah, that's what I was trying to avoid, but at least I got all the tension off of it, I got a good portion of it.
Now, with the tensioner out, I can go ahead and take the timing belt off. Bring it around slowly, making sure I don't put any tension on those cams. I don't want them to turn on me. I'm going to take this plate off. It's just a little 10 millimeter socket. The stud will stay in on the block, just remove the two nuts, and you can take the guide plate right out of the way. It helps put pressure on the belt. It also helps with instillation.
So, you can see that the beautiful cheap metal that we use for this bolt is bent. It couldn't take the pressure, so basically I'm going to take out my Whizzer and I'm just going to cut it flush here so I can back it out the rest of the way without any damage to ear on that block.
Now, I'm going to take the timing belt tensioner pulley part off. It's 14 millimeter socket. Now, I can get to all the water pump bolts clearer. And, see what I'm doing a little bit easier. That's right where it bends, so I'm going to bring it back through, cut it more where it's straight so it will come right out. Yeah, that should be a lot easier.
Wow, that was a lot of fun. It's a great idea. Great concept. I strongly recommend a stronger grade metal for a bolt if you're going to do it. Preferably steel and not probably white metal. So, now I'm going to remove this idler pulley. It's a 10 millimeter socket.
Now, we're at the point where the belt is off. The tension is off. The tensioner pulley, and the idler pulley is off. We have a great, clear view of everything, and it's dry. So, this is where I would say examine your seals. So, you can look at your cam seals, make sure they're dry because if not this is the time you need to change them. And, the crank seal, especially where if you used heat like I did to loosen this up, you want to check that out. Now, I don't want to take that pulley all the way off because then, that involves me snapping that bolt free and, I'm going to turn that. It wouldn't be damaging but, it wouldn't--I just don't need to do it. So, I can actually see the seal with a flashlight. I can bring it in here and see that it is beautifully dry. It doesn't have any burn marks. It doesn't look like I manipulated at all with the heat that I used. We used it more direct on the bolt and internal on the threads. So, I'm not going to change any seals, but what I am going to change is the water pump.
And, you might say well, it's not leaking. I'm not going to change my water pump. Well, the timing belt puts pressure on the pulley of the pump where it drives it. That has constant pressure on it from that timing belt. If the bearings in there are starting to wear, which you're not going to know if you don't have any play, but there could be a flat spot on one. You're not going to be aware of it. That water pump pulley lets go when you put the new belt on in a month, two months, a week, doesn't matter. You could end up with engine damage. With doing the job all over again. So, that's why they sell it in a kit. 1A Auto sells the kit with the timing belt, water pump, idler pulley, tensioner and timing belt tensioner. So, I would recommend getting the kit, and doing the job correctly.
So now I'm going to remove the water pump. There is five mounting bolts on it. Once the tensioner and idler is out of the way it's a 10 millimeter socket. I'm just going to loosen them all up, snap them all free. I'll probably be able to do it with my fingers after, or my hands. The strength of my hands. It's just because the ratchet and everything is so big in here. There's no need. You can break them free. So, make sure you have a catch pan, even though we drained the radiator. There's always going to be residual, that's a word, coming out. Once again, I'm going to examine each bolt for the length, and make sure that there's not one that is in a special order or a special place. So, I know those two are the same length. Then, I will examine the back ones when I take those out. Now, I'm standing here and I'm taking these bolts out slowly. I'm examining the water pump. I'm looking at it. I can actually see it's really small, but I can see residual right here of coolant. It's not enough that you would maybe notice it, but the trained eye, I can see residual. So, that tells me that inner seal is wearing out. So, it's just seeping out.
Some manufacturers, Honda being one, Toyota being another, and some Chevy's actually, they tell you that the water pump is allowed to have residual. Either way, this water pump is being changed. So, pay attention for that too, to convince yourself if you want to come up with that one. Cool, all bolts the same. No worries there. So, now I'm just going to take a little screwdriver, flathead screwdriver, and I'm going to pry this water pump away from the block.
So, there's a guide pin on the bottom here, and up in that upper corner there. So, I'm just going to work my way around and, try to, without damaging the surface, just wiggle it. There we go. Pull that water pump right out.
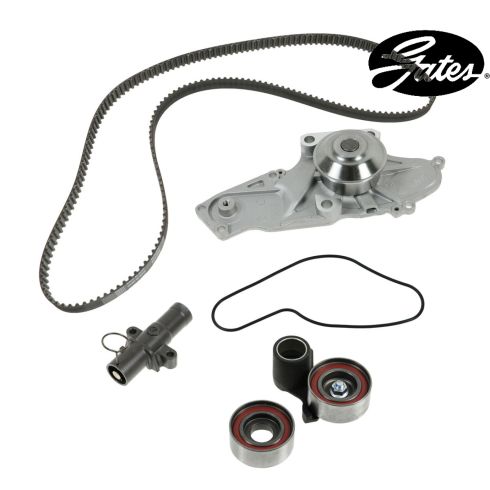
Here, we have the new kit from 1A Auto for our 3.5 Honda engine, 2011. Here is the original parts that came out. That's the original timing belt, water pump, tensioner, idler and tensioner pulley. As you can see, the water pump is set up exactly the same. It's got the mounting for the tensioner. It's got the drain. If you spin it around it comes with the two guided pins where it mounts into the block. Comes with a new O ring gasket. The new hydraulic tensioner, comes with a pin. So, you pull it out once you've mounted it. You do have to transfer over the bolts. That's very normal. New idler, new bearings, steel bearings. You'll have to transfer over the bolt. As you can see the staging is exactly the same. And then, the tensioner idler pulley. Same size, same sealed bearing, same mount. Just transfer over the bushing, pushes out. Goes in the back. And then the bearing.
They also supply you with a shim, there's a technical service bolt in on the idler pulley, and you have to see if your vin number is in guide to mount that. It comes with a sticker you can place on your engine for your intervals of timing belt. If you need this part or any other part for your car, click on the link below and head on over to 1AAuto.com.
So, now I'm in the process of cleaning the threads on the timing belt idler bolt. You can use a hand wire brush or a wire wheel if that's what you have.
Before I install the water pump I'm going to extract any coolant I can out of the side jacket here. I'm going to use the fluid extractor that we sell here at 1A Auto. Only reason I'm doing this is because I don't want coolant seeping out between the new gasket and the surface. I would like to make sure that it is as drained as much as possible because it is a rubber gasket, it's not paper. It's just precautions that I like to take. So, now I know no cooling is going to be hitting the new surface. And we're going to clean up that surface. We're going to take a little sand paper, very fine grit. I'll use my sanding block. I just want to make sure I've got a nice, clean, smooth surface that that rubber gasket is going to hit.
I'll just wipe that off, right down. We can take the new water pump that has the two guide pins on it, one there and there. Make sure the gasket is seated flush down in the groove. There's a couple little dimples that will hold that rubber gasket in.
Now, we can replace the five bolts. There was no distinct different sizes. They're all the same. The torque specs for this water pump is 8.9 foot pounds. That's not a lot so, it's because it's just a rubber O ring. You just need to mount it. Nice, flush, equal torques all the way around. Okay, I'm going to take a 10 millimeter on a quarter inch ratchet. I'm just going to snug them. I'm going to go from the center out.
Get my torque wrench and I'm going to set it to 8.9. I'm going to go in the same sequence. I'm going to go from the closest one in and work my way around. The last one. Going to give it a quick check.
Now that we've cleaned up the bolt of the old thread lock, I'm going to apply a new layer of thread lock. Then, I'm going to install this tensioner. There's a guide pulley. I like to mesh it into the threads. Make sure I get it all in there. This one is located right here. It's a 14 millimeter socket. It's a fairly good sized bolt, so it has a torque specs of 33 foot-pounds. When using a thread lock on the threads you want to apply it and install it and torque it before. You can't let it set. So, I'm set for 33 foot-pounds. There we go.
So, here we have the new timing belt tensioner idler pulley. Got to use the old bolt, and make sure you grab this bushing out of the old tensioner. It gets installed through the back, and then the bolt goes on. So, we can line this up right now. There's a cut out on the water pump that that sits right in. Like that, and you put the bolt in. So, here's the cut out. So, the bolt can start by hand. That is supposed to free flow pivot. That's what you want. The torque on that bolt is 18 foot-pounds. That is a 14 millimeter socket.
Now I'm going to install the hydraulic tensioner. You have to reuse the old bolts, so make sure you pull them out of the old tensioner, the hydraulic tensioner. I'm going to guide that up and, line those two bolt holes up, and start them by hand. These are just small six millimeter sized bolts. The torque spec is 8.9. Same as your water pump. It's a 10 millimeter socket, and just put that on.
Now, I'm going to clean it, and take a little parts cleaner now that all the thread bolts, bolt holes and threads are clear. I don't want any debris going in them. This way I can clean up the actual antifreeze that sat on the lower crank here. I don't want that hitting the belt. I want that clean. And, if I think there's any antifreeze in there I'm going to clean that out too. This will air dry and it should be all set. Antifreeze has got like an oil base, petroleum base to it, and you don't want your timing belt getting coated with that.
Before I install the belt, the new timing belt, I'm just confirming that my marks are good on both cams. Nothing has moved, because I'm down below here. This is the angle that I'm going to be at to install the timing belt. All the lines are still lined up, and the crank. So, now we're going to go ahead and install the belt.
Now, Honda has this marked as how you install it first. So, we're going to go counterclockwise starting at the base crank. So, this pulley, the crank pulley, and then around the idler pulley, then up through the right side cam, down below the water pump, over the left side cam, and down around the timing tensioner pulley. Then we can release the pin in that sequence.
So, once I get it on the bottom here I'm going to grab my timing belt guide that belongs on the bottom crank. That's that 10 shield. I'm going to put that on. That's going to stop that from falling off. Those are the two nuts that go right on there with a 10 millimeter socket. I'm just going to hand tighten them right now. I can tighten them up later. It's just reassuring me that this belt, if I let go or if it slips, it shouldn't come off the bottom. So, you want to keep tension on this. You want it to be taut as you bring it up and around.
You don't want this. See how sloppy this is? That's not what you want. You want that to be a lot tighter than that. There we go. So I've got the belt on the back pulley now. What I did was I lowered the vehicle and came back up on the top. See this guide right here? From down below I could not manage to put the belt underneath that. So you might have to work from the bottom and the top at the same time. I fit the belt through that guide and it fell into the grooves. Then, I wrapped it around. There's another one of these on the bottom, but I had to push the belt in under it. Then, I could ... it lines right up, bring it right around, and slide it right over the tensioner pulley. So, what we want to feel right now is we want to feel tautness here and here, which we do. All on the front side of that timing belt you want it to be taut. We should have slack down on the bottom right here. That's where we want it. Let's one last time double check our marks. Make sure all the marks are lined up properly. So I can use a mirror here and I can see that's lined up perfectly. Right no the money. Maybe I can see it from down up here. Perfect.
So, now you can either raise the vehicle and pull the pin, or pull the pin from here. I'm going to option to pull the pin from here because that way, I can keep an eye on the tensioner, on the cam springs, at the same time. Just grabbed a pair of pliers, see if I can force this out a little bit easier. Well, that was a tough latch.
All right, I'm going to double check my alignment again because you can never be too safe with this. You don't ever want to start that and have that be off tooth. That's lined up. That's lined up, perfect. Okay. I'm going to raise the vehicle, check the crank, make sure that's lined up. Then, I can start installing the timing belt's cover.
So, now I'm just taking my 10 millimeter socket and I am snugging down on that bottom timing belt guide, on the lower crank. Just snugging it. Now, I've already checked my marks, everything this lined up perfect. Before I put the cover on it is a natural process to, it's a 19 millimeter socket, and you go clockwise. I'm going to turn this timing belt around two complete turns.
Got a little less than a quarter half a turn, almost a quarter turn left. I'll line everything up. If it looks good then, I'll put my covers on. Got my bottom crank lined up, and I'm going to check the two cam marks. Perfect. All right. Ready to put the covers on.
Okay, I'm going to install the mount bracket, leaving that one bolt in there. The one that has a sunk in, inverted front. That's really hard to get to. I'm going to install the other top line bolt. Now, that bottom bolt is one that had thread lock all over it. So, we're going to clean this thread lock, and apply some new stuff. I'm just going to start all these bolts, bring them in as far as I can by hand because it's not an easy spot to get to. I took a wire brush to that lower bolt. So, it goes through the water pump, and I cleaned off all the old thread lock on it. I applied some new stuff. I'm going to bring that in, put that bolt thread in. The torque on these three bolts with a 14 millimeter socket head is 33 foot pounds.
I can't get a head of our ratchet in there. So, I'm going to give it my best and tighten it. Not over tighten it. I can feel the difference. That is tight. Now, I can install the lower timing cover. Line up all those mounting bolt holes. Start with the center one first.
I bottom them out, and then just turn it because they have a sleeve on them. If you over tighten them they'll break because they stop. Soon as you feel them stop they're right there. The bolt shoulder. This is the last one, and then I'll just take my three eighths ratchet and make sure they're snug.
So, now I just have to break this, the crank bolt, free again so I can put the harmonic balancer on. So, I'm going to do just a quick reverse. And, if you notice, the crank didn't move at all because that was only on hand tight. So, this was the step that I've seen people forget when they take them apart. Don't forget to put in that. It's a little spacer guide. We take our harmonic balancer, line it up with that pin. Now, we're going to install the crank bolt. I'm just going to install it by hand. Then, we'll look up the torque sequence. So, the torque spec on the crank bolt is 47 foot-pounds. So, they want me to torque that to 47 foot-pounds with the tool holding the crank pulley. So I've wedged that in there. Now, that's 47 foot-pounds.
Now, we have to turn it an additional 60 degrees. Luckily, I have a torque wrench that does degrees. So 60 degrees--let's mark this at 12:00, the bolt now that it is torqued to 47 foot-pounds is 12:00, and 60 degrees is probably between right about here. That's zero, over a quarter would be 90, and then straight down is 180. So, we want between zero and 90. That would be 60. So, it's about that size of a turn. So, if you have to mark your bolt and you can do it visually, you can do it visually. Obviously, don't mark the bolt in two places because it's going to turn. You would mark the housing on the back at 60, but I have a torque wrench with the degrees in it.
So, if I just want to redo this. So, the bolt, I lined up at noon and marked it. Now, right about this area I would mark this housing and turn that mark that I have at noon to that mark. I'm going to be using this. 52. I'm going to line the jack back up, and lift my engine up. There we go. I'm going to reinstall the little six millimeter bolt up on top here. That's a 10 millimeter socket.
So, now we have the timing covers on the top for the cams. A quick reference, if you place them down and you're like, ugh. The back cover has got that plastic guide for the harness. So, the right side cam, if you're looking at it from the front, it would be left side cam, and the closest to the firewall that has the guide for that harness. Make sure you bring that harness out to the front like that. It's going to want to fall in the back. You also have to make sure you get the cover down. There we go, inside this. See how that's got a lip on it? Make sure it goes down inside there. Okay. I'll grab my ratchet and tighten those down. Okay. Now, I can tuck that harness in. Don't want to forget. Going back here and get it over with. There we go. Okay, now I'm going to move to the front cover.
Pretty much the same basics. You want to make sure this guide is in, in this housing. Don't forget that we loosened up ... by we, I say me. Loosened up the housing there, so make sure you tighten down that wiring harness. Right there. I'm going to install the power steering pump now, before I put the mounting bolts back down. So, this was a pain.
You know what? I think if I lower the engine I'll have more through. Okay. Might as well just put these in by hand now. Torque on these is 33 foot-pounds also. That's a 14 millimeter. Going to torque that to 33 foot-pounds. Now, for the fun part, put the power steering back down in. Okay, we have two mounting bolts for the power steering pump. Then, one under the pulley, almost in the center of it. It's not the easiest thing to get to. Both these bolts are 12 millimeter socket. Power steering mounting bolts are 16 foot pounds. Okay, now the bottom one.
I'm going to install the new tensioner assembly. Going to guide it right up in there, and put that bolt right in the threaded hole. You can start it by hand. So, I'm going to guide. You put the lower bolt in now. That holds the bottom part of that shock, hydraulic shock in place. The bolt for the mounting on this is 17 millimeter socket. The torque specs for this tensioner bolt is 54 foot-pounds. And, to tighten this lower one it's a 12 millimeter socket, and that is 16 foot-pounds.
All right, so I'm going to install the belt from down below and finish it up on top. I'm going to guide the belt up through. Goes around the crank pulley first, then around the A/C. Okay, when you install a new tensioner with a hydraulic shock it's just like your shocks in your car. You need to what they call bleed them, and that's compress it three times. So, the belt isn't on yet up on top. So I'm going to put my 19 millimeter socket on that hex head, and I'm going to compress the shock slowly til I feel it bottom out. Then I'm going to let it retract. I'm going to do it again. I'm going to repeat this process for three times total. If you don't do this, just like with shocks, you have a ticket straight. Great chance of the hydraulics having air in it. So, you don't want your belt to fall off because the oils aren't compressed. When you do a shock on your vehicle, you don't want it to bang, and make a rattling noise. So, now we are all set there.
Now, I'm going to tighten up the drain plug on the radiator. Get a pair of pliers and just give that a little tweak. So, I've got the belt around the power steering, and it goes down around the pulley here, there. I've got to raise it back up because it fell off the crank, and I'm going to put it on down there with the tensioner. I'm going to remount my coolant tank, overflow tank, right here. I've got to go down below and put the belt on.
Okay, so now I'm going to put the undercover mudflap, thread these in. Got a bolt right here. Now, we're clear to install our negative batter cable. Let's place it down on that battery post all the way to the bottom. 10 millimeter socket. Snug that post up. Make sure it doesn't move, and we can pout our engine cover on. These rubber bushings, they come off. So, I like to install those first so that I can make sure it sits down flush. There we go. Guide the front ones up, the back will follow. Push down, and then you take a flathead screwdriver and tighten these down. Now, we're ready to add our coolant.
So, I use a vacuum pump, which basically it hooks up your shop air to the system, through this, and it pulls the vacuum on the coolant. So, it will hopefully suck any air bubbles out. Then, it sucks the fluid back in with limited air bubbles. You watch the gauge go as high as it goes til it stops.
So, I can reuse the old coolant. I tested it. It's still good, and if there's any leaves or any particles it won't pick it up because I have a screen, and I can just drop it right in there and then, pull on the valve. The vacuum from the engine, from me pulling it with the machine sucks the coolant back down in.
So, now we're going to use the funnel to run the system. That way, if there is any air pockets it won't make a mess and it'll just burp right up through there while it's running.
Now, I'm going to install the right front tire. So, now I'm going to torque the wheel to the manufacturers spec. It's 94 foot-pounds in the star pattern. Give it one check.
Now that the fluid is full I'm ready to put the cover on. It's right up to the top of the neck. Then, I'm going to fill the overflow, and because it's warm this is high max. I'm going to bring it just a little bit below max because the engine has been running for about 45 minutes. Just a little bit more. Now, we're ready to put the cap on, clean the engine down, go for a road test.
Thanks for watching. Visit us at 1AAuto.com for quality auto parts, fast and free shipping, and the best customer service in the industry.