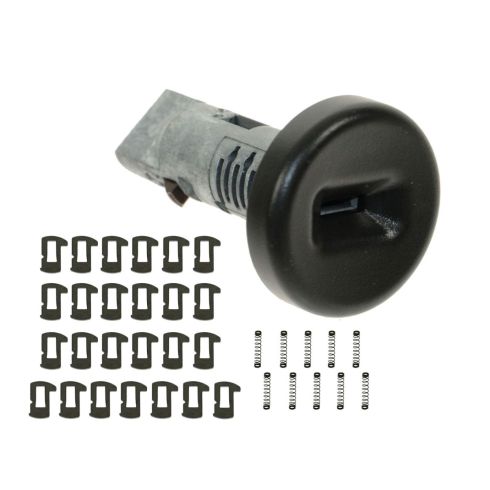
1AIMX00183-Ignition Lock Cylinder Dorman OE Solutions 924-716

Replaces
2013 Chevrolet Suburban 1500 Ignition Lock Cylinder Dorman OE Solutions 924-716

Frequently bought together
Product Reviews
Loading reviews
4.78/ 5.0
46
46 reviews
Great product
April 20, 2018
Very easy to install. Came with good instructions. My local dealer was going to charge me tons for this part. But this was very simple to do my self.
My key turns now!
July 30, 2018
My ignition cylinder switch wore out. I found many advertisements for replacement cylinders but 1A Auto had the goods to tumble the lock so I could continue to use the same key. The parts ordered and the installation video were perfect. Thanks 1A Auto!
Ignition lock cylinder
July 31, 2018
Wasn't confident I could rekey the cylinder
myself. Took it to locksmith for $25. Putting it in was a breeze. Quality products. A1 is my go to for parts.
key cylinder wont turn
October 9, 2018
The key cylinder in my 2008 Silverado was getting so bad I was afraid it would not turn on. I found a utube vid showing how to rebuild it so you can keep your original key and not have to go thru replacing door locks and spare tire lock. They recommended this place to get the stuff I needed. I got a new cylinder and all the tumblers to key it to my old original key. It was simple cheap and it works great. They send instructions with it. I highly recommend this. There is no programming the keys or anything. Follow the instructions and go.....great product and great company.
Satisfied
November 13, 2018
Came with instructions that was easy to follow. Delivery was fast.
Just what I needed!
November 15, 2018
My 2008 Silverado 2500HD was to the point that sometimes I could not get the key to get the key to turn the ignition switch. I had never replaced and ignition lock cylinder before so was a little reluctant to try. I was the video on 1A Auto and decided to give it a try. It was no problem at all. I would highly recommend this if are having a problem with your key not turning the ignition cylinder. Thanks 1A!!!
Ignition switch
March 6, 2019
Very pleased. Instructions were easy to follow. Part fit perfectly. Will use this company for buying more parts.
STILL WAITING FOR REPLACEMENT PART.
April 14, 2019
I bought this key cylinder for my pickup I am a mechanic by trade and followed the instructions to the T. but it did not work. 1A auto told me they would send a replacement. " I AM STILL WAITING FOR IT"
Perfect replacement ignition cylinder for 2007 GMC sierra
May 2, 2019
Worked perfectly. Instructions easy to follow, took about 20 minutes with double and triple checking everything. Truck starts great.
Great product!
July 5, 2019
I never knew this could be done. This product was super easy to replace. Thanks to the great video from 1A Auto. Works absolutely amazing.
August 18, 2019
This part works great easy to code would recommend to others with key switch problems . Works great with my key
Great Product
September 15, 2019
Instructions were super easy to follow! Saved at least $400 from the dealership
Great Product!!
October 9, 2019
Product looked identical to the OEM cylinder I pulled out. Using the available on line videos rekeying the new one to my current key was a breeze. Best of all it fired up when I turned the key!!! Price was very reasonable as well.
Excellent product and huge savings over dealer repair
November 15, 2019
The ignition key on my 2011 GMC Sierra was getting worse and refusing to turn without a lot of fiddling. If I had not watched the 1A Auto video I would never have been able to do this repair, which seems intimidating with the small parts on the key cylinder, but actually is simpler than it looks if you carefully follow the instructions step by step. No need to reprogram the truck since you are re-using the original key with a new lock cylinder and tumblers to match the old key. I cannot imagine what the GM dealer would charge for parts and labor for this job. Very pleased.
Easy Install
December 12, 2019
I had never replaced an ignition lock cylinder or re-coded tumblers before, yet it turned out to be extremely easy and took maybe 20 minutes total. I was so worried that I would mess up on the tumblers, but it was one of the easiest vehicle fixes ever. Don't let inexperience with tumblers keep you from buying. And don't forget to unhook the negative battery cable.
Exact fit. Problem solved.
April 2, 2020
I never replaced lock tumblers for a vehicle before.
I watched the how to remove key cylinder video tutorial on 1aauto.com. for my Chevy Silverado. It was spot on accurate.
I ordered a new cylinder and the instructions that came with it were easy to follow.
I must have saved at least $300 by doing it myself. There are other vendors that have this cylinder for less money.
I figured I helped pay for some of the labor costs that goes into making the help videos! Its all good! Thank you!
worked great!!
May 8, 2020
arrived right on time, easy to put together, great product fixed my ignition key turning problem!
Easy fix
July 18, 2020
Fixed the problem of key not turning at times on my 2008 Silverado.Very easy to do,probably took just over an hour total.
Worked great no problems
August 23, 2020
Worked great no problems
Easy Fix / Great Instructions
March 15, 2021
step by step video instructions were spot on and easy to follow. fixed my 2012 Chevy 2500 key not turning. Had to use a putty knife to push out the old tumbler keys. Did 1 tumbler at a time per the instructions, 0 issues. Completed in under an hour.
Lock cylinder
April 26, 2021
2007 lock cylinder was wearing out. This part was easy to replace and works perfectly at a good price.
Ignition lock cylinder
May 25, 2021
The part was and exact match .was very easy to install. Very happy with the product.
Excellent Product
June 13, 2021
I worked as a locksmith for 20 years and found this to be an excellent product for the replacement of the original cylinder. As long as your keys are in good condition, this will solve the problem of the lock not wanting to turn due to the original wafer tumblers wearing out. The video provides clear instructions for the replacement and rekeying process. Don't wait until one of the original wafers completely fails and jambs the lock, then you will have a real problem on your hands.
June 23, 2021
exact fit. old tumblers were worn. replaced in less than an hour.
July 10, 2021
Easy to follow instructions and added video to site. Great value.
Ingnition cylinder
July 10, 2021
I bought this ignition cylinder from 1A and will buy from them again. The videos on YouTube showing how to install make it a no brainer. I appreciate a company like this.
??
August 1, 2021
Worked perfect look identical to the oem cylinder Paper direction was good but the video showing steps for repair was spot on good price fast ship will buy from again.
August 9, 2021
Replaced lock cylinder on 2007 Silverado all went great . YouTube video was a big help. Next project is replacing headlights .Five stars.
Replaced worn out lock cylinder
September 5, 2021
Fixed my issue and installation was easy.
Works great and installation was easy
October 4, 2021
The new lock cylinder works great. The installation video was a big help and the cylinder was easy to install. I would definitely buy again.
Worked like a champ
October 17, 2021
I watch the video first and it worked like a champ. I do recommend a magnifying glass to read the numbers on the pins to keep them in order as You remove them from the old cylinder
Not impressed
November 2, 2021
What is not told to you beforehand is you must change out the tumblers exactly to match your existing ignition switch configuration.
All I Wanted was a new key and cylinder, as the keys get to short in length over time. There are two kinds of cylinders, one with bars to hold the tumblers in place, one without. I had a locksmith do it and make me two new keys, which added $120 to the cost of the repair. I was afraid I would pull the cylinder and tiny springs and tumblers would fall out. No way to know which design you have until it comes out.
Works as it should
January 14, 2022
Easy to install tumblers into cylinder and to install cylinder into vehicle thanks to your video. No need for new keys and nothing to reprogram. Took about half an hour for everything and started right up. Part itself is almost identical to original.
No more key switch sticking
March 10, 2022
Works great.
Five stars!
April 17, 2022
Everything went smoothly! Just take your time matching up the numbers and make sure the springs go in right!
Good product
November 21, 2022
Very good product quality is really good. I had the truck torn apart and put back together less than an hour after taking the key and changing the inner parts. and it works great no more sticking.
I have two trucks with the same problem. I will buy this product again to fix that one as well.
You wont be disappointed
February 27, 2023
Worked great. Very easy to follow steps! Only a one drink job!
Good quality part and an easy to follow how-to video
June 6, 2023
The YouTube video made this rather fiddly repair pretty simple. The replacement part works well.
Exact fit
September 23, 2023
As described. Watched a couple videos to see how to change the pins then it was pretty straightforward. Good quality parts. So far so good, no issues.
Worked great and no issues.
June 23, 2024
Was a bit intimidated at first but A1 provides a great video of how everything is set up along with good info of how to install the part.
Thumbs up to 1A Auto
July 8, 2024
One a auto helped out tremendously to change out key lock cylinder with videos and phone calls
Thank you a lot
Can't get any better.
July 9, 2024
I was skeptical, but more concerned about which style lock I had. 1A confirmed the non-chipped cylinder and I ordered.
So simple. Video was spot on and easy to understand. The worst part of the whole thing was getting the plastic fantastic column trim snapped back together. Mostly.
A job I had been dreading done in half an hour. And the parts and knowledge to do it over and advise others to do it. And use 1A. Great job 1A!
July 29, 2024
Everything went I just right but now when I ha e my door open and no key in ignition the truck dings like the key is in the ignition
Don't put too many keys on your ignition keyring
August 13, 2024
I made the same mistake nearly everyone makes with the ignition key. We hang the key and the key fob on a keyring along with every other house and lock key we own and let it dangle from the ignition switch as we drive. That is all fine and dandy and convenient for one stop shopping for your necessary keys, but it has consequences.
Driving 160,000 miles over oilfield service roads, long highway trips and along country and farm roads with the weight of the keys bouncing and swinging back and forth take their toll on the ignition switch lock and internal lock pins. I had to really giggle the ignition switch to get the truck started.
I watched the 1AAuto instructional video on replacing the ignition switch and programming the pins and felt confident enough to attempt it myself.
I ordered the new switch and got right to work replacing the old one when it arrived.
Everything went smoothly and exactly as shown in the video and I was finished in an hour and ten minutes. The new switch
Very easy to install this unit
August 25, 2024
Easy to install with instructions they provide!
Great item; buy this part now!!!
September 25, 2024
Awesome product! Watch the 1A Auto YouTube installation video for this part. It made removal of the old cylinder, and installation of the new cylinder a breeze. Quality product too, and even came with lubricant!
Customer Q&A
Where is the key? Does it come with this?
April 16, 2018
10
no key. You key it to your existing one. I got this and it worked great. easy to set pins. just use your existing one and match it up.
April 16, 2018
Dave P
10
It does not come with the key. It's just the mechanical part that is mounted inside the ignition switch. If you need a new key, you can probably talk to your local car dealership. if you still have the original key or any duplicate keys, they should still work in the new cylinder as it is specific to a particular, make, model and year.
April 16, 2018
Stevie B
10
No it doesn't come with a key. You have to set up the tumbler with the old one and use your original key.
April 16, 2018
M I
10
You use your old key. When you take the old lock cylinder out, you set up the new lock cylinder just like the old cylinder. That way your old key works.
April 16, 2018
JAMES H
Carjacked. Keys out there. Have tried to take again. If I get this and another cut key. Does that key need to be programmed in some way and how?
April 30, 2018
10
Hello! According to our specifications this product comes with a tumbler to program to the original key(s).
April 30, 2018
Peter L
What would cause my engine to try to start when SHUTTING OFF THE KEY???
November 27, 2018
10
There could be multiple reasons why you're having this particular problem. We suggest taking your vehicle to a nearby reputable shop to identify the cause. Once you know the cause, we'll be happy to see if we carry the parts and how-to videos needed for your repair.
November 27, 2018
Christa R
My key broke in half and my son lost the other half so is it still possible for myself diy dad to change it out and if so how do I do it ??? Thank you
July 7, 2020
10
Thanks for your inquiry. Written and video installation instructions are found on the product page under the "How-To & Tools" tab.
The video for this repair can be found here: https://youtu.be/3DKNx7im76s
We're constantly adding new installation video instructions. If we do not have one for your vehicle on the product listing page, please check again at a later time or check our Video Library to see similar repairs here: https://www.1aauto.com/videos
July 7, 2020
Curtis L
good morning !!!! I have a tahoe 07 with problems starting, when trying to turn it sticks I have to try several times, what is wrong? cylinder or Switch ignition??
November 24, 2020
10
There could be multiple reasons why you're having this particular problem. We suggest taking your vehicle to a nearby reputable shop to identify the cause. Once you know the cause, we'll be happy to see if we carry the parts and how-to videos needed for your repair.
November 24, 2020
Emma F
Does this new ignition lock cylinder require new matching keys?
June 15, 2021
10
You can use the existing set of keys or new ones, as this cylinder comes with tumblers that you can code in.
June 15, 2021
Adam G
10
No it does not require new keys, you will match the new cylinder to your old keys. It comes with instructions that are easy to follow, but it is a little bit tedious.
June 16, 2021
Phillip L
10
you use the original key , so no programming required.
June 23, 2021
RICHARD J
What if the current key will not turn at all, can you still release the ignition lock cylinder according to the video?
July 3, 2021
If the current key will not turn at all can you release the old ignition lock cylinder for removal according to the video?
July 4, 2021
10
I believe so, as the key in my truck did not turn at all either.
July 4, 2021
Phillip L
What do they mean by new body style ?
July 20, 2021
10
There was both a New Body style and a Classic Body style offered for the Chevy and GMC. This item is specific to models with the New Body Style depending on the year and model.
July 20, 2021
Jessica D
Can I just replace the key groves and springs or do I have to get the whole lock and cylinder?
May 31, 2022
10
If the cylinder isn't locked up just replacing the grooves works.
June 1, 2022
K E
10
Not sure if the new parts fit into the old cylinder. I used the whole kit and replaced everything. It was super easy to do and has worked flawlessly for the last two years.
June 1, 2022
Nicole M
10
Yes. And I used my old lock and cylinder .
June 1, 2022
James D
Chevrolet is a registered trademark of General Motors Company. 1A Auto is not affiliated with or sponsored by Chevrolet or General Motors Company.
See all trademarks.


