What's up, guys? I'm Andy from 1A Auto. In this video I'm going to show you how to replace the thermostat and housing on this 2015 Jeep Wrangler. If you need parts for your vehicle, click the link in the description and head over to 1aauto.com.
Take this cover off. Just grab underneath. Lift up. Slide it forward. I'm going to take a straight blade screwdriver and just loosen up these worm clamps: one right here and then one right here on the throttle body.
I'm going to take a 10mm socket and a ratchet and take these two bolts out. We'll just remove this hose right here. This is going to be loose. This connects it right here. Just slide it out right there. Then there's a connector right here, we want to disconnect the connector. Just slide this off.
I'm going to take the cap off the radiator. Then we want to drain the coolant. I'm going to raise the vehicle up. We're using a two post lift. If you're doing this at your house, you can use a jack and jack stands.
I'm going to pull this panel off. I'm just going to use this trim tool to take all these retainers out. There's two clips on the inside that all these brackets on that are similar to those ones, you just have to take those out as well. There we go, and you can just slide it down just like that.
At this point, we're going to get a drain bucket. We're going to open up the drain on the bottom of the radiator. It's right there, so we'll place a drain bucket underneath there and we can loosen this up right here.
Just going to use some needle nose pliers and twist this. There we go. It's starting to move, it's starting to drip, so that's good. There we go.
Okay, I want to take this hose clamp off. I'm going to use these hose clamp pliers. We sell these 1aauto.com. Let's line this up just like this, and I can squeeze it right here just like that. Now the clamp is loose. Now I can try to grab the hose and just twist it back and forth. If it's on there really tight, you can take a a pick and go around the hose and break this seal. Some of the coolant is going to come out of here when I do this. Try to put the bucket underneath it.
At this point, I'm just going to leave that tool attached. It's not in my way. Leave it to the side. I'm going to use a 10mm socket, an extension, and a ratchet. I'm going to take these two bolts out right here. There's one on the top, there's also one underneath. Once I pull those bolts out. I can just grab the thermostat housing and just slide it up. You want to look at the old housing and see if the seal is there. The seal stayed on the engine side, so grab that and peel it off.
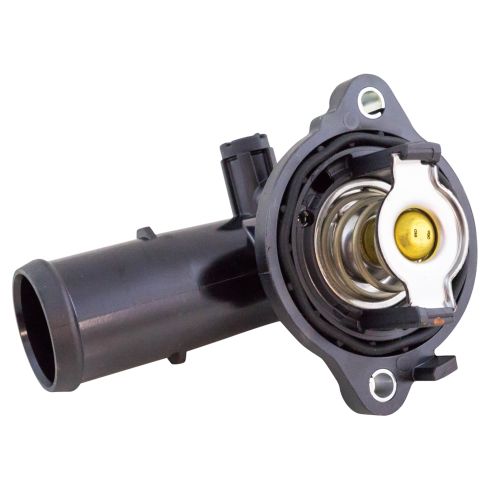
Here's the old thermostat housing. Here's the new thermostat and thermostat housing from 1aauto.com. As you can see, the shape is the same, it has the same mounting holes. The thermostat itself looks the same. Get yours at 1aauto.com and you can do it yourself.
All right. I want to clean up the surface a little bit. I'm just going to take a rag and some brake parts cleaner. If there's any debris from the seal, you're going to want to take a razor blade and scrape it off. Just make sure it's nice and smooth.
All right. I'm just going to use a little scuffed pad with some brake parts cleaner. Be careful with this--you don't want to scratch it up too much, but if you get a little area that's not coming clean too well or some corrosion, this will work pretty good. Okay. Just wipe it off with a rag one more time. Make sure it's nice and clean. Looks good. Bob's your uncle.
Now I'll take the housing with the bolts. Just line this up. I'll start the top bolt and the lower bolt. All right. With those bolts snugged down a little bit, I will take a torque wrench. I'm going to tighten these to 105 inch-pounds.
Now I'm going to install the hose. Just line it up, push it on, and get the hose clamp lined up. If the hose clamp seems weak or it's rusted really bad and you're going to want to replace it, you can replace it with a worm clamp. I'll just loosen the tool and pull it away. That's good. All right. Before we install the new coolant, you want to take and close this drain in the radiator, so get underneath there and close it up.
All right. Before I put this snorkel on, I want to add coolant, but I can access the bleeder. There's a bleeder actually on this thermostat housing right here. You can take a straight blade screwdriver, just loosen it up. Once you get it a little bit loose, you should be able to do it by hand. We'll loosen that up, and that's going to make bleeding the coolant system a little bit easier. The coolant is going to be able to go down into the radiator, and then come through the engine, and then back up through the bleeder.
All right. You're going to want to make sure you use the correct coolant for the vehicle. As I'm pulling this in, you can actually hear the air coming out of the bleeder. We want to add it once we start seeing coolant come out of there, then we can close it up. There we go. See some air bubbles are coming out. That's pretty good, so we'll close it up. Just take the screwdriver and just close it a little bit more, right about where it was. That's good.
All right. Now we want to put this snorkel on. Connect this temperature intake temperature sensor. We'll lock it in place. Slide it in position. The two bolts right here, just get those lined up. As long as these are on properly, then I'll tighten these two down. Just use a 10mm socket and a ratchet. Then we'll slide this hose in position. This goes over to the coolant reservoir.
I'm going to tighten up these two worm clamps. Just use a straight blade screwdriver and tighten them up. It's good. Now it's good. Take this engine cover, just slide it in position and push it down.
Now, we're going to reinstall this lower shield. Make sure you put the push pins on the back side where these go on in the back and then these four the front.
All right. With this all back together, I'm going to add some more coolant to this. Then I'm going to let the car run. I'm going to run it for about 10 minutes, constantly monitoring the coolant level, making that it's not overflowing and constantly monitoring the coolant temperature on the vehicle. You do not want it to overheat. Once that's all set, we can shut the vehicle down for a while, let it cool down, recheck the level, and then take it for a road test.
All right. Now I'm just going to start the car up. It's always a good idea to put the heat on, and put it on hot, and just constantly check it and make sure that you actually get heat. If you're not getting heat, there's probably not enough coolant in the system and just make sure you have enough coolant.
All right. We also want to check this upper radiator hose. Be careful when you go to touch it, it might be hot. Right now it's not too bad, so I know the thermostat hasn't opened yet. If the thermostat opens, it's going to be hot enough that you can hold onto it for too long, but right now it's still not hot. I'm starting to feel it a little bit, but not yet.
All right, so the thermostat opened up. This hose is nice and hot. You can't touch it for too long. We let it run for about another five minutes. At this point, I'm just going to shut it off. I'm going to leave the funnel on and it's going to suck the rest of this coolant in, and we'll just top it off a little bit more, and should be good to go.
All right, so now our engine has cooled down. The coolant has stabilized again. I can put this plug in this funnel. We actually sell this funnel 1aauto.com. Take this off. Make sure it's nice and full right there at the radiator. Then I can take the cap, install the cap. At this point, you're going to want to check the overflow tank and make sure the level is up where it needs to be. Ours looks good, so we're good to go.
Thanks for watching. Visit 1aauto.com, your place for DIY auto repairs, for great parts, great service, and more content.