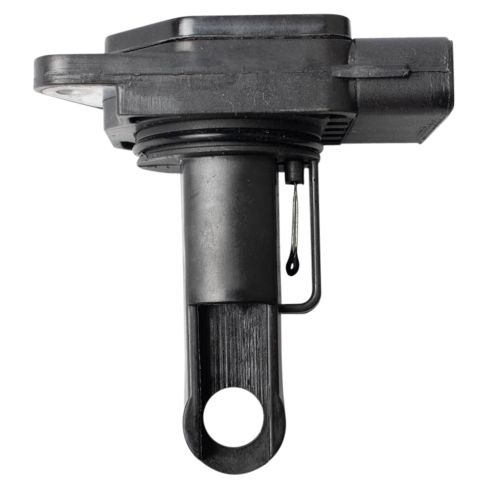
Complete Repair in One Purchase - Stop searching for parts individually and complete your repair with a customized kit or set from DIY Solutions.
High-Quality Parts from Trusted Brands - DIY Solutions' kits and sets are selected from the best automotive brands and include hard-to-find and even obsolete parts you may need for your vehicle.
Guaranteed Fit - DIY Solutions ensures its selected parts are quality-tested to guarantee fit and function.
Install Tip: You may be required to reset the vehicle computer after installation of this part.
Quality Tested - built to a strict level of product standards.
Item Condition:New
Attention California Customers:
WARNING: Cancer and Reproductive Harm - www.P65Warnings.ca.gov.
Lifetime Warranty
This item is backed by our limited lifetime warranty. In the event that this item should fail due to manufacturing defects during intended use, we will replace the part free of charge. This warranty covers the cost of the part only.
Returns: Parts with electrical components cannot be returned once installed.
FREE Shipping is standard on Orders shipped to the lower 48 States (Contiguous United States). Standard shipping charges apply to Hawaii, Alaska and US Territories. Shipping is not available to Canada.
Expedited is available on checkout to the United States, excluding Alaska, Hawaii and US Territories as well as P.O. Boxes and APO/FPO/DPO addresses. Final shipping costs are available at checkout.
How to Replace Mass Air Flow Sensor Meter 2000-05 Toyota Celica
How to Replace MAF Sensor 2000-07 Volvo V70 2-4L
How to Replace Mass Air Flow Sensor 2004-13 Mazda 3
How to Replace MAF Sensor 2004-13 Mazda 3
How to Replace Mass Airflow Sensor 2003-13 Mazda 6
How to Replace MAF Mass Air Flow Sensor 2001-07 Toyota Highlander L4 2-4L
How To Replace Mass Air Flow Sensor 2000-07 Volvo V70
How to Replace a Mass Air Flow Sensor 2000-06 Toyota Tundra
Created on:
Tools used
Phillips Head Screwdriver
1. Removing the Mass Air Flow (MAF) Sensor
Disconnect the MAF sensor wiring harness
Remove the two Phillips head screws from the MAF sensor
Pull the MAF sensor up and out
2. Installing the New MAF Sensor
Put the new MAF sensor into place
Insert the two Phillips screws into the MAF Sensor
Connect the MAF sensor wiring harness
Brought to you by 1AAuto.com, your source for quality replacement parts and the best service on the Internet.
Hi, I'm Mike from 1A Auto. I hope this how-to video helps you out, and next time you need parts for your vehicle, think of 1AAuto.com. Thanks.
In this video, we show you how to replace the mass air flow sensor on this 2000 Toyota Celica. It's the same part and process on a large variety of Toyota, Lexus and Scion vehicles from the years of 2000 through 2006. All you need for this is a new mass air flow sensor from 1AAuto.com and a Phillips screwdriver.
Your mass air flow sensor is located right here. You just want to push in the tab and disconnect the harness and then remove these two Phillips screws. Once those screws are out, it just pulls right up and out. On the right is the old one, on the left is the new from 1A Auto. You can see they're identical and they'll mount exactly the same. Now you just want to push your new mass air flow sensor down into place and replace those two Phillips screws, and just reconnect your harness.
We hope this video helps you out. Brought to you by www.1AAuto.com, your source for quality replacement parts and the best service on the Internet. Please feel free to call us toll-free, 888-844-3393. We're the company that's here for you on the Internet and in person.
Tools used
Phillips Head Screwdriver
1. Removing the MAF Sensor
Remove the Phillips screws from the MAF sensor
Lift the MAF sensor up and out
Disconnect the wiring harness
2. Installing the MAF Sensor
Connect the sensor wiring harness
Press the sensor into place
Tighten the Phillips screws to the MAF sensor
Hi, I'm Mike from 1A Auto. We've been installing auto parts for over 30 years.
Hi, everyone. Sue here at 1A Auto. Today we're going to show you on our old 3 Volvo V78, 2.4 liter how to take the MAF's air filter sensor out. It's located in the top of the air filter box. And the mounting screws are just two Phillips heads. So we'll take a Phillips screwdriver. Push down. Let's take that bolt out. And the other one. Real small, make sure you set them aside. And then you can grab this sensor and twist it. Pull up. It's mounted with an O-ring. Now we see the connector. Push down on that tab, and slide it out. If it gets stuck you might need a flat head screwdriver. There we go. Well here's the MAF's airflow sensor.
I'm ready to connect the connector again. I'm making sure there's no damage and that the prongs are all straight. Connect it. Line up and snap it together. Now I can drop it down in the air box. Just wiggle it slightly back and forth so the O-ring sits. And I'll just get my mounting screws. The little small Phillips heads. Snug it down. Maybe make sure it's nice and air tight. It has to be tight. Then you're ready to go.
Thanks for watching. Visit us at 1AAuto.com for quality auto parts, fast and free shipping and the best customer service in the industry.
Tools used
Phillips Head Screwdriver
1. Removing the Mass Air Flow Sensor
Disconnect the wiring harness
Remove the Phillips screws from the sensor
Remove the sensor
2. Installing the Mass Air Flow Sensor
Connect the wiring harness
Tighten the Phillips screws to the sensor
Hey friends, it's Len here at 1A Auto. Today, we're working on our 2011 Mazda three and I want to show you how to replace a mass airflow sensor. If you need this or any other part, you can always check us out at 1aauto.com. Thanks.
Okay, so right here is our mass airflow sensor. This is what meters the amount of air that's going through into our intake and getting burnt up in our engine with the fuel. So, what I like to do is just try to clean it up a little bit around the area. Doesn't have to be anything too special, but if I can at least get off of the majority of the big chunks that are in the generalized area, I'm doing all right.
With that done, there's a little push right here. I'm just going to squeeze it. Give this a little wiggle. Pops right off. We always check our electrical connectors for any funny colors. Rainbow colors inside of electrical connectors are very bad. You don't want any blues, reds, greens. Well, pretty much anything except for metal color. This one looks great. I'll set it aside. We have two Phillips heads that are holding in the mass airflow sensor, so I'm just going to use this. You can use a regular screwdriver with a Phillips head if you want. That's what one of our screws looks like. Screw number two, the exact same thing as the first. Easy peasy. We'll grab this, give it a little wiggle and it pops right up.
Let's move ahead to the next step. Okay, friends, a quick product comparison for you. Over here we have our original mass airflow sensor out of our 2011 Mazda three and over here we have our brand new quality 1A Auto part. Both these pieces are manufactured the exact same specifications. They're both the exact same shape. They have their metering area in there. That senses how much air is flowing by. We have the electrical connector port. You want to make sure you have the same amount of prongs. This one looks perfect. Coming along the top, you can see we have the same two mounting holes. With all that said, I don't see any reason why this wouldn't be a quality part to install into the vehicle, so I'm going to go ahead and do it. If you need this or any other part, you can always check us out at 1aauto.com. Thanks.
Okay. So, we're going to take our brand new quality 1A Auto part mass airflow sensor. It's going to go right in here. Give it a little push, slides right down into its happy place. We've got our two screws. I'm going to get them both started in here before we tighten either of them down. Just see about getting it started. There we are. This one. Okay. They're both started in. I'll make sure I have this thing turned all the way down here. Here we are.
Okay. What we're doing is we're just screwing into plastic here so you don't want to go super tight, but you do want to make sure that you go tight enough to make a good seal on this. You don't want any air getting sucked in past this and not getting metered, getting sucked into the engine. Not only the fact that it's not going to be metered, but also it's not going to be filtered because the air filter's on the other side of it. Okay. So, we'll grab our electrical connector. We already checked it. It looks great. We're going to slide it in and we're going to listen for a click noise. There it is. Nice and locked. Give it a nice little tug. You can't go anywhere. Close the hood, down the road we go.
Thanks for watching. Visit 1AAuto.com, your place for DIY auto repairs for great parts, great service, and more content.
Tools used
Flat Blade Screwdriver
Phillips Head Screwdriver
Trim Tool Set
1. Removing the MAF Sensor
Pry up the push pin with a trim tool from the protective shield
Remove the push pin with a flat blade screwdriver from the protective shield
Disconnect the MAF sensor wiring harness
Remove the two Phillips screws from the MAF sensor
Pry up the MAF sensor
2. Installing the MAF Sensor
Insert the MAF sensor into place
Tighten the two Phillips screws to the MAF sensor
Connect the wiring harness
Insert the shield into place
Press the push pin and flat blade screwdriver
Hi, I’m Mike from 1A Auto. We’ve been selling auto parts for over 30 years!
Hey everyone, Sue here at 1A Auto. We've got a '07 Mazda 3 with a 2.0 liter in it, and we're going to show you today how to remove the mass air flow sensor, examine it, and reinstall it. If you need any parts for your car, head on over to 1AAuto.com.
Hood release is located right here. Safety latch is right above the Mazda symbol, right in the center. Just turn it over to the right, and then you have the hood prop rod, and you put it in where the arrow goes and says rod. Right in there and lock it in.
I'm going to remove these three clips. This one will might just be a pull up. It's a body clip. There we go. These plastic clips are just like a little Phillips. Just pull them up a little bit and I can wedge them out with a screwdriver. Set that aside.
Now we're going to remove this right here. Take the cover. Start by removing the tab, and that is a tab that you push down on the back here. You can see the arms push-up and pull on it. Then we have two mounting screws. They're Phillips heads. Just take a Phillips screwdriver and pull that one out. Grab it and twist it. Pull it up. There we have our mass air flow sensor.
To reinstall the mass air flow sensor, reverse the procedure. Make sure there's no dirt or grime in there. Make sure the O-ring is still connected and sealed around. Place it down, and you'll feel it push and grab. Install the two mounting screws. Just a snug down. They're plastic housing. You don't want to strip that. Snug it.
Examine the connector and make sure everything's still there. All the connectors, there's none melted, there's no debris in there, and no oil soaked. Line it up. Push it 'til it clicks. This goes underneath the air box, well first it goes down this way, sorry. Let's see what's happening here. There we go.
So line this plastic piece up. It's got the V shape in it. You're going to line it right up with that indent plastic, and then this side will go inside the battery box on top of the air cover. Then we have the plastic cover over here. There you go.
Thanks for watching. Visit us at 1AAuto.com for quality auto parts, fast and free shipping, and the best customer service in the industry.
Tools used
Phillips Head Screwdriver
1. Removing the Mass Airflow Sensor
Disconnect the wiring harness
Remove the Phillips screws from the mass airflow sensor
Pull the sensor up and out
2. Installing the Mass Airflow Sensor
Insert the mass airflow sensor into place
Tighten the Phillips screws to the sensor
Connect the wiring harness
Hi, I’m Mike from 1A Auto. We’ve been selling auto parts for over 30 years!
Hi, my name's Sue from 1Aauto.com, and today we're going to be putting a mass airflow sensor in an 07 Mazda 6 Sedan 2.3-liter. To start, we're going to open the hood, and that's the lever mounted on the driver-side knee panel that has a picture of the hood. Pull on the cable, and then go out and release the safety latch.
So now I'm going to release the hood safety latch that's mounted right above the symbol of the car. Bring it over to the driver's side. Lift up the hood. The hood prop rod is right here in the front. It goes right into the slot that's marked with an arrow. So to replace the mass airflow sensor, we're going to disconnect the sensor itself first, from the harness and it's a push tab, push down on it, and squeeze it out.
I like to make sure there's no burnt connectors that can cause a code or running condition also. Now we have two mounting screws. You just need a Phillips screwdriver. I'm going to dismount them. You just give it a firm twist and lift up. There's an O-ring right here, that keeps it nice and sealed.
Here we have a mass airflow sensor from 1aauto.com, and the factory sensor I just took out of my Mazda 6 2007. They look like they're from the same manufacturer.
So then we have our new mass airflow sensor, has a new O-ring, as you can see it's not crushed like the other one was.
So I'm just going to place that right in here. I wouldn't put any silicone or lubricant on this, because on a mass airflow sensor that is part of the reader right there. That's the air temp sensor on it, and the mass airflow sensor is inside. They pick up on dirt or oil, and it throws the sensor off, the reading, so a nice dry seal's fine because it's plastic, it's not metal.
So I'm just going to mount it down. You cannot mount it the wrong way as you can see. If I went like this, the holes don't line up, it's nice and easy, self-explanatory, press down. I felt it move right in. Now I'm going to remount it with the two Phillips head screws. I'm not going to snug that down tight yet until both are in. Now I'm going to reinstall the connector. Make sure that that orange seal is still on there. That's the moisture barrier, water seal. And I'm just going to wind it right up, click it on. There you go, now you're ready to go.
Thanks for watching. Visit us at 1AAuto.com for quality auto parts, fast and free shipping, and the best customer service in the industry.
Tools used
Phillips Head Screwdriver
Magnet - Extendable
1. Removing the Mass Air Flow (MAF) Sensor
Disconnect the wiring harness
Remove the two Phillips head screws from the MAF sensor
Remove the MAF sensor from the intake housing cover
2. Installing the MAF Sensor
Insert the MAF sensor into the back of the intake housing cover
Tighten the two Phillips head screws to the MAF sensor
Connect the wiring harness
Hi, I’m Mike from 1A Auto. We’ve been selling auto parts for over 30 years!
Open the hood. We have to pull the release inside the car. It's just inside. Right around your left knee on the driver's side. I need to release the secondary, or safety release. Just kind of feel around for it. This one is right here. Squeeze up.
Mass airflow meter is located here at the back of the air box. To remove it, start by unplugging it, push down on the connector to unlock it, and then wiggle the connector off. Use a Phillips head screwdriver to remove the two screws. Grab the screw, and put it aside so I don't lose it. Do the same for the other one. This should lift right out of the intake tube.
This is the original mass airflow meter from our car, and the brand new one from 1AAuto.com. It has the same style connector and the same style mounting holes. This should fit and work great in our vehicle.
So you can only install it one way because the screw holes aren't going to line up. So line them up like that. Just push it in, and it will go past the rubber O-ring. Use your magnet if you don't have a magnetic screwdriver. Get that in place. These are just self-tapping screws. As soon as I feel them get tight, I'm just going to stop. That's nice and tight. Reconnect the plug. The job is complete.
Thanks for watching. Visit us at 1AAuto.com for quality auto parts, fast and free shipping, and the best customer service in the industry.
Tools used
Flat Blade Screwdriver
Phillips Head Screwdriver
10mm Socket
Ratchet
1. Removing the Air Intake Box Cover
Disconnect the mass air flow sensor wiring harness
Loosen the air intake hose clamp with a flat blade screwdriver
Pull back the air intake hose
Flip up the clips on the air intake box and pull them back
Pry off the vacuum hoses on the back of the air intake box
Lift the air intake box up and off
2. Removing the Mass Air Flow Sensor
Remove the two 10mm bolts from the air flow sensor
This next part is only necessary if your sensor comes without a housing
Remove the Phillips screws from the mass air flow sensor
Remove the air flow sensor
3. Installing the Mass Air Flow Sensor
Insert the sensor into the housing
Insert the Phillips screws to the sensor
Push the housing to the air box
Insert the two 10mm bolts to the air flow sensor housing
4. Reinstalling the Air Intake Box Cover
Line up the tabs on the intake box cover with the slots on the intake box
Clip in the air intake box clips
Connect the two hoses on the back of the air intake
Push the intake hose in place
Tighten the air intake clamp with a flat blade screwdriver
Connect the mass air flow sensor wiring harness
Brought to you by 1AAuto.com, your source for quality replacement parts and the best service on the Internet.
Hi, I'm Don from 1A Auto. I hope this how-to video helps you out, and the next time you need a part for your vehicle, think of 1AAuto.com. Thanks.
In this video, we're going to show you how to replace the mass air flow sensor on this 2002 Volvo V70 with the 2.4-liter non-turbo engine. The items you'll need for this is a flat blade screwdriver, a Phillips screwdriver, and a 10mm socket and ratchet.
Your mass air flow sensor is located right here. Just push down on the tab and disconnect the harness. You may need to pry out a little bit if it hasn't been removed in a long time. Now loosen up this hose clamp and pull the intake hose back. Now flip up these clips, pull them back, and pry these hoses free. Then the top of your air intake box will lift up and off.
Next, remove these two 10mm bolts. If your new mass air flow sensor doesn't come with the housing then remove the sensor with a Phillips screwdriver, and then remove these two bolts. Then the sensor just pulls out.
Then you'd push it into your new housing and replace those two Phillips screws. Push your new mass air flow sensor back into the top of your air intake box and replace those two 10mm bolts. Now push the tabs on the top of the air intake box back into those slots and push it down into place. Re-clip those three clips. Then reconnect these two hoses on the back. Push the intake hose back into place and tighten up that hose clamp. Then reconnect your mass air flow sensor harness. You're all set.
We hope this video helps you out. Brought to you by www.1AAuto.com, your source for quality replacement parts and the best service on the Internet. Please feel free to call us toll-free, 888-844-3393. We're the company that's here for you on the Internet and in person.
Tools used
Phillips Head Screwdriver
1. Removing the Mass Airflow (MAF) Sensor
Disconnect the electrical harness
Remove the Phillips screws
Remove the MAF sensor and o-ring
2. Installing the MAF Sensor
Insert the MAF sensor firmly into place
Tighten the Phillips screws
Connect the electrical harness
Hi, I’m Mike from 1A Auto. We’ve been selling auto parts for over 30 years!
Hey everyone, Sue here at 1A Auto. Today on our ‘03 Tundra, we're going to teach you how to remove and replace your mass air flow sensor. If you need this part or any other part for your car, click on the link below and head on over to 1aauto.com.
Hood release on this Tundra is located on the driver's side, right at the knee panel. Has a picture of the hood, pull on the cable. So the safety latch is located to the left of the symbol. You'll feel the lever right there. You push up on it. Lift your hood up.
This is the mass air flow sensor location. It's on top of the air box cover. So to change that, I would loosen the harness out of the connector here. You've got the tab, push tab, push down on that and slide her out. It's been a while since this has been out. So squeeze firmly and wiggle. Or not. There you go.
I was careful not to break that tab. You never want to break the lock tab if possible. Phillips screwdriver, these two mounting bolts. And then you're just going to grab it and pull it up. There is an O ring here. Make sure that's not broken. Seals not broken. And that's actually the pieces that take the reading of the air flow and the temperature.
To replace it, you just place it, line it back up, and press down firmly so that O-ring seats. Put each screw in. I'm just going to bottom that out. I'm not going to tighten it until the other one's in. Now it's safe to reconnect our connector. Hear that click, line up the harness, and you're done.
Thanks for watching. Visit us at 1AAuto.com for quality auto parts, fast and free shipping, and the best customer service in the industry.
EMS00612
In Stock
Product Reviews
Loading reviews
4.73/ 5.044
44 reviews
5 Stars
4 Stars
3 Stars
2 Stars
1 Star
39
2
1
0
2
Service
Bradley
March 21, 2017
I had ordered a part from another web sight and it never came in so I ordered one from 1A. While I was waiting for the part to come in from 1A the part I had ordered from the other web sight came in one day before 1A's arrived. Next time I order parts 1A will get that business.
Problem solved!
Patrick
August 28, 2018
Replaced my old MAF sensor for my 2000 Toyota Celica because I was having acceleration issues and it would rumble and stall at times. Now it runs smooth. I'm glad I bought this first before bringing my car to a mechanic.
Mark
August 28, 2018
My Prius was losing power and quitting on the road till I replaced this part. Solved my problem completely.
Excellent
jeff
September 27, 2018
Extremely fast shipping and product fit as described.
Excellent purchase
Helmut
November 23, 2018
I installed the new mass air flow sensor it works perfectly. Good part. The car runs perfect now. This was a good purchase ,quick delivery well priced . I am very satisfied
"The old fashioned human being of Great service"
Dwight
November 26, 2018
I would like to say to a great and considerate team of experts,you all was so professional and gracious.from beganing in to end my first item part didn't fit...yall responded so well and I could since the passion and concern and yall voices you all really cared and kept me inform of what was happening with making sure everything was getting done to give me the best experience of taking care of this..you all wow me..thanks a lot I highly recommend yall..ps this was my first time in a long time experience the good old fashioned people first service..#youguysrock..Mr.Dwightc.thx aliot..
Struts
Danny
February 18, 2020
Good product pretty easy to install with video keep the videos up
Excellent
Andres
November 3, 2020
What a difference this M A F Sensor has Done to the engine performance, buying 1 more for my Ladys Car.
Work like a charm...they are awesome.
ed
May 29, 2021
The parts work and work well. Very simple installation.
Very satisfied and have recommended 1A Auto many times!
Thanks Guys!
My expecftations were exceeded at every point in my purchase
John
June 29, 2021
I am completely happy with my purchase, Watching your installation before I purchased this part convinced me how easy it would be to install. My car is now perfomrig well and I am very glad that you sell quality parts at very reasonable prices. Free shipping was an added bonus and I received my part in only a few days after placing my order. Your customer service teams kept me informed of the status of my order and expected delivery date.
luis
August 24, 2021
Fit perfectly just like advertised
Christine
August 24, 2021
Love the pricing and quick shipping.
2001 Toyota Highlander v6
Toua
September 9, 2021
Works great. Thanks.
Mass air flow sensor
Manuel
September 23, 2021
It worked perfectly. Cleared check engine light. Drove >100 miles. Went for a a smog and passed.
Manuel
November 16, 2021
I thought it might take the check engine light off but still light is on
This item is perfect
Jiasui
November 18, 2021
Its very good and easy to install. Im delayed it survey because the other item around me crazy
Hector
March 7, 2022
The part was correct and the support videos for installation was very helpful.
Quality
Vernon
May 13, 2022
Worked great. Just had to disconnect battery to reset fault after installation.
Nazario
September 15, 2022
Wont work cheap material
Goood
David
September 16, 2022
Great product
It works!
Jose
January 6, 2023
Great item! Fast shipping. The sensor works as it expected
Russell
January 20, 2023
So far no problems. I hope it is reliable for years to come.
For spare
Terence
February 4, 2023
Bought it for a spare part.
Gene
March 28, 2023
I got exactly what I needed! Thanks
Perfect product, good experience, great price!
TOM
April 27, 2023
Arrived fast, well packed, quality and a perfect fit! From start to finish even viewed the video on how to install it was a good experience. Thank You .
Fehmi
May 30, 2023
Great product
Great fit and work like new
Ariel
October 19, 2023
My gs300 was having some issues with acceleration, then I bought this MAF sensor and the car was working again. this part was super easy install and it fit like OEM
Good fit
juan
November 10, 2023
Got it for my 2006 Toyota Corolla and it fixed good and the connection was good heard that click so I know it's secure in place
Melissa
December 28, 2023
I was very pleased with my orders
1AAUTO does it again
John
March 12, 2024
Installed this part in my 2005 Lexus LS430 and it resolved the check engine issue. Easy to install and 50% less cost than AutoZone quoted me.
Good to go
Marty
April 18, 2024
So far so good everything goes pretty smooth. As far as ordering and getting parts all the parts that I have purchased have fit and have been working. Can I ask for much more net at a discounted price?
Affordable and reliable.
Javier
April 30, 2024
Arrived quickly as described without any issues. It's been 2 weeks and no issues yet.
Easy Button
K.
April 30, 2024
Perfect fit, easy install, fast shipping, great availability, good price! What more can you ask for!
Good price and good product
Scott
May 4, 2024
Over 200 miles and no check engine light
Great product
owen
May 26, 2024
It easy to install and fit good. Good product for the money and it was fast shipping.
Very satisfied with this product highly recommended
Saim
August 18, 2024
It works really well for me my car running smooth since I replaced my old one with this.
Raymond
August 21, 2024
The shipping was great. Very easy to install. Price was good.
Awesome
michael
August 25, 2024
Just perfect
Easy to order.
Michael
August 26, 2024
Easy to order and fit as expected. Even had a video showing how. Great ordering experience.
I'm just a biologist.
Zachary
September 17, 2024
Video was super helpful. Part was cheap and visually identical to the broken one. Garage quoted me almost $400 to replace this $30 part! It took me less than 5 minutes to fix it and all I needed was a Philips head screwdriver!! I don't even know what this thing does! I'm not a car guy, I can't even believe it was this easy
Andrew
September 23, 2024
Finally received part. Looks like the old one and operates perfectly.
Thank you
Erick
October 24, 2024
I don't recommend the product
Worthless
Good part
jd
November 4, 2024
Great fit and Easy install. This resolved the P0171 code that was being thrown and bringing on the service engine light.
Mass Air Flow Sensor
Mark
November 10, 2024
Exactly like the original Toyota part for a fraction of the cost.
Part arrived sooner than expected, was simple to install, and fit perfectly. Truck running normally again.
Customer Q&A
Do you have 2003 toyota rtd tundra driver door?October 1, 2022
John D
how does air sensor effect car performance ?December 8, 2022
Dolores S
10
Im not sure it affects performance at all. It senses the air mixture and lets you know a problem exists. I purchased one hoping it was just a bad sensor. Not my luck though. The new sensor also told me I had a problem. Ended up being a leaking gasket.
December 8, 2022
M G
10
There could be multiple reasons why you're having this particular problem. We suggest taking your vehicle to a nearby reputable shop to identify the cause. Once you know the cause, we'll be happy to see if we carry the parts and how-to videos needed for your repair.
December 9, 2022
T I
Will this Mass Air Flow sensor be compatible with my 2.4 four cylinder 2005 Toyota Camry computer sofware?May 6, 2024
Lou G
10
Yes, this part is listed to fit the 2005 Toyota Camry L4 2.4L.
May 6, 2024
Kemal S
Customer service
877-844-3393
Monday - Friday 8:00am - 9:30pm ET Saturday - Sunday 8:00am - 4:30pm ET
Volvo is a registered trademark of Volvo Trademark Holding AB. 1A Auto is not affiliated with or sponsored by Volvo or Volvo Trademark Holding AB.See all trademarks.
Enter Vehicle Year Make Model
Specify your vehicle's year, make and model to guarantee fit.
Year
Make
Model
Options
Drivetrain
This part doesn’t fit a . Select from parts that fit.