Brought to you by 1AAuto.com, your source for quality replacement parts and the best service on the Internet.
Hi, I'm Mike from 1A Auto. I hope this how-to video helps you out, and next time you need parts for your vehicle, think of 1AAuto.com. Thanks.
In this video we are going to show you how to replace the windshield washer bottle on this 2003 Nissan Maxima, pretty much the same for any 2000 to 2003 Maxima. Tools you'll need . you'll need to remove the front bumper cover, which is not that difficult . and you'll need a flat blade screwdriver, a Phillips screwdriver, a 10mm socket with a ratchet, and you'll need a two-inch extension and a longer extension.
With the hood open, you want to remove four clips, and you just use a flat blade screwdriver and press in under the middle and pry up the middle of the clip and then it comes out, and I'll repeat that for the other three. Now, I'll just fast forward. On these clips you only want to pop the center up about 1/8 of an inch, pop them up too high and then the clips will be hard to get out. So you pop up the center about 1/8 of an inch, and then you can either pull them out or pry up the rest of the clip with your screwdriver. Up underneath on each side there's a Phillips screw that's kind of close to the front wheel, and you want to remove it from each side. In addition to that screw, there's a series of these clips again, and I'll remove those. They're here and then they continue right across the front. So, I'll fast forward again. These clips can even be more challenging on the bottom, because a lot of times they get sand and dirt stuck in them so they're hard to pry out. Using a little penetrating oil on them sometimes helps; also if you just have to pry them out and end up breaking them, you can get clips that are a similar style, usually at any hardware store. Then once you get the screw off from underneath here, then what you want to do is just reach right in here and grab your inner fender and push it in and pull it down, and then there is another either Phillips screw or 10mm bolt right up there. Looking further . it's a little difficult here . just pull the inner fender out of the way, and then you can see in further. Where's that other bolt? It's hard to show it to you. There it is. I'm going to speed up as I remove that first 10mm bolt; then I'm going to use a screwdriver and a rag and pry out each of my side marker lights and disconnect them just by pressing a little tab and pulling on the harness, and then, again, with a 10mm socket and ratchet, and you can access it through that hole where the parking light was, remove that second bolt. Do that for both sides. So, I've got both bolts and the lights out on each side. One thing to keep in mind is the fog lights; so I'm going to bring my bumper cover forward, and as I do that I'll reach down in. There's a connector for the fog lights. There's a little button on it, unplug that one. Take the bumper right off.
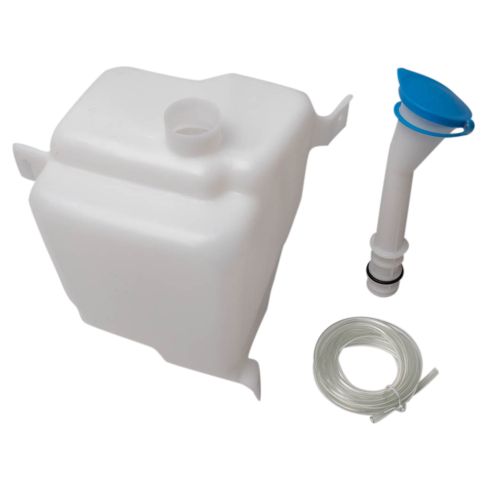
Your reservoir is right here on the passenger side. A lot of times, they get broken in a small fender bender or something like that. As you can see, mine's in fine shape, so I'm just going to take this one out and put it back in to show you. If they're broken usually you won't have them full of washer fluid, but what I'm going to do first is . right here's the washer pump, and it's just got a connector right here. Press down on a little tab. It's not coming out, so what I'm going to do is .here is the line . I'm just going to twist that and make sure it's going to come off, and then I'm going to grab my pump, and just pull it right out. That will allow my fluid to come out, and then when I open up the cap here, it allows air in there, it allows the fluid to come out faster. In the video, I actually disconnect the pump by using a screwdriver to help push the locking clip down and push the electrical connection off and then take the washer too, just twist it and pull it off. You don't actually have to unhook the pump to replace just the washer bottle, but you'll have to unclip the tube and the harness from the little clips in the bottle. So now to get it out, this is your fill tube right here. You just take this back and forth and twist it a little bit. Just basically, go back and forth and pull up and it comes out. Now the reservoir's held in by three bolts. There's one right down here, and one up in here. You'll need an extension to get to that one, and you can see there's one here and before I did the video I was just testing things out, and you can see that the head to this one broke off. While we speed up through taking those two bolts out, I use a 10mm socket and then for the one that's closer to the wheel I use a 10mm socket with a long extension. With the third bolt that broke off, unfortunately, I was not able to get the remnants of the bolt out, so we just have to install the pump using the two bolts that bolt to the body and that's not the ideal way, but we can't use that third bolt. It pulls right down and out, and there's a low fluid sensor here. Again, has a tab on it. Use your thumb or use a screwdriver, push on the tab and disconnect.
I'm pretty much forced to do this. It's not the ideal way, which is just to put this in here. There is a little key here that you hang up on that bracket, that offers it some support, so I'll put it in here. Make sure that my fill tube is lined up, and put in the bolts. I'll speed up here again. I start the lower bolt in, then I load the upper bolt into my extension and socket and carefully try and line up the bottle with the hole and feed the bolt in with the socket, and start it in and then tighten those up nice and firm. Make sure you plug the low level sensor back in, reinstall the washer pump, just make sure that you have a good grommet in here and put the grommet in. The pump just pushes right into place. Reconnect the pump and reconnect the washer hose, put this harness back in place, and the washer hose clips back in place.
Put nice new fluid in. I've got a funnel with a little screen on it, so I can just take my fluid that I drained out and add it back in.
Okay, and just a quick test. Turn the key on, and hit the washers so you can see they're squirting. Everything's working good.
So, once you've done everything you need to do with the bumper cover off .as you see, maybe you can tell on this car, we put a new set of headlights in it . put the bumper cover back on, put it up in place. If you have fog lights, reconnect the fog lights; then raise the bumper cover up in place and put a couple of the top clips in place to hold it. Continuing to work at a feverish pace, put both the side bolts back up in and through, and make sure that you get the sides secured correctly, as well as putting both side marker lights back on, and once you get everything bolted together, make sure you push the inner fender back in where it's supposed to be. It's supposed to be in behind the lip around the bumper cover. Now you can see, I actually take the lower plastic panels and push them up onto the top of the lower lip of the bumper cover, and what you don't see, off camera, I took all the clips and sprayed a little bit of penetrating oil on them, cleaned them out, and got them to work. Basically, you just have to work them back and forth until they will push in and clip in easily, and then you secure all those clips, and make sure you put the screws that go on the edge near the wheels on the lower side, put those back in each side, and you're all set.
We hope this video helps you out. Brought to you by www.1AAuto.com, your source for quality replacement parts and the best service on the Internet. Please feel free to call us toll-free, 888-844-3393. We're the company that's here for you on the Internet and in person.