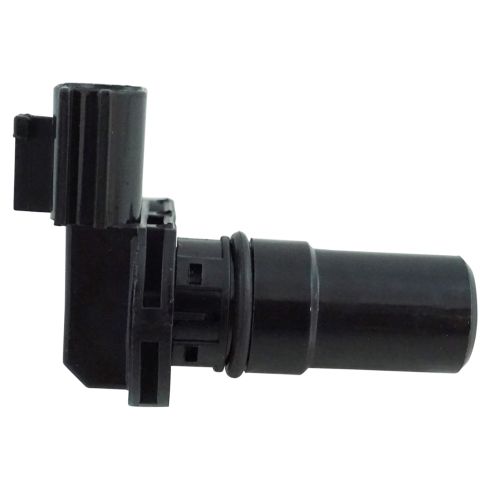
1ATRS00320-Nissan Transmission Speed Sensor TRQ VSA92947

Replaces
2016 Nissan Quest Transmission Speed Sensor TRQ VSA92947

Frequently bought together
Product Reviews
Loading reviews
4.77/ 5.0
22
22 reviews
Quality parts
May 4, 2019
Quality product, oem exact replacement for a great price. Would recommend it highly to everyone I know. Fast shipping as well
September 20, 2019
It's fits great.
Satisfied customer
September 30, 2019
Very good products
Worried for nothing
January 13, 2020
This speed sensor worked just the way that it was designed to work. My transmission shifts in all gears now. Thanks 1aauto for your great service, quality parts, low prices, and a timely delivery.
Nissan speed sensor.
January 22, 2020
This part. Was a great fix car runs perfect. Thanks
Transmission sensor
March 3, 2020
Easy to order, it came fast and it was the very part that I needed. Thanks for making my process so easy.
Transmission sensor,definitely the right part
June 29, 2020
Order this part an got it before the due date delivery,I am very happy with this dealer,better than other dealer websites ,
delivery got lost
August 2, 2020
i requested thespeed sensor but it did not diloved
August 14, 2020
All products that I have purchased from 1aauto have been at a great price and great quality. I am satisfied and will continue to purchase my parts from 1aauto.
September 15, 2020
I got this product super fast no more 2 days so that was great
It fixed my problem
October 14, 2020
I can see how fast Im going now
Prompt delivery
March 15, 2021
Just what I ordered. Prompt delivery, good price. Nice website, easy to navigate.
Great store
May 3, 2021
Recieved my part quickly and it work perfectly. Thank you!
LOVE
[{"url": "https://wac.edgecastcdn.net/001A39/prod/media/pNISJll75W64CYGsite/b81a2698f60c0892e2be3092d4dc6794_1628149206980_0.jpeg", "caption": ""}]
August 5, 2021
After going to 4 different part store and Everytime getting the wrong one each time. I WILL BE RECOMMENDING THIS PLACE. FRIENDLY PEOPLE AND THE SERVICE IS WORTH THE MONEY AND RIGHT PARTS EVERYTIME. THANK YOU
April 25, 2022
Work Good
August 8, 2022
Very good!I will recommend to everyone!
Excellent auto parts online store
November 7, 2023
It worked great thanks 1A Auto
November 29, 2023
Good products!
New sensor, who this?
December 3, 2023
It worked just fine. But I ended up not needing the particular sensor but a different one LOL new is new though so I'm satisfied!
Good
January 22, 2024
Like oem
Quality Parts
August 25, 2024
Excellent product ,, perfect fit
September 13, 2024
I after the part was Replaced to the car.the preformed better.
Customer Q&A
Will this meake my 08 cube run but not drive?
December 29, 2018
10
You may want to have the vehicle looked at first before purchasing electronic parts and replacing them. We just want to make sure you are getting the correct part you need to make your car drive again.
December 29, 2018
Corey M
Sensor does not go all the way into hole, even when screwed in. Vehicle is a 2007 nissan sentra. Sensor is similar but not exactly the same as old one. New one has o ring that is slightly off of old one, otherwise everything else is the same. Is this
August 3, 2019
10
As long as you are replacement the secondary transmission speed sensor and you have a CVT transmission, this part will be correct. You might need to apply to lubrication to the o-ring so it seats properly.
August 4, 2019
T I
2007 nissan murano does it have 2 vehicle speed sensors, 1 input and 1 output or just 1?
April 1, 2020
10
Hello Lloyd! These vehicles will have multiple sensors, included an input and output.
April 1, 2020
T I
Where is the transmission speed sensor located for my 2008 Nissan Rogue ?
May 3, 2020
10
Hello,
I will be emailing you the diagram showing the location for the secondary sensor.
Thank you,
Corey
May 4, 2020
Corey M
10
Exactly where is the transmission speed sensor located for my 2009 Nissan Rogue?
December 1, 2020
Mark R
where is my transmition speed sensor located in my nissan murano 2006 sl ?
October 3, 2020
10
Hello,
We do not have the exact location for that sensor.
October 3, 2020
Corey M
will this fit a 2012 Nissan versa hatchback? it doesn't look similar to Nissan website part and the cost on their site is $180.00
October 5, 2020
10
Thank you for your inquiry, Jimmie! There are multiple sensors for this application, it could be a case where you need a different one. This is the secondary transmission speed sensor.
October 5, 2020
T I
Do you have RH,LH CVaxels FWD 2014 Nissan Juke CV ?
November 10, 2020
10
At this time we are not selling the CV axle for your vehicle.
November 10, 2020
Emma F
Where is the sensor located on a 2014 Nissan Sentra?
June 26, 2021
10
The speed sensor on the 2014 nissan sentra is located on the right rear of the transmission near the tail shaft, under the hood of the vehicle.
June 28, 2021
Cristina P
2012 nissan maxima input turbine speed sensor location? Thanks
May 22, 2022
10
Yes, we do have installation instructions available for this part. Here's a link for that: https://www.youtube.com/watch?v=bfoW9kTJnc4&feature=emb_title
May 23, 2022
Cristina P
Where's the auto trans input sensor located in 2011 nissan rogue?
November 18, 2022
Am I correct to assume that this is different from the ENgine input speed sensor? If so, do you guys have it in stock? Also, what is the difference between them?
January 4, 2023
10
Currently, we do not carry this part for your vehicle. We're always updating our inventory so please check back soon!
January 5, 2023
T I
Do you have both speeds sensors for the 2007 Nissan Sentra 2.0?
January 15, 2023
10
We do not carry both. This part will fit your vehicle if it is an automatic with the CVT transmission.
January 18, 2023
Andra M
Where is the transmission speed sensor located for my 2010 Nissan Rogue ?
February 7, 2023
10
Typically it is on the transmission housing.
February 8, 2023
Andra M
Where does this go on a 2007 Maxima and can you use the same sensor for Input/Output? Any help would be great before I make a purchase. Thank you!
February 25, 2023
10
We don't currently have an installation video or instructions available for the Maxima. We're constantly adding new installation videos and instructions though, so please check again at a later time or check our Video Library to see similar repairs here: https://www.1aauto.com/videos
February 26, 2023
T I
10
The one I bought at 1A didn't fix my problem, I took it to a mechanic and they said it was a few millimeters off. So the new sensor had to be replaced.
February 27, 2023
Stacy P
Do you carry the wiring harness for this? I need to replace both.
April 20, 2023
10
We would be happy to check. What is the year, make and model of your vehicle?
April 21, 2023
Andra M
I have a 2002 maxima GLE it have two speed sensors on the transmission one is out put and the other is input. Both sensor look the same. I dont know where the out put goes in and the input. Can you please tell me where to put the out put and the inpu
May 7, 2023
Nissan is a registered trademark of Nissan Motor Co., Ltd. 1A Auto is not affiliated with or sponsored by Nissan or Nissan Motor Co., Ltd.
See all trademarks.


