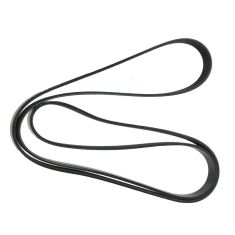
Replaces

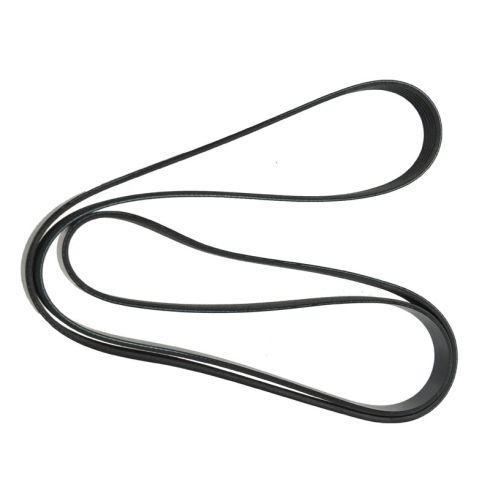
This part doesn’t fit a . Select from parts that fit.
Frequently bought together
Item Condition:
New
1 Year Warranty
This item is backed by our 1-year warranty. In the event this item should fail during intended use, we will replace the part free of charge. This warranty covers the cost of the part only.
FREE Shipping is standard on Orders shipped to the lower 48 States (Contiguous United States). Standard shipping charges apply to Hawaii, Alaska and US Territories. Shipping is not available to Canada.
Expedited is available on checkout to the United States, excluding Alaska, Hawaii and US Territories as well as P.O. Boxes and APO/FPO/DPO addresses. Final shipping costs are available at checkout.


Created on:
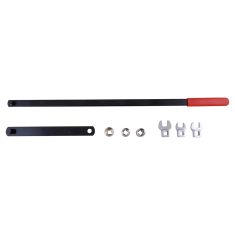
Tools used
Hi, I'm Mike from 1A Auto. We've been selling auto parts for over 30 years. We're dedicated to delivering quality auto parts, expert customer service, fast and free shipping, all backed by our 100% satisfaction guarantee. Visit us at 1AAuto.com, your trusted source for quality auto parts.
Determining whether or not your vehicle is a California emissions or a federal emissions vehicle is pretty straightforward. To do this, you'll want to locate your catalyst sticker under the hood of your vehicle. It'll either be actually on the bottom side of the hood, most GM vehicles have it on the air box, and other vehicles may have it along your radiator support at the front of the engine bay.
All you need to do is see, "This vehicle conforms to California regulations." That means that this vehicle is a California emissions car. Just because you're not in California or are in California doesn't necessarily mean your vehicle will be one way or the other.
Now, our F150 has it down here on the radiator's support, right at the front of the engine bay and you can see here, "This vehicle conforms to US EPA regulations." This means that this vehicle is a federal emissions.
Now, here we have two things that are a little different. Our catalyst is located on the vehicle's air box and this vehicle conforms to US EPA regulations and California regulations. If it conforms to both federal and California emissions, it's considered a California emissions vehicle.
Thanks for watching. Visit us at 1AAuto.com for quality auto parts, fast and free shipping, and the best customer service in the industry.
Tools used
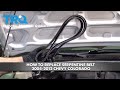
Brought to you by 1AAuto.com, your source for quality replacement parts and the best service on the internet. In this video we'll be showing you how to remove and put back on the Serpentine belt on this 2004 Chevy Blazer with a 4.2 liter. Only tools you'll need is a 3/8 ratchet and you'll want either a long-handled ratchet or a piece of pipe to get some extra leverage as well.
First thing you want to note is how the Serpentine belt is on your vehicle. It goes across up there to the alternator and down to an idler pulley and down around the AC pulley way down there, then up and around the water pump and fan and then it wraps back down and around the crank and back up to the tensioner right there. I'm going to place the camera over here. What you'll want is a ratchet with a 3/8 drive end on it ... is a square hole in our tensioner here- Here's a shot of it from the other angle of my ratchet in my tensioner... going to take your ratchet and you're going to want to push it clockwise. As I push down on the tensioner, that loosens the belt, I can remove it up here from the alternator and slowly let my wrench back being careful not to pinch my hand in anything.
Now my belt will come off. Check the condition of your belt. Ours is in pretty good shape, see there's a little bit of cracking on the ribs but that's not too big of a deal. You want to check the whole length. Where they sometimes can get bad is where they're joined together and if it's getting bad there you'll know it because you'll see it and I don't see it so this one's okay. If you do need a new belt, we carry them at 1AAuto.com. Can't really film putting this on too well but I'll try and put it together and detail as best I can. I'm putting a loop down and around the crank pulley which is the largest pulley at the bottom of the engine. Loop it down there. Then I'll bring it back up and over my water pump right here on top. Then way down and around my AC pulley which is a smaller pulley at the bottom of the engine. Then up and around my idler pulley here and on this side around my tensioner pulley. Then around my power steering pulley.
Now basically I have the whole thing routed except for having it on the alternator. Okay. Here's my belt. I took a piece of pipe actually, you can see it at the top of the camera there, put it onto my ratchet that's in my tensioner and that gives me a lot more leverage. Pull my tensioner over, put the belt onto my alternator there, let the tension back, take out the pipe, take out the wrench, make sure everything is routed correctly. It appears to be and we're all set.
We hope this helps you out. Brought to you by www.1AAuto.com, your source for quality replacement parts and the best service on the internet. Please feel free to call us toll free 888-844-3393. We're the company that's here for you on the internet and in person.
Tools used
Brought to you by 1AAuto.com, your source for quality replacement parts and the best service on the Internet.
Hi, I'm Mike from 1A Auto. I hope this how-to video helps you out, and next time you need parts for your vehicle, think of 1AAuto.com. Thanks.
In this video we're going to show you how to replace the serpentine belt on this 2000 Lincoln Town Car with the 4.6 liter V8. The only tools you'll need are a 3/8 inch ratchet handle and an 8mm wrench.
Take the 8mm wrench and disconnect your negative battery cable.
Before you remove your belt, you want to make note of how it's routed. On most vehicles, there's a belt routing diagram, although I don't see one on this Town Car. You can see that it goes down around your crank pulley way down there, around the power steering pulley like that, then up to the alternator, around the idler pulley, down to the AC pulley, and then back up to the tensioner and then around the water pump and down. Removing the belt is quite simple. Right here is your tensioner. It has a 3/8 hole in it right here where you can put a ratchet handle and then you want to move it clockwise. You can see that the belt loosens up so you can take the belt off the alternator. Slowly let your handle back and pull it out. To remove the belt, peel it basically off of your accessories and it's off.
I'm not going to be able to really film this that well but I'll try and explain what I'm doing. I'm going to take a loop, like this, and I'm going to put it down and around the air conditioning compressor, which is down here on the passenger side of the motor. Loop it on there, and then, I'm bringing that right around my tensioner. Then, from there, I'm going to bring this side up and around my idler pulley. This then goes down around my water pump here and then around the crank pulley, which is the largest center pulley. I'm going to bring this off of my alternator and then put it down and around my power steering pulley. Pretty much with everything in place I've got the belt on all my pulleys except for my alternator. I put my wrench on my tensioner, pull my tensioner all the way over. It doesn't want to quite get up to alternator which means I must have something wrong somewhere. It looks like my belt's not quite on my A/C compressor down here correctly. There we go. I'll try that again. Belt comes up around my alternator. Let my tensioner off, and recheck the belt in all the locations and it looks good.
Reconnect and tighten up your negative battery cable and you should be good to go.
We hope this video helps you out. Brought to you by www.1AAuto.com, your source for quality replacement parts and the best service on the Internet. Please feel free to call us toll-free, 888-844-3393. We're the company that's here for you on the Internet and in person.
Tools used
Brought to you by 1AAuto.com, your source for quality replacement parts and the best service on the Internet.
Hi, I'm Mike from 1A Auto. I hope this how-to video helps you out, and next time you need parts for your vehicle, think of 1AAuto.com. Thanks.
In this video, we're going to show you how to service or replace the serpentine belt on this 2000 Mercury Grand Marquis, same as any 1998 to 2002 Grand Marquis with the 4.6 liter V8. The tool you'll need is a 3/8 inch drive ratchet and also a piece of pipe might help for some extra leverage.
It's pretty easy. Right here is your tensioner. Take a 3/8 inch drive ratchet handle. Work it right into your tensioner. If you only have a short handle, use a nice big piece of pipe. It helps you to move the belt easier. Then you can pull it off there. Actually, you can see that my tensioner's in need of replacement because it's not moving freely. When it does that you want to be careful because it could snap back at any minute. Let's take our belt off and out. Let's take our belt off and out.
Before we show you how to put the belt back on you can see we put a new tensioner on the car. If you want to see how we did that, you can just check out our other videos for the Mercury Grand Marquis belt tensioner replacement.
Take a loop, and you want to put it down, all the way down, onto your A/C pulley which is the one furthest down. Then you want to come up, around your tensioner here and then around your water pump and down to your crank pulley, and then across. Over here is your power steering pulley. Then you should be able to kind of pull it a little bit tight and get it up on top of this idler pulley here. Now it's all preliminarily routed. Just make sure it's in the grooves in these pulleys. It looks like it's good. Now take a 3/8 inch ratchet, put it on there. Put on the pipe just to make it nice and easy. Pull this over, and while you do that, pull this up, and on top of your alternator. Then make sure that everything is pushed in. Your tensioner will go back. Make a quick check. It's not quite on my pulley down there. It's around the crank fine. I'm just going to put this back in. Take the tension off a little bit, and push it onto this pulley way down here. Now it's good. You're all set.
We hope this video helps you out. Brought to you by www.1AAuto.com, your source for quality replacement parts and the best service on the Internet. Please feel free to call us toll-free, 888-844-3393. We're the company that's here for you on the Internet and in person.
Tools used
Tools used
Tools used
Tools used
Brought to you by 1AAuto.com, your source for quality replacement parts and the best service on the Internet.
Hi, I'm Mike from 1A Auto. I hope this how-to video helps you out, and next time you need parts for your vehicle, think of 1AAuto.com. Thanks.
In this video we're going to show you how to replace the serpentine belt on this 2000 Lincoln Town Car with the 4.6 liter V8. The only tools you'll need are a 3/8 inch ratchet handle and an 8mm wrench.
Take the 8mm wrench and disconnect your negative battery cable.
Before you remove your belt, you want to make note of how it's routed. On most vehicles, there's a belt routing diagram, although I don't see one on this Town Car. You can see that it goes down around your crank pulley way down there, around the power steering pulley like that, then up to the alternator, around the idler pulley, down to the AC pulley, and then back up to the tensioner and then around the water pump and down. Removing the belt is quite simple. Right here is your tensioner. It has a 3/8 hole in it right here where you can put a ratchet handle and then you want to move it clockwise. You can see that the belt loosens up so you can take the belt off the alternator. Slowly let your handle back and pull it out. To remove the belt, peel it basically off of your accessories and it's off.
I'm not going to be able to really film this that well but I'll try and explain what I'm doing. I'm going to take a loop, like this, and I'm going to put it down and around the air conditioning compressor, which is down here on the passenger side of the motor. Loop it on there, and then, I'm bringing that right around my tensioner. Then, from there, I'm going to bring this side up and around my idler pulley. This then goes down around my water pump here and then around the crank pulley, which is the largest center pulley. I'm going to bring this off of my alternator and then put it down and around my power steering pulley. Pretty much with everything in place I've got the belt on all my pulleys except for my alternator. I put my wrench on my tensioner, pull my tensioner all the way over. It doesn't want to quite get up to alternator which means I must have something wrong somewhere. It looks like my belt's not quite on my A/C compressor down here correctly. There we go. I'll try that again. Belt comes up around my alternator. Let my tensioner off, and recheck the belt in all the locations and it looks good.
Reconnect and tighten up your negative battery cable and you should be good to go.
We hope this video helps you out. Brought to you by www.1AAuto.com, your source for quality replacement parts and the best service on the Internet. Please feel free to call us toll-free, 888-844-3393. We're the company that's here for you on the Internet and in person.