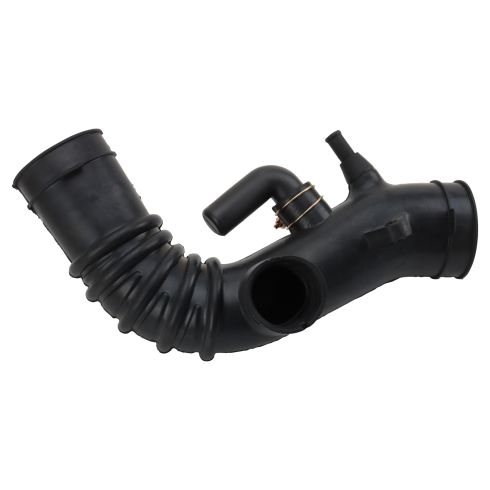
1AEIH00024-Toyota Camry Solara Air Intake Hose TRQ AIA93050

Replaces
Toyota Camry Solara Air Intake Hose TRQ AIA93050

Frequently bought together
Product Reviews
Loading reviews
4.78/ 5.0
18
18 reviews
Extremely satisfied!!!
July 22, 2017
Thank you 1A Auto! Not only did you have the parts I need at very reasonable and affordable prices, you had the videos that explained exactly how to replace each part. From start to finish, I was able to replace both parts within a half hour! And I have no mechanical experience and thanks to you, I feel more comfortable and confident in trying more repairs on my own, with your help and instruction. Oh, and the most exciting was that...I save a whole lot of cash!!! Thanks!!!
Was perfect fit
August 3, 2017
I decided to buy the part from 1A Auto because they had a video on how to replace the actual part. Since it showed the part fit perfectly on the video, that convinced me to go ahead and buy it. It arrived quickly and i installed it the same day and my Camry was working again.
Easy cheap replacement
October 2, 2017
Bought this as a replacement for my son's 1999 Toyota Camry. Bought a used car and this part was taped shut with duct tape that was already failing. Found this part on 1A Auto for cheap and with fast shipping had it replaced in 15 minutes!
Super easy install with no prior knowledge.
October 30, 2017
I know nothing about cars. But I knew this part needed replacing on my car, so I googled it. I found a 10 minute YouTube video showing how to replace it and a link to the part here on 1AAuto. I had previously priced out the part at AutoZone. They wanted 187 dollars. 1A wanted 31. So I bought it, thinking even if I failed it was a low risk venture since it was so cheap. The part arrived super fast (with free shipping) and I installed it in 15 minutes with the help of the video. I will forever buy parts from 1A from now on.
November 28, 2017
The video was easily understood and the parts wasn't hard to install.
Feels Good
March 10, 2018
After looking to clean my sticking throttle plate on my old 1999 Camry, I noticed that the intake hose had completely separated from the throttle box. I ordered this part. It was very easy to install with the help of the 1A video. One slight problem.The hole on the bottom tab was missing. I felt that a hole was required to be there to help secure the tray beneath the hose. I drilled a hole in the tab. The hose then fit perfectly. Saved myself some money
to boot. Thanks 1A.
Nearly a perfect fit
June 29, 2018
The original part had a hole in the bottom tab for the plastic nipple on the part below to secure to. The new part had a solid tab instead. Not a big deal - drilled a hole and secured the nipple.
1A Auto video s are the best!
December 18, 2018
Took 3 weeks to ship out and I couldn’t ever track my order. Customer service helped me out but my order still was delayed and I had to wait almost a month.
Great purchase experience! Great product!
July 10, 2019
Very happy with the product purchased and the purchasing experience was easy, quick and I got my part fast!
1999 Toyota Camry Le
June 2, 2021
1A auto should be everyones place to go for parts for your car or truck there great no problems at all parts fit perfect and the best part of it all is there videos on how to do it yourself I wont go anywhere else for car parts 1Auto is my go to and there packaging is right on to always packed right so no damage happens to your parts
January 14, 2022
Fit like a glove no issues on the install
February 22, 2022
Nice
May 27, 2022
Great
99 Camry 2.4cyl intake hose fit great!
June 22, 2022
Great quality, fit my car almost as snug as the glove that OJ put on.
December 21, 2022
Perfect fit. No need for any additional adjustments.
Good deal
May 30, 2023
I noticed cracks on my old one around the intake manifold port, so I got this one. Good price, easy to install. I recommend it.
High quality thick rubber intake hose. Perfect fit replacement
November 15, 2023
This is a perfect fit and of very high quality.
I bought this from 1A Auto because 1A Auto provided a video of how to replace this.
Everything went easy doing this replacement myself. My wife's 99 Camry runs better now.
1A Auto is AWESOME. Thank you.
Great fitment! Hoses went on pretty easy. Clean throttle body while off.
February 24, 2024
Installation went great. This part fits great. While you have this off might as well clean throttle body as well. ??
Customer Q&A
No questions have been asked about this item.


