Replaces
This part doesn’t fit a . Select from parts that fit.
Frequently bought together
Part Details
TRQ suspension kits are manufactured using premium raw materials and coatings for extended service life. Each TRQ suspension component is designed to be a direct, maintenance-free replacement to the stock unit. To extend the life of your steering and suspension components, TRQ recommends replacing components in pairs, sets, or kits. All products are fit and road-tested in our Massachusetts R&D facility to ensure we deliver on our promise of Trusted Reliable Quality.
Product Features
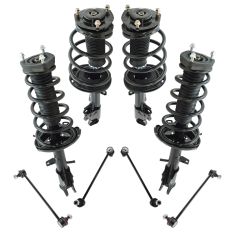
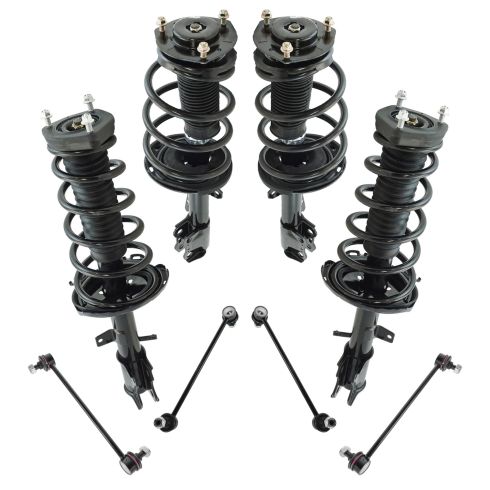
Replacing struts used to require specialized tools to compress, remove, and transfer the old spring and mount. Our Pre-assembled, complete strut & spring assemblies come with all new parts and make the job much quicker and easier for the do-it-yourself mechanic.
Strut & spring assembly contains:
Our steering and suspension components are pre-greased and sealed for long life and do not require the extra maintenance typically required by greaseable versions.
Item Condition:
New
Attention California Customers:
 WARNING: This product can expose you to chemicals including Chromium (Hexavalent Compounds), which is known to the State of California to cause cancer, and birth defects or other reproductive harm. For more information, go to www.P65Warnings.ca.gov
Lifetime Warranty
This item is backed by our limited lifetime warranty. In the event that this item should fail due to manufacturing defects during intended use, we will replace the part free of charge. This warranty covers the cost of the part only.
FREE Shipping is standard on orders shipped to the lower 48 States (Contiguous United States). Standard shipping charges apply to Hawaii and Alaska.
Shipping is not available to a P.O. Box, APO/FPO/DPO addresses, US Territories, or Canada for this item.
Expedited is available on checkout to the United States, excluding Alaska, Hawaii.
Final shipping costs are available at checkout.


Created on:
Tools used
Hi. I'm Mike from 1AAuto. We've been selling auto parts for over 30 years!
Use a large pry bar or a flat bladed screw driver to remove the wheel cover. Just kind of slide it between the wheel and the plastic and pop it off. These lug nuts are a 21 millimeter socket. I'm going to use that and a breaker bar to loosen them while the vehicle's on the ground. Raise this part of the vehicle. We're using a two post lift, but you can use a jack and jack stands. The lug nuts are loose. I’m going to take my socket and finish removing them. I’m just going to hold onto the wheel and take the last lug nut off. It's going to be loose. You don't want to drop it. You can drop the lug nut. That's okay. You just don't want the wheel to fall.
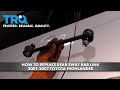
I’m going to disconnect the sway bar link from the strut. Going to spray some rust penetrant on this upper sway bar mount. Use a wire brush to clean off some of the rusty bits. These can be difficult to take off, they get rusty and then the ball joint spins. It does have a hex spot here to put in a six millimeter hex drive. A lot of times that strips almost instantly as soon as you try to break it free ad you end up having to put vice grips behind to grab onto the ball joint, because there's no point here for a wrench. We’re going to do our best to get this one off without having to cut it off.
So this is 17 millimeter nut. Try to break it free first. See, it's turning, it's turning the whole ball joint with it. It's really tight. I’m trying to clean out any rust and dirt that's in this hex drive so I can get the hex drive to sit as far possible inside here, so it doesn't strip. Use some brake parts cleaner, I've sprayed some oil in there and I've been working the hex drive in to try to clean it out. I can see it's going in a little deeper, trying to get this sit as best I can. That's as far as it will go. Spray some more rust penetrant on there. I'm going to try to counter hold this hex drive while I free it with the 17 millimeter boxed wrench. We'll see how this goes. Sometimes you have to brace that against like the strut ad these just have so much – see, it's moving. That's good. It's really tight, though, so I'm just going to put that there. I'm going to spray some more rust penetrant.
These are typically self-locking nuts, so they're a little bit, they're not perfectly round. They're kind of oblong and that can make removing them difficult and also the rust gets gummed up in the threads. So I'm trying to spin this on and off to try to work the rust penetrant into the threads. So as I kind of expected, working these back and forth this hex drive they basically always strip. It's nearly impossible to remove them without these stripping, no matter what you do. So the next step I'm going to get some vice grips and try to hold the ball joint back here and use a 17 millimeter socket and ratchet and continue to remove this nut.
I’m going to try to slide these locking pliers behind the ball joint on the sway bar link. I’ve got a 17 millimeter deep socket on this longer ratchet, going to try to remove these. It feels like it's turning. One thing to mention if you're going to have to remove sway bar links for any reason or think you're going to have to remove them for any reason, you should have new ones on hand. They're almost a one-time use part.
If you're as lucky as us, you'll have to resort to power tools or a hacksaw to cut these sway bar links free. I'll do my best to avoid the strut, I don't want to damage that. I just want to kind of cut on the – going to try to find the narrowest part of the ball joint and the sway bar link. I think I'm on there.
I've actually gone in here. Because these sway bar links get seized on here so easily, I went in and cut the boot away, the rubber boot. So that I can get locking pliers in here to get a better grip on it and it's kind of working by holding it. I'm able to turn the nut out. Worst case if I get loose enough and it just keeps spinning, then I will take a saw and cut it right here. But I'm going to keep trying it right now with the locking pliers. Got it.
Here are our old sway bar links from our vehicle. You can see where I had to cut them. I was able to finally get this one out, but still, these have been destroyed by trying to remove them and you can see they're kind of rounded here. There's no real way to counter hold them to remove the bolts. They are supposed to have a hex drive in here. That strips out pretty quickly when you're trying to remove them.
Here's a brand new sway bar link this is from 1AAuto.com. These actually have a six-point on them so you can put a wrench on here and tighten them down and it's not going to spin on you and when you want to remove them to do other services, you can put your wrench over here and spin this off without destroying the ball joint and the sway bar link. So this should fit great and work great in your vehicle.
Put these up. Get this one up top. You can bend these around. Slide it through. These nuts are locking nuts, so the hole is not perfectly round. It's kind of oblong. So when this starts to tighten it will lock and it won't want to back off.
These nuts are 18 millimeter get this one set up here. The counter hold on the back is 18 millimeters. I'm going to use a deep socket 18 millimeter in the front. Get these snugged down and I'll come back and torque them. Torque for these sway bar links is 55 foot-pounds, and repeat it on the other nut.
Reinstall our wheel. It’s important to note these lug nuts have a taper. Taper meets the wheel and matches the inside of the wheel. Don't install them on the flat side like this; that is incorrect. Install them with the taper to the wheel. It helps locate the wheel on the lug nut stud. I'm just using the socket and ratchet to bring these down snug before I put the car on the ground. Torque the lug nuts to 76 foot-pounds, going in a cross pattern. Reinstall the hub cap. You’ve got to line up the opening for the valve stem with the valve stem on the wheel. Just push it in place.
Thanks for watching. Visit us at 1AAuto.com for quality auto parts, fast and free shipping, and the best customer service in the industry.
Tools used
Tools used
All right. One of the first things we need to do is safely raise and support the vehicle so the wheel's off the ground. We're gonna remove the lug nuts and take the tire off. Let's go ahead and get the proportion of the sway bar link off of the strut. Use your wrench, and then you're gonna need to use a tool to hold the center. There we are. Now, let's do the same to the lower. Let's get ready to install our brand new sway bar link.
Something I want you to look at is right here on the stud. You have an area that you can grab onto with a wrench. Start that nut on there. Let's get our sway bar link in here. Let's torque this to 55 foot-pounds. Do the same to the other one. Let's get the wheel back on here. We'll snug up all the lug nuts, and then, we'll torque them to 76 foot-pounds. With the wheel so it's just barely touching the ground, let's go ahead and torque these. Torqued.
Tools used
Tools used
Tools used
Tools used
Tools used