What's up guys? I'm Andy from 1A Auto. In this video, I'm going to show you how to replace the oil pan on this 2010 Toyota RAV4. If you need this part or other parts for your vehicle, click the link in the description and head over to 1aauto.com. From underneath the vehicle, on the passenger side of the vehicle towards the back of the engine side, we're going to use a 14 millimeter wrench and loosen up the drain plug.
Make sure you put a drain bucket underneath here. I'm going to take that drain plug out. And there's a seal. It looks like the seal got stuck to the pan, which is okay. Just keep that in mind. You don't want to double seal it. Just make sure it goes back on the drain plug when you go to put it back together. I'm just going to grab this gasket or seal. And it's a good idea to replace this seal when you're doing an oil change but I'm just going to reuse this one. And drain plug, reinstall the drain plug. And this one feels like it's cross threaded a little bit. But just take the 14 millimeter wrench and tighten up this drain plug. And just snug that up. That's good. Just take a wet rag and wipe it off. If it's a real mess, you can use a little brake-parts cleaner.
All right, then just take a extension, a three-eighths extension and a ratchet. I'm going to loosen this little plug on the bottom of where the filter goes. Oh, so this is on pretty tight. The actual filter's starting to move with it, and I don't really want that to happen. Okay, so under normal circumstances, what you want to do is take this little plug off with your extension and ratchet, but this one, someone put this on too tight and it's not coming off.
What you can do is take that plug off and then, with a drain bucket underneath,... Generally, with your filter you get this little siphon thing. So what you do is you take this and, when that plug is out, you just push this up the center there. And then all the oil's going to drain out of where the oil filter is. And once that's drained out, you can pull this off, put that plug back in. And generally it comes with a new O-ring, so you can replace the O-ring in there. And then you can take... And normally you need a special filter housing cup that I have. I'll show you in a second. Then you can take the whole filter housing off and you won't get as much oil leaking all over the place. So that's kind of nice on these. But someone tightened that up too tight so I can't show you that.
So here's the oil filter cup. Just line this up, and you use an extension and a ratchet. And just slide this off. And there is a little lock right there. Just make sure that lock isn't hitting on the filter right there. And then, like I said, keep your drain bucket underneath so it doesn't go all over the place. And it's probably going to go all over the place. All right, that's loose. Let's see how much of a mess this makes. Oh, not too bad. But if you were able to drain it out, it would have been even less than that.
So after all that oil has drained out, I'll just take the old filter out. And I'm going to replace this O-ring right here. So just push that together and grab the O ring. You could always use a pick to pull the O-ring off. Just like that. Take the new O-ring and just slide this over. This is going to go in that groove. It's not going on the top groove. It's going on one down from the top. So that's good. Take the new filter, and it doesn't matter which way it goes on. Slide that on just like that. That's good. And then we can take this housing, just get it started. Be careful not to cross thread it. And you can use that same cup to install it. Just go slow. All right, once that's snug, then you can get a torque wrench and just torque this to 19 foot-pounds, so it's not very much at all. So just be careful of that. Pull that off.
At this point, if you had this little plug off, you'd want to put the O-ring on and this plug, and then you'd want to torque this to nine and a half foot-pounds, so not very much at all. So I have this panel off on the front. You don't necessarily need to take this panel off. It just makes it easier to see for the video purposes. So now I'm going to take these bolts out of the oil pan. There is 11 bolts and two nuts. We're going to use a 10 millimeter socket extension and a ratchet. Here's one of the nuts. That is the last one. What you could do is leave two of these in, one here and one on the opposite corner, just so the pan doesn't fall when you break it free.
All right, we want to separate the pan from the engine. Just take a pry bar and just... There's a couple areas that you can pry to try to get it to loosen up. Right here, and then on the backside over here there's an area you can try right there. Actually, I'm going to use a longer pry bar. You can also try to use a screwdriver as well. And just kind of pry it. Make sure you do have all the bolts out, which I do. All right, so if I use a pry bar right here, loosen this up. Try to get a screwdriver in here to try to break this free a little bit.
All right, there we go. pry to break free a little bit. You want to be careful, you don't really want to mess up the surface on the engine side, so keep that in mind. Just pry this down a little bit. you can take those extra bolts out. Let's just support it a little bit, as I'm doing this. Here we go. Lift this last bolt out. Then drop the oil pan down just like that. There's a little bit of oil in there. We'll just dump that out in a oil bucket.
What you want to do is take a scraper or a razor blade. Be careful if you're using a razor blade. Number one, you don't want to gouge the surface of the engine, the aluminum. It's pretty easy to go gouge it. And then peel the gasket off. Also be careful, you don't want to cut yourself or drop it. Make sure you're wearing safety glasses. You can you use a scraper like this. These work well. Or a lot of times they have plastic razorblades. You can use the plastic ones. They don't work that great, but they're safer both for the person doing the job and safer for the engine. When you get a good amount of that off, just take a rag, and you can use some brake parts cleaner. Just try to wipe it off the best you can. Try to get it nice and clean as much as possible. Generally, the RTV, if you leave a little bit of spots, it should stick to each other.
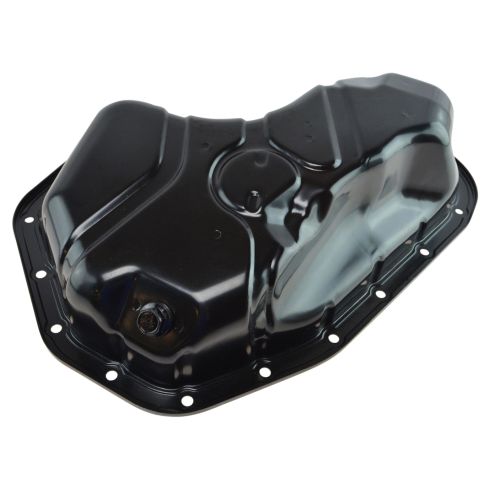
Here's the old part. Here's the new oil pan from 1aauto.com. It's got the same shape as the old one. It's the same size. It comes with a new drain plug, with a new seal. Get yours at 1aauto.com, and you'll be ready to rock and roll.
So just because this part is new, I do like to clean it. So I'm just going to take a little brake parts cleaner on a rag, clean the inside, and then also the surface area where you're going to put the silicone, the RTV. Make sure that's nice and clean. Then we're going to take the silicone. And what you're going to want to do is read the directions on the silicone, and they'll tell you how much to use. You generally want to do a small bead, between a quarter and not quite half an inch, but about a quarter of an inch is good. I'm going to go around the bolt holes. I'm going to go around on the inside the first time around, and then I'll come around and go on the outside of the bolt holes. And that's just preference. You could go around the bolt hole like this if you want. Whatever works for you.
Now, I'm just going to go around to the outside of the bolt holes. Depending on how hot it is out, if you're doing this outside on a hot summer day, you're going to want to work pretty quickly. If it's a cooler day, not a lot of humidity, you shouldn't have to rush as much. All right. That looks pretty good. And what I like to do is give it one more cleaning. Give it one more wipe before I send that pan up. Just use a little break clean on a rag, just wipe it down right there. There's a little bit of RTV, I'll just wipe that off. All right, that's cleaned up, and we want to slide this pan on. And you're just going to angle it up like this a little bit. Make sure all those bolt holes line up. Push it up there. Looks pretty good. Take the bolts, get the bolts started.
I'm going to put all these bolts in before I snug it up, or at least put it finger tight. I'm just going to get them all started because you don't want to tighten this up and then have to move the pan slightly to get the bolt holes to line up. So all those bolts are in. There's the two nuts that I got on those studs, this one and then one back here as well. Now, I'm going to go around just with the 10 millimeter socket and the extension and just finger tighten all of these. You can cross, go back and forth to tighten it down evenly if you want. And basically, do what the directions on the RTV say. These directions say to snug this up by hand, just like this, and then let it sit for an hour and then go back and torque the bolts afterwards. So that's what we're going to do. Snug these up by hand and then wait one hour.
So this has sat over an hour. Now I'm going to torque this with a 10 millimeter socket and a torque wrench. I'm going to torque these to 84 inch-pounds. Make sure you're on inch-pounds, not foot-pounds. Now there is a torque sequence, so you're going to start right here. This is number one. Number two is the nut on the back side over here. So once you do that, then pretty much from there you're going to go around. This is number three. Number four is right here. 14, and then last, that nut again, 15. And you're good. Before I put the vehicle down, I do want to just double check the torque on the drain plug. I'm going to use a 15 millimeter socket and a torque wrench. Torque this to 30 foot-pounds, and it's good. You don't have to loosen it up or anything, just double check it.
Take the oil fill cap off. We'll take a funnel, install the funnel. Now I'm going to use the appropriate type of oil. Check your owner's manual to find out what type of oil, and also this one says on the cap. And just pour the oil in, carefully. Make sure it's not spilling. Remove the funnel. Put the cap back on. Then you're going to start the engine, let it run for about 15 seconds, and then shut it off. Make sure you're on a level surface and check the oil level. Grab the dipstick, take a rag. First thing you want to do is wipe the dipstick first. Put the dipstick back in, pull it out. What you want to do is have the oil in between these two dots, preferably towards the upper dot. And this oil is right on the dot, which is good. And we insert the dipstick, and you're good to go.
All right, take the key, turn the vehicle to the on position without starting the vehicle. And over here, where the trip button is, push the trip till you get to trip A, and then we're going to shut the key off. We can keep the key in there, but just shut it off. And then we're going to press and hold the trip button. Turn the key to the on position. You're going to see these little dashes flashing and it's going to go to all zeroes. And then once you see trip A again, release the trip button and your oil life is reset.
Thanks for watching. Visit 1aauto.com for quality auto parts shipped to your door, the place for DIY auto repair. And if you enjoyed this video, please click the subscribe button.