Replaces
This part doesn’t fit a . Select from parts that fit.
Frequently bought together
Part Details
Product Features
Item Condition:
New
Attention California Customers:
 WARNING: This product can expose you to chemicals including Lead and Lead Compounds, which are known to the State of California to cause cancer, and birth defects or other reproductive harm. For more information, go to www.P65Warnings.ca.gov.
Lifetime Warranty
This item is backed by our limited lifetime warranty. In the event that this item should fail due to manufacturing defects during intended use, we will replace the part free of charge. This warranty covers the cost of the part only.
Returns: Parts with electrical components cannot be returned once installed.
FREE Shipping is standard on orders shipped to the lower 48 States (Contiguous United States). Standard shipping charges apply to Hawaii and Alaska.
Shipping is not available to a P.O. Box, APO/FPO/DPO addresses, US Territories, or Canada for this item.
Expedited is available on checkout to the United States, excluding Alaska, Hawaii.
Final shipping costs are available at checkout.


Created on:
Tools used
Tools used
Tools used
Hi. I'm Mike from 1AAuto. We've been selling auto parts for over 30 years!
Disconnect the negative battery terminal. This is a 10 millimeter nut.
Remove the intake air duct from the radiator support. These are 10 millimeter bolts. These removed, the duct should lift right out. Place that aside.
Before we can unbolt the starter from the transmission, we have to disconnect the electrical connector here, and the electrical, the main power cable here. I’m just going to put that back, push in on the lock. Sometimes you push it in first and then work it out. You might need to use two fingers. Put that plug aside.
Just take this nut off of the starter to remove the power cable. It's a 12 millimeter. Slide the cable right off. With the cables removed, I can sneak a 14 millimeter socket and extension in behind the starter. We'll reach this rear-most bolt. There's two bolts, this will be the rear one. Steady it with one hand and break it free with this one. I've got the rear one loose, so now I'm going to loosen this front one. It's loose enough that I'm just going to pull it out with my fingers. Take the socket and my extension, reach in here. I'll just turn it loose with my fingertips. Snake the bolt out here. With the bolts removed, the starter should pull from the transmission. Pull it right out of the engine bay.
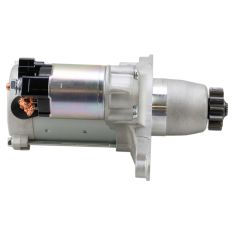
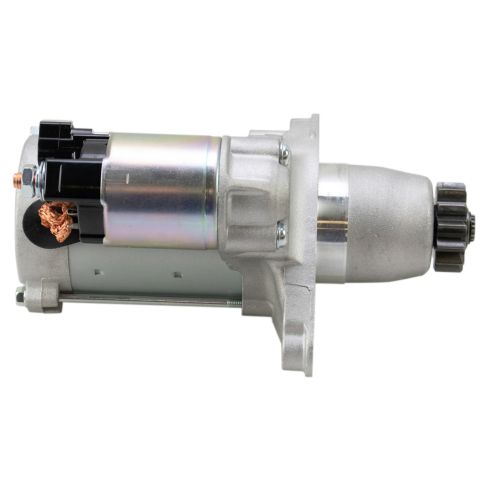
Here's our old starter from our vehicle, and our brand new one from 1AAuto.com. It's no core on this. It is brand new. See they're identical in design. It has the electrical connector here and the same size stud and nut here for the main power cable. So this should fit and get your car started again.
Feed our new starter into the engine compartment back into the transmission. Go under the shift cable, push a little bit farther back. Get this front bolt caught. This one's pretty easy to thread in, so I'm just going to thread it by hand all the way down. The rear bolt's a little trickier to get to, so I'm going to put it in the end of the socket with the extension and then just sort of carefully feed it down in here. Get it over this without dropping it. Get it in place. Just use my fingers to thread it in.
Torque the starter bolts 28 foot-pounds. I’ve got the extension and socket already in there. Just sliding in the torque wrench.
To reinstall the main power cable, the nut is on here from the factory, so we have to take off this nut and washer. Place the cable back over so those little metal tabs kind of lock in place over the square part. Push this rubber cap out of the way. 12 millimeter socket, tighten this nut up. Don't over-tighten it, because you can break the stud off here. So just bring it down. Feel like it tight. Reinstall that rubber cap. That prevents that cable that gets direct battery power from grounding out. Reinstall the electrical connector.
Reinstall your intake tube, sliding it back on to the air box, lining up the holes on the radiator support. Reinstalling the bolts. these are just bolts holding plastic into the sheet metal of the radiator support, so once you feel them get tight, just stop.
Reconnect the negative terminal. Starter installation's complete.
Thanks for watching. Visit us at 1AAuto.com for quality auto parts, fast and free shipping, and the best customer service in the industry.
Tools used
Hi, I’m Mike from 1A Auto. We’ve been selling auto parts for over 30 years!
Open the hood. We have to pull the release inside the car. It's just inside right around your left knee on the driver's side. You need to release the secondary or safety release, just kind of feel around for it. This one is right here. Squeeze up. Use a 10-millimeter wrench to loosen this so you can remove the negative terminal. This one's a little loose just from being rusty. If you needed to, you could use an adjustable wrench because that would probably fit better and do the same thing, loosen it. Once it's loose, you should be able to wiggle it free and then you can just push it aside.
Disconnect the positive terminal. We're going to lift up on the protective cover. Use a 10-millimeter wrench to loosen it. You don't have to take that all the way off, just get it loose enough and then you should be able to wiggle it free. Put that over there. Just going to spray some rust penetrant on these because they're rusty. Same for this bolt over here—get it from underneath. Use our ratchet extension and 10-millimeter socket. Don't need to fully loosen this one. Work on this bolt here. This should unhook. Just kind of have to play with it a little bit to get it to unhook from where it hooks underneath, but you don't have to take the nut fully off. We'll put this aside.
Now you can lift the battery out of the engine compartment. This is probably pretty heavy so be prepared. And then just put this in a safe place.
With the battery out of the way, you can reach down and pick up the plastic tray. Just kind of sits in there.
The starter is located right here in the top of the transmission. Pull these positive cables out of the way. There's the electrical connection. That's the signal wire, and then the direct power is right here.
You can pull the rubber boot down. I'm going to unplug this. I'll put the rubber boot back up. Unplug this first and push down on the lock. Sometimes you need two fingers, and then with other fingers you can push down and pull it out. Just put that aside. Move the boot out of the way.
Just going to spray some rust penetrant on here. Looks a little rusty, corroded. There's a 12 millimeter bolt, needs a 12 millimeter box wrench to loosen it. Reach in, take it off with my fingers. Boot's kind of in the way, just push the boot out of the way. And we'll pull this off. Put that off to the side. There are two bolts holing the starter to the transmission. There's one here and one back here.
I'm going to spray some rust penetrant on them. The seal's pretty tight between them, but it might soak in there and help. Use 14 millimeter box wrench to break these bolts free. I've done the hard work of loosening them with the box wrench, so I'm just going to use a small ratchet with a 14 millimeter socket, spin them out quickly. Put that bolt aside. And there it is. Starter's loose. Pull it from the transmission. Kind of have to maneuver it out of here. Just going to push it backwards. And then, slide it up this way. Maneuver it right out of here. There is our starter.
Here’s our original starter from our vehicle. Here’s a brand new one from 1AAuto.com. Same style mounting. Turn them around here. Same style electrical connector. Same style positive terminal. This is a brand new starter. There's no need to send it back for a core. This'll fit great and work great in our vehicle.
Feed our starter in. Kind of the reverse of the way I took it out. Maneuver it down in here. Got to go beyond this. Get it into the transmission opening. It gets a little hung up on the harness that's right here. Just kind of wiggle it in. And I'm going to turn it and get it to line up. So right there should do the trick. Pull the harness out of the way.
Going to reinstall the bolts. Both bolts are the same. Might have to move this around, get it to line up. I'll thread it in by hand. The same with the back one. Find my way back here with it. Move this around, get it lined up and installed. Using our torque wrench, and a short extension, because it's difficult to get the torque wrench in there with the bolt. The torque on this is 27 foot-pounds. Going to reconnect the wires. Start with the positive one. So I'll take off the nut that came with the starter, and place it right over.
This replacement nut is 13 millimeter, as opposed to the original was 12. I'm going to get it threaded down there and started. The torque on this is seven foot-pounds. Very, very light. So I'm just going to do it by hand. Seven foot-pounds really just feels kind of like finger-tight. Don't want to break the stud off the starter, so as soon as you feel it get tight, just like that, and I'll go about a quarter turn more. Perfect. Put the rubber cap back on. Don't want it to ground out. Find the electrical plug, and it's stuffed under here. Plug that back in. It's locked into place. Starter is installed.
I'll reinstall the battery. I'm going to reinstall the tray. It's got these two little plastic bumps that are going to fit right here with the metal battery support. Kind of cleaned some of the dirt out of the tray. Should just kind of find those. There it is. It just sits in there.
Replace your battery back in the engine compartment. Not going to hook it up, going to install the bracket first. Back of our bracket has a hook and you want to go down here and hook it into the opening, just like that. Lay the bracket on top. It sits over here on the radiator support. Install this 10-millimeter bolt, nice and tight. That's still hooked in there. Now I can tighten this down. You don't have to over-tighten this but you want it tight. So once it gets tight, just stop. Just don't want the battery to bounce around or go anywhere.
Reconnect the positive terminal first. Tighten it up. Put the cap back on it. Reconnect the negative terminal. Tighten it down. That's tight, battery is replaced.
Thanks for watching. Visit us at 1AAuto.com for quality auto parts, fast and free shipping, and the best customer service in the industry.
Tools used
Hi. I'm Mike from 1AAuto. We've been selling auto parts for over 30 years!
Disconnect the negative battery terminal. This is a 10 millimeter nut.
Remove the intake air duct from the radiator support. These are 10 millimeter bolts. These removed, the duct should lift right out. Place that aside.
Before we can unbolt the starter from the transmission, we have to disconnect the electrical connector here, and the electrical, the main power cable here. I’m just going to put that back, push in on the lock. Sometimes you push it in first and then work it out. You might need to use two fingers. Put that plug aside.
Just take this nut off of the starter to remove the power cable. It's a 12 millimeter. Slide the cable right off. With the cables removed, I can sneak a 14 millimeter socket and extension in behind the starter. We'll reach this rear-most bolt. There's two bolts, this will be the rear one. Steady it with one hand and break it free with this one. I've got the rear one loose, so now I'm going to loosen this front one. It's loose enough that I'm just going to pull it out with my fingers. Take the socket and my extension, reach in here. I'll just turn it loose with my fingertips. Snake the bolt out here. With the bolts removed, the starter should pull from the transmission. Pull it right out of the engine bay.
Here's our old starter from our vehicle, and our brand new one from 1AAuto.com. It's no core on this. It is brand new. See they're identical in design. It has the electrical connector here and the same size stud and nut here for the main power cable. So this should fit and get your car started again.
Feed our new starter into the engine compartment back into the transmission. Go under the shift cable, push a little bit farther back. Get this front bolt caught. This one's pretty easy to thread in, so I'm just going to thread it by hand all the way down. The rear bolt's a little trickier to get to, so I'm going to put it in the end of the socket with the extension and then just sort of carefully feed it down in here. Get it over this without dropping it. Get it in place. Just use my fingers to thread it in.
Torque the starter bolts 28 foot-pounds. I’ve got the extension and socket already in there. Just sliding in the torque wrench.
To reinstall the main power cable, the nut is on here from the factory, so we have to take off this nut and washer. Place the cable back over so those little metal tabs kind of lock in place over the square part. Push this rubber cap out of the way. 12 millimeter socket, tighten this nut up. Don't over-tighten it, because you can break the stud off here. So just bring it down. Feel like it tight. Reinstall that rubber cap. That prevents that cable that gets direct battery power from grounding out. Reinstall the electrical connector.
Reinstall your intake tube, sliding it back on to the air box, lining up the holes on the radiator support. Reinstalling the bolts. these are just bolts holding plastic into the sheet metal of the radiator support, so once you feel them get tight, just stop.
Reconnect the negative terminal. Starter installation's complete.
Thanks for watching. Visit us at 1AAuto.com for quality auto parts, fast and free shipping, and the best customer service in the industry.