Hi, I’m Mike from 1A Auto. We’ve been selling auto parts for over 30 years!
Open the hood. We have to pull the release inside the car. It's just inside right around your left knee on the driver's side. We need to release the secondary or safety release. Feel around for it. This one is right here. Squeeze up. Underneath this plastic cover there's a secondary cover that is actually covering all of your valve train components. Where that meets the top of the engine's head, there is a gasket that seals and holds in the oil. When this gasket fails, you'll get a bunch of oily residue leaking out.
Because oil is sticky, dirt and debris will stick to it. This is the number one easiest way to tell that you need a valve cover gasket. It's very obvious that this is leaking. However, some other things that would be a problem attributed to a leaking valve cover gasket would be oil loss. If you're checking the oil regularly and the engine oil keeps going low, it could be leaking from the valve cover gasket. Also, if you've got a rough running or engine misfire, the valve cover gasket also seals around where the spark plugs go into the engine. There could be oil leaking down into the spark plug openings and then leaking past the spark plugs. It will give you a rough running and misfire.
The valve cover gaskets are typically near the exhaust manifold. If there's oil leaking, this exhaust manifold is of course hot when the engine is running. The oil will burn off. You'll get a burning oil smell. Sometimes you'll even see smoke coming from underneath the hood and a faint whiff of burning oil. Worst case scenario, if this is really leaking badly, you could cause a fire. This one is leaking quite badly, so it needs to be changed.
We're going to remove these two top nuts that hold on the appearance cover. They are 10-millimeter, so I'm using a 10-millimeter socket ratchet and extension. They should thread off real easily. There's our appearance cover. It's got some foam inside. That's just for noise. It keeps the noise down from the valve train. There is some oil that's been spilled from when the oil has been added to the engine. It spilled underneath the oil fill cap, but the majority of this oil is coming from a failed gasket because you can see the seam between the valve cover and the engine head. The gasket seals between that seam. It goes all the way around. We can see some oil leaking in the back.
These are your four coil packs. We need to disconnect the electrical connectors and then remove the 10-millimeter bolts that are holding them into the head. We can pull them right out. Push down on the lock and remove the connector. These can be brittle. Sometimes they break, the lock does. This procedure will be the same for the other three. Use a ratchet extension and 10-millimeter socket to remove this 10-millimeter bolt. Just pull it to the side.
Now we need to move the coil. You might have to wiggle it because there is a seal in here. Break it free. Once it's free it should come right up. There's our coil pack. After removing the coil pack, you can see that part of the valve cover gasket that goes around the spark plug opening has begun to leak. There's oil now in the spark plug openings. Eventually, if this gets bad enough, it can cause a rough running condition and a misfire. Remove all the coils. This is pretty interesting.
This cylinder and this cylinder are dry, but this cylinder and this cylinder have oil leaking in them from the valve cover gaskets even though it's all one piece. I'm going to unbolt this 10-millimeter bolt that's holding onto this harness bracket. I've got to be gentle with this harness. That will be okay. I'll have enough space to maneuver the valve cover out. This harness can stay right here. I just needed it loose from the valve cover. I'll loosen this 10-millimeter bolt holding on the harness. We might need to hold that out of the way to get to these, but that will stay right there.
I'm going to take this vent hose off. Take a needle nose pliers and squeeze the spring clamp. Just got to push it up the hose. There it is. Once it's over that, take a right angle pick. Just try to work it under the hose here while pulling it at the same time. Sometimes you can get under here. It helps to break the seal. Try to work around the hose. Break the seal. Eventually it will come off. Loosen the clamp on the PC valve. You might be able to squeeze it or use the needle nose pliers. I just need to push it up and over like that. Work that hose off the PC valve.
There are six bolts around the perimeter of the valve cover, and two nuts on studs, and then two bolts in the center. It's a total of eight bolts and then these two nuts. Once you've removed all those, the valve cover should come off.
I'm going to start with the one in the back corner. You see it's covered with some oil. Reach back here, so I don't drop it. These are 10-millimeter head bolts. I'm using a 10-millimeter socket and ratchet to remove them. I'm just going to take note of where I took these out of in case they're different lengths. This one is in the back corner. I'm going to go along the edge and find all the bolts. These two bolts are different. They're much longer. They have washers on them. With all the bolts and the nuts removed, you can take the valve cover off. It might be stuck on there.
I'm going to remove the oil cap. Put the oil cap aside. Try to reach my fingers in here. Pull up. It might need a little persuasion, so I'm going to use a rubber mallet. You don't want to damage the aluminum. I'm just going to tap on it. There it goes. Lift this out of the way. Then get the cover off of these studs. There it is. Actually, the valve cover gasket didn't come up with the valve cover. It stayed stuck to the top of the engine. Sometimes the valve cover gasket can stick in this little channel. You'll have to dig it out carefully to not nick the surface, but it's so dried out and baked on it actually stuck to the head. This valve cover gasket has lost all its elasticity. When they get really old they turn into a hard plastic. That's why it's not sealing anymore. I should be able to carefully peel this all off. Hopefully, it doesn't disintegrate too much more.
If you look in the center, you can see this is all supposed to be one piece. It's actually broken here. Who knows where that part went? It looked like this. It must have got pushed in the engine and then ground up. It's rubber. Luckily, it's a lot softer than the metal in the engine. See, that broke right apart. That's totally brittle. I'm going to carefully remove all this stuff, try not to drop too much of it in there and or any of it. Just go along, break it free. This is actually easier that it's stuck to the head. A lot of times this gets stuck in the valve cover, and then it takes a lot of work to dig it out. Lift out that one piece.
We're going to leave this engine alone for a few minutes. I'm going to put some towels over the top of it to prevent anything from falling into the engine while we replace the valve cover gasket in the valve cover. Normally, you can take off a valve cover, and this gasket will remain stuck in the groove. Ours came out stuck to the engine. It would be stuck in this groove, and it's all dried out.
You're going to have to come in with a small pick or something and try to lift it up. Then you're probably going to want to use some sort of plastic prying tool because you don't want to damage the aluminum. You want to be really careful with using a flat-bladed screwdriver. You're basically going to have to get in here and work it out. If it's stuck, then that can happen sometimes. Luckily, this one is all right. It's going to come right out for us. We'll remove it and throw it away.
Of course, there's the middle part that is broken. Take those out too. The part we're missing on top of the engine actually stuck to the valve cover. Remove that too. Now the next step before we install our new gasket, we're going to clean out all these grooves, so that it seals well. Take a paper towel and get in there. You can use that plastic tool. We're going to clean in here. If need be, you can take some brake parts cleaner and spray it in here. Take your paper towel and repeat this all the way around all the openings. Then you'll be ready to install the new gasket.
Before you reinstall your valve cover, with it off the car it will be easy to clean. We're going to wipe down all this excess oil. You're going to need some paper towels. You can start by wiping off the heavier stuff with a paper towel. A lot of it might come off. If need be, you can use some brake parts cleaner and the rag, or you can use some dish detergent and really scrub it down because that will cut the oil and grease, but then you have to dry it off really well before you put it on the engine.
Basically, clean all this off so it looks nice and fresh like that. When you put on the new valve cover gasket, and you reinstall the valve cover, if it does leak again you'll be able to tell. Since we've got a parts washer available to us we're going to clean off the valve cover with the parts washer. This is our old dried out and destroyed valve cover gasket from our vehicle.
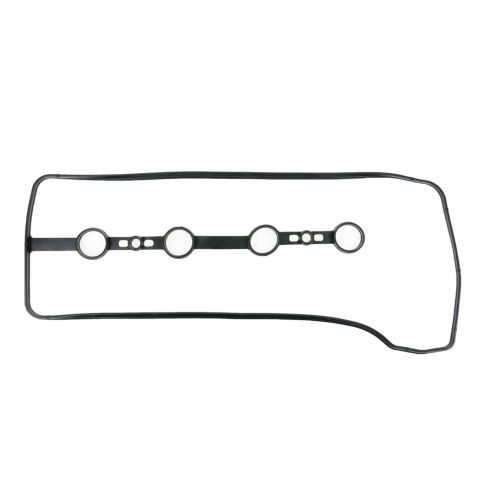
Here's our brand new one from 1AAuto.com. The rubber is nice and soft, and it will seal. This is old. It barely moves. In fact, when you bend it, it just cracks. This is not sealing anymore. It's letting all the oil escape. This nice brand new one from 1A Auto will stop your valve cover leak and fit great for you. Now our valve cover is clean.
We'll take our new valve cover gasket. It can only go in one way. Lay it in place and push it down. It will sit in place. That should stay in place while I install it. Pull these rags out of the way now. Take your valve cover. I've got to capture it over these two studs first before it will sit down. I'm also going to have to slide it underneath this little harness holder. I'm going to lift up, get this underneath. Try and capture that there, and then spin it backwards a bit. Pull this harness out of the way.
Now I'm going to capture these two nuts right here. Right now I'm going to thread everything in by hand. The two larger bolts that were from the center, I'll get those started. Now the rest of the bolts are the same. I'll go around and install those. I'm going to start with the center two bolts and tighten them down evenly and work my way out from the middle. These are steel bolts going through an aluminum valve cover into an aluminum head. I don't want to overtighten them because you can crack the valve cover or strip the bolt holes in the head. I basically want to compress the valve cover gasket enough, so it seals. I feel that those are getting tight. Then I'm going to stop. I'll do the same over here. Now I'm going to work my way outwards.
Reinstall this bolt that was holding this harness down. It's a really small bolt. It's only holding this bracket on. Just give it a little bit of snugness, and that's tight enough. We'll lay our harness back down for the coil packs. I'm also going to install the small bolt that was holding it. It's just a small bolt again going into the aluminum head. As soon as I feel it get tight I will stop. Reinstall the coil packs. I'm going to put them in place right now, come back and put the bolts in. Now get the bolts in here. Tighten these down.
This is a steel bolt going into the aluminum head to the aluminum valve cover to hold the coil pack in. As soon as you feel it get tight, just stop and reconnect it. Unfortunately, our plug is really brittle and the lock broke off. We're going to push that on there. Reinstall the oil cap. Put our PCV hose back on. Clamp back over. I may need to use pliers with my fingers. Put this hose back on. Put the clamp back over it. Now do your best to clean the oil that's run down the head here from the leaking valve cover gasket and use whatever degreaser you prefer or brake parts cleaner.
Then I'm going to take a rag and wipe it up best I can. I'm not going to worry about it too, too much. It would be nice to have it clean, so you could see any potential leaks, if they do happen again. You also want to clean up anything that might be dripping on the exhaust and causing a burning oil smell.
Now I can reinstall the plastic engine cover. Wiped it down with a rag to clean some of the dirt off of it, make it look a little nicer. Get it lined up over those studs. It will sit right down. Reinstall the nuts and actually do these hand tight. They don't need to be super tight. The job is complete
Thanks for watching. Visit us at 1AAuto.com for quality auto parts, fast and free shipping, and the best customer service in the industry.