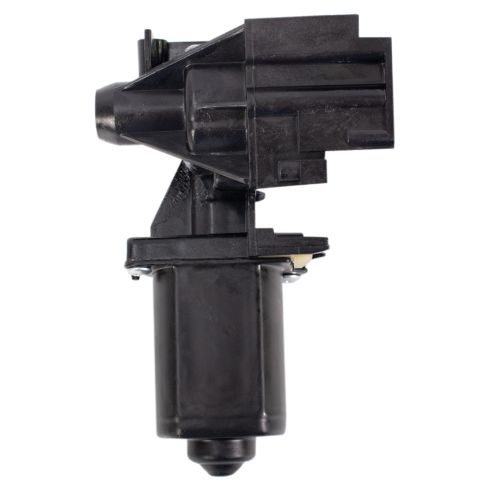
WARNING: This product can expose you to chemicals including Chromium (Hexavalent Compounds), which is known to the State of California to cause cancer, and birth defects or other reproductive harm. For more information, go to www.P65Warnings.ca.gov
Lifetime Warranty
This item is backed by our limited lifetime warranty. In the event this item should fail due to manufacturing defects during intended use, we will replace the part free of charge. This warranty covers the cost of the part only.
FREE Shipping is standard on Orders shipped to the lower 48 States (Contiguous United States). Standard shipping charges apply to Hawaii, Alaska and US Territories. Shipping is not available to Canada.
Expedited is available on checkout to the United States, excluding Alaska, Hawaii and US Territories as well as P.O. Boxes and APO/FPO/DPO addresses. Final shipping costs are available at checkout.
How to Replace Trunk Lid Pull Down Motor with Gear 1986-91 Chevy Camaro
Created on:
Tools used
12mm Socket
Flat Blade Screwdriver
Phillips Head Screwdriver
White Grease
Ratchet
12mm Wrench
1. Accessing the Hatch Pull Down Motor
Remove the plastic pins from the trunk liner with a flat blade screwdriver
Remove the Phillips head screws from the top of the trunk liner
Gently pry out the trunk light with a flat blade screwdriver
Disconnect the light from its wiring harness
Pull off the trunk liner
Disconnect the trunk light switch wiring harness
2. Removing the Pull Down Motor
Remove the three 11mm bolts from the motor
Slide the motor assembly down and out, off its tracks
Remove the plastic bushings from the motor assembly
Disconnect the wiring harness from the motor
Remove the Phillips screw that connects the casing to the housing
Pry out the tab that connects the casing
Remove two bolts from the motor
Pull off the housing and motor
Separate the housing from the motor
3. Installing the New Motor
If replacing the housing only, attach the new housing to the motor
Clip the housing into place
Insert the bolts into the housing
You may hear a cracking sound as the bolts thread
Clip the casing back into place
Insert the Phillips screw into the casing
Apply white grease to the motor assembly tracks
Put the bushings on the motor assembly brackets with the thinner side on the outside
Being sure not to let the bushings fall off, slide the motor assembly on to its tracks
Insert the 10mm bolts that holds the motor
Reconnect the wiring harness to the motor
4. Reinstalling the Trunk Liner
Reconnect the wiring harness to the trunk light switch
Push the trunk liner into place
Insert the Phillips screws into the trunk liner
Connect the light to the wiring harness
Insert the clips into the trunk liner
Brought to you by 1AAuto.com, your source for quality replacement parts and the best service on the Internet.
Hi, I'm Mike Green. I'm one of the owners of 1A Auto. I want to help you save time and money repairing or maintaining your vehicle. I'm going to use my 20-plus years experience restoring and repairing cars and trucks like this to show you the correct way to install parts from 1AAuto.com. The right parts installed correctly: that's going to save you time and money. Thank you and enjoy the video.
In this video, we're going to show you how to replace the rear hatch pull down motor on this 1986 Chevy Camaro Iroc-Z. Same as any '82-'92 Camaro or Firebird or Trans Am Formula. The only tools you'll need are a Phillips screwdriver, a flat blade screwdriver and a 12 mm socket and ratchet or a wrench.
A properly working hatch on one of these cars, you put it down, nice and easy and then the motor sucks it down. Then when it pops up, you can see right here that's coming up. First take the flat blade screwdriver. There are four of these plastic pins. You can see I've already taken the trim out of this side. It's not necessary to take that piece of trim out. It's just something I did in a previous video. Take a Phillips screwdriver. There are two screws on top. We'll fast forward through removing those screws. Then, before you can actually take this light out, just gently pry out one side and it comes out like that. Then just pull the connector off. It has a couple of ears and you want to gently pry those because this is usually pretty brittle. Pry and pull at the same time and that light comes off. The switch is still hooked up. I'm just going to pull the switch connector right off. There's the switch connector. This can stay just like that. Looking closer here, here's the pull down motor.
At 1A Auto we sell a new pull down motor assembly with the housing. We also sell the housing on its own. Generally if the motor burns out when you lower or pop your trunk lid you won't hear any noise. What else can happen, is the plastic housing can break and when that breaks usually you'll hear a noise and a clicking or grinding noise. If you're hearing the noise that means the motors working and probably your housing's broken. Either way, the next step to get this apart is to take an 11 mm socket with ratchet and there are three bolts over here. There's one, there's two right close to each other right here, and then one further down here. We'll remove those. We'll just speed it up here as all I'm doing is undoing those bolts. You can see that I'm removing those things that are loosening up. Once you remove those you can pull your motor out and this whole assembly can slide down and out and then what I would tell you to do is take these plastic things off and put them aside because they will fall off. A better term for the plastic things is plastic bushings. You can see on mine one is broken. If just one's broken, you're probably OK enough to slide on.
Now what you want to do is flip this around. Actually before you do that actually probably one of the first things you do really is disconnect the motor here. Just pry up on a little tab and disconnect there. Flip it up and over and there is a Phillips screw right here that goes into the motor and you can actually see my housing right here is cracked right around that screw which is kind of the beginning of a problem. Remove this Phillips screw. Now go back to your regular screwdriver. There's a little tab here your pry out on and push this whole housing off. What that now enables, is there are two bolts on top here that you need to remove.
There's your housing out or your motor assembly out. If you're just going to replace your plastic housing it simply pulls off like that and your new one goes on. Obviously if you're going to put your new motor on, then you just bolt it in place. I'm going to use the new housing. My motor is working fine for now. So I'll put a new housing on with the existing motor.
I've got it upside down. You want to put the motor on. Make sure that this goes on and lines up there. You might have to just kind of force it on there a little bit. It went on OK. Start this bolt here. When you first put these bolts in you will hear a little bit of a cracking and feel a little bit of cracking sound. That's the bolts threading their way into the plastic. You're not breaking anything. It's just how they work. We'll fast forward through putting that bolt in the rest of the way and then start that other bolt that goes up and in the same way and tighten it up.
Now you want to take this and it has to go into the casing here on this side. This goes onto the motor so then it clicks down on. Put our Phillips screw back on. I'll fast forward as we put that screw in. Just a note, this screw does thread itself as well and it's probably one of the tougher screws to get in. You see me change position a little bit to try and get some more leverage on it. Grease up the tracks with some white grease. Now you want to put these bushings back on. There's a groove in them. The thinner side goes out. The most fun part is actually getting it into the tracks with those all intact so make sure our upper ones are on there well. This guy already wants to fall off. That ones on there. They're going in nicely. The little one on this side are fine. Got this broken one on this, but that's going to right up in there. Once they're in it slides nicely. I'm going to push it up into place and then start our bolts that hold the motor. Start one. Now I'll speed it up here as I start the other two. Then I slowly tighten them up and when you get them tight you want them snug or firm. You don't have to tighten them up. You don't want to over tighten them and break the plastic housing. Plug that in. I'm really going to speed it up here as I connect that switch then just make sure the harness for the light is through. Put it up into place. Put those two Phillips screws back in. Then make sure that those pins are back in. Hook up the light.
We hope this helps you out. Brought to you by www.1AAuto.com, your source for quality replacement parts and the best service on the Internet. Please feel free to call us toll-free, 888-844-3393. We're the company that's here for you on the Internet and in person.
747-000
In Stock
Product Reviews
Loading reviews
4.75/ 5.04
4 reviews
5 Stars
4 Stars
3 Stars
2 Stars
1 Star
3
1
0
0
0
Trunk pull down.
M
September 9, 2020
This item is a perfect match for functionality, although the gear casing and housing are pressed in black compared to the original which was clear this info is for the purist
Item works fantastic. I would recommend this to those who need proper fitting and functioning items. It now closes!
Great Value
Garry
May 10, 2023
Perfect fit. Install video was a huge plus. Kudos!
Trunk Lis Pull-down motor
Paul
July 31, 2023
Part fit and works well. Video was a great help. Very satisfied.
Exquisite
William
August 25, 2024
Good product, had small fitment issue but got it eventually. Would definitely recommend to other people.
Customer Q&A
What is the operating voltage for the motor?October 9, 2017
Jerad K
10
Dont have a clue
October 9, 2017
Robert H
10
We do not have this voltage available. You may attempt and contact Dorman who would have more specific details on the operating voltage.
October 9, 2017
Alex P
10
12 volts
October 10, 2017
B R
I installed the new gear and housing. My trunk light is working so I know I have power to the unit. Everything is back together and it still doesn't work. I do not hear anything at all when the hatch is lowered. It does not pull down. What's nexApril 9, 2020
T E
10
Thanks for your inquiry. There could be multiple reasons why you're having this particular problem. We suggest taking your vehicle to a nearby reputable shop to identify the cause. Once you know the cause, we'll be happy to see if we carry the parts and how-to videos needed for your repair.
April 9, 2020
Jessica D
will this fit in a 1992 firebird?January 18, 2023
BRUCE C
10
No, this part will not fit your vehicle and we currently do not carry the one you need. The closest thing we have for your '92 Firebird would be the motor housing, which is part number 747-001.
January 19, 2023
Andra M
10
Will this fit 1996 Cadillac Fleetwood brougham
February 10, 2023
Carlton E
10
This part will not fit your vehicle, but we may have a part that is listed to fit.
Please enter your vehicle's year make and model in the search bar at the top of the page. This will display parts guaranteed to fit your vehicle. Just be sure to verify all of the information shown in the Vehicle Fit tab before ordering.
February 10, 2023
Jean O
Customer service
877-844-3393
Monday - Friday 8:00am - 9:30pm ET Saturday - Sunday 8:00am - 4:30pm ET
Pontiac is a registered trademark of General Motors Company. 1A Auto is not affiliated with or sponsored by Pontiac or General Motors Company.See all trademarks.
Enter Vehicle Year Make Model
Specify your vehicle's year, make and model to guarantee fit.
Year
Make
Model
Options
Drivetrain
This part doesn’t fit a . Select from parts that fit.