Hey friends, it's Len here at 1A Auto. Today we're working on our 2004 Volvo XC90. It's the all-wheel drive version. And I'm going to show you something very simple, replacing the crankcase breather hose. Can be super easy. I can do it. You can do it too. As always, if you need this or any other part, you can always check us out at 1aauto.com. Thanks.
All right, so you can see we've got a clamp right along here. It's not really holding on super tight, so this doesn't seem like it's a type of clamp that you'd really need to replace with something strong and clamp it down nice and tight. This is just a breather hose. It's under no pressure. It's essentially just air going from inside the crankcase down in under there and getting recirculated. So with this type of clamp, it's a single use only type of clamp, and once it's pinched on, it's on and that's it. You can't take it back off and reuse it. So we're just going to give it a little bonk, get it to separate, remove it, and I'll show you what it looks like.
So this just goes around the hose all the way around like that, and then it kind of latches in with these little latches. And then once it's latched and it's pretty tight, go right on here and you give this a little squeeze and it tightens up even more. Like I said before, this is a one time use, so go ahead and recycle this properly. We can move along.
Okay, so I'm just going to show you where the clamp is. You'll follow this hose down, right down in, and then there's the clamp. Once again, we're dealing with a single use clamp. So we're just going to use a long pry bar. We're going to give it a loving bonk, try to get it to break free, and then we'll draw the hose right out of here.
Pry bar, flashlight. I'm just going right on the little ear of that clamp, the part that I told you that you pinch down and squeeze it. That's the best place to grab onto these. A little bonkie bonk, should break free for you. Okay. Let me grab another screwdriver, something a little smaller. I'm just going to see if I can get that ear, just make it so I can get this stuff to let go. If it doesn't let go with this, I'll go back to the bar again.
The part that this hose is going on to is plastic down there. So you need to be careful not to go ahead and bonk right through that plastic obviously. If I could get this in. Now grab my hose, just going to see if I can lift it up from here. Now I'm just going to try to pull the hose up. Okay. It's definitely on there still.
Sometimes these come off easier than other times. The clamp is definitely not holding it on at this point. I can move the clamp all around. No problem. So I don't think that's the issue. I think it's just the fact that it's been on there since 2004. And there it is. It just wasn't willing to want to come off. It was happy there. So there's our breather hose. We're going to compare this to the new one and we'll continue.
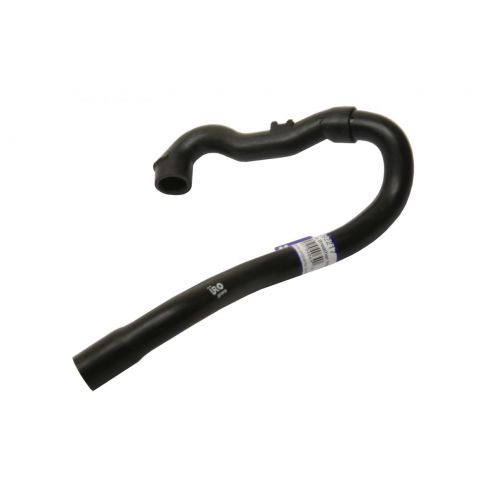
So here we are friends. We have our crankcase breather hose out of our 2004 Volvo XC90 all-wheel drive version. And over here we have our brand new quality 1A Auto part. Yes, it's true. They do look a little different. The reason for that is because this one's been in there since 2004. It's seen a lot of oil, and in all honesty, it's a little swollen. It's tired. It's ready to be recycled into something new.
This right here is a quality part. It's made to the same shape so it can go up and over and around and down and through, just like it's supposed to do. The only difference would just be that this one hasn't had a whole bunch of oil and stuff getting pushed through it over time with all the air and oil and getting swollen. This is a little bit smaller looking than this one as you could tell. It's okay though. This is still going to fit over everything just fine. It's just not going to be all loosey goosey.
With that said, I don't see any reason why this wouldn't be a quality part to install under the vehicle. So I'm going to go ahead and do it. If you need this or any other part, you can always check us out at 1aauto.com. Thanks.
Okay. So we took off those clamps down there, like I said. And those came off very easy and neither of them were very tight. This hose doesn't have any real pressure inside of it, whether it's vacuum or positive pressure. So when you go to put this on, essentially you just need to make sure that it can't slide off. So it doesn't need to be super tight. I'm just going to go with some of these wire ties. I'm just going to go right like this. Get it so it's approximately the size of the hose.
When we bring this down in, after we get it down and onto where it's going to go, I'm going to grab this with my needle nose as close to the locking area as I can. And then I'm just going to twist. Twist, twist, twist. It's going to continue tightening this down until it can't go any tighter. And then I'll just trim off whatever's left and we'll do the same for the top.
Oops. It's got to go through here. Right down and in. Okay. So I can see where the hose has to go. It's right near where the hose is now. I'm going to push it over where it's going to be happy. I'm just trying to give this a little bit of downward pressure with this hand as I try to push and twist with the other hand and slide it down. If the zip tie or wire tie, if the wire tie is in the way, just slide it up, and we'll slide it back down once this is all the way bottomed out down there.
So now that we've got the hose all the way down, we're going to make sure that the wire tie's centered on where the stud is that's coming out of that unit down there and goes up into the hose. Once we know that the wire tie is centered, we can go ahead and snug it down. I'm just going to use my long nose pliers or needle nose pliers. Grab onto it. Give it a little twist so it's going to tighten down that wire tie. Here we are.
If you're terribly worried about the extra, just trim it off. And it's down in here. Nobody's really going to see it anyway, but there we are. That's off of there. Give it a nice tug. Yeah, it's going nowhere. Nice. All right, so that's definitely in down there. We gave it a nice little tug. We didn't rip the hose. Obviously, I wasn't putting my full body force into it. We're going to grab another wire tie, go up along here, and then we'll just put it right on there. Slide this on and wire tie that end.
Thanks for watching. Visit 1aauto.com, your place for DIY auto repairs, for great parts, great service, and more content.