Hey, friends, it's Len, here at 1A Auto. Today, I'm working on our 2004 Volvo XC90, all-wheel-drive version. And I'm going to be showing you something very simple. We're going to be replacing the oil and the oil filter housing. It's going to be very simple. I can do it, you can do it too. As always, if you need any parts, you can always check us out at 1AAuto.com. Thanks.
Okay, friends. So, we just got underneath the hood here. You're going to come over to where your oil cap is, which is right here. Take that off. Take a peek at it. Make sure the seal isn't too bad right there. This one looks like it's borderline. We might replace that at some point. We'll set that right over here. Your oil dipstick is located right here. It's for checking the oil level once you're done. I'm going to leave that down for now though.
While you're under the hood, it's always a good idea to go ahead and check your fluids. You've got your coolant reservoir right here. It's got the green cap. Power steering reservoir right here. It's got power steering written right on the top. This is your washer fluid. Should have a little cover on there. Generally speaking, it'll be blue or black, but generally, blue. Should have a cover. Come across the car, you've got your air filter housing right here. And your brake fluid reservoir right there. Under here's your fuses if you need to take a peek at those. I don't see any reason why you need to for an oil change. I just like checking all my fluids and my air filter while I'm under the hood. It's just a good habit.
So, now that we got the oil cap off, we can raise the vehicle or at least get underneath the vehicle and drain the oil. All right, so now that we're underneath the vehicle, we can see that we have this right here. We're going to use this little cup. This is a 86.5-millimeter cup. Just slide it right up on here. I like to give it a couple of bonks just to make sure that it's completely set. If you kind of put it on and you just get the tip of it, a lot of times you'll just kind of round off the edges. In which case, you're going to have a major issue trying to get your filter off.
I'm going to use my 22-millimeter socket and my ratchet just to remove the filter here, turning it counterclockwise. Got my oil bucket here, hand protection and of course, eye protection. Have a rag ready. There's our oil and the filter. As you can tell, that oil is completely filthy, black. This was well overdue by the look of it.
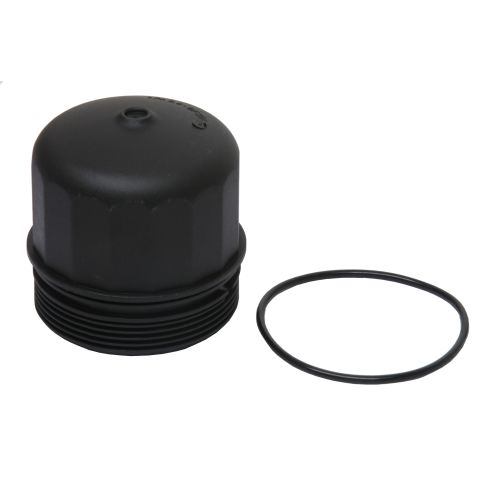
So, here we are, friends, a quick product comparison for you over here. We have our filter housing out of our 2004 Volvo XC90 and our brand new quality 1A Auto filter housing. The inside's been upgraded, which is very nice. You're going to have less oil getting past that oil filter, super important. Aside from that, it's the same shape. You got the same thread pattern, super important. The new housing even comes with a brand new gasket.
Every time you change the oil and or take down this filter housing for any reason, you need to replace the rubber gasket that comes right here. Generally speaking, when you buy the filter kit, it comes with a gasket. So, in which case, you would just take off the old one by taking it with a screwdriver. Pop it off of there. Slide on your new one. Grab your new oil filter. Give it a bonk so it's in there nice and tight and then screw this into the vehicle. With that said, I don't see any reason why this wouldn't be a quality part to install into the vehicle. So I'm going to go ahead and do it. As always, if you need this or any other part, you can always check us out at 1AAuto.com. Thanks.
So, we're going to take our filter, put it right down into the housing. It kind of feels like it wants to sit there, but it doesn't, it actually really wants to go a little further. It just doesn't know how to tell you. So, I'll just go over to it, push it down on there, give it a little twist. It sits in there nice. This is what it's supposed to look like before it goes into the vehicle. Now, all you do is just add a little bit of lubricant along here, some brand new engine oil. So, you lube your gasket and then you can install it into the vehicle and torque it to 25-newton meter.
All right, so we got some clean oil on her finger here, gloved finger, I should say. I'm just going right around this seal right here. Okay. It's super important to make sure you put oil on this. It doesn't seem like it would be that big of a deal, but it's going to help you in the long run. Next time you go to do this oil change, the gasket won't be stuck up on there and the oil filter would come off much easier. Before we go ahead and put this up in there, I'm just going to use our rag, just come right around. Make sure that there's no leftover pieces of gasket in there. There's no debris, no gunk of any sort.
Take this, put it right up in here. Turn it clockwise. Okay, we got our little cup. I'm just going to tighten this up until it bottoms out and then we'll torque it down. That's bottomed out. We're going to stop there. Grab my torque wrench. So, we're going to go ahead and torque this down to 25-newton meters. There we are. As you can tell, it's not very much at all. Just like that. Just a little wiggle. Let me get our tool off of there. A lot of times, when the tool sticks on, you just take your socket and your ratchet and give it a little wiggle like that and it'll come right off. What happens is it just kind of gets jammed in on the flutes there as it spins, so you just got to break it free.
All right, we'll get our tool out of here. Clean up our mess, drain some oil. Keep on rolling. So, it's time to drain the oil. We're going to remove the drain plug, which is located right here. We need a 17-millimeter wrench. I've got my eye protection of course, and my hand protection still. Get this on there. Have our oil bucket ready. The oil's going to come out and down. We don't know how far out it's going to want to come. There we are. Heard the gasket fall in there, so we'll make sure we check for that there. Here's our drain plug. Set that aside.
So, we've got the oil coming to a slight trickle there. We've got our new gasket, our drain plug. We wiped it down. We're just going to put our gasket right onto the drain plug, just like that. Put the drain plug up in here. You can wait as long as you want for the oil to finish draining. It's going to keep dripping like this for a long while, really. So, pretty much, as long as it's not coming out in a solid trickle and just keeps on running and it's just out a drip like this, I'd say you're probably doing all right. But like I said, you can wait as long as you want. It's your prerogative, how much time you got in the day to do this. It's really up to you.
Take our drain plug. I'm just going to tighten it up by hand here, 17- millimeter wrench again. Get it so it's bottomed out. Just give it a teeny bit more, just like that. And that's it. You don't need to keep cranking, cranking, cranking, cranking, cranking until you're really ripping on it. Just until it bottoms out and then a teeny bit more just like I did. So, there's that. We'll clean this down and we can continue. All right, so we're going to use a little bit of parts cleaner. Just try to clean up our mess a little bit here. Less oil that drips on the ground and contaminates mother nature, the better. There we are. Just take a rag, we'll wipe down the rest.
All right, so it's time to go ahead and add some oil to this. This particular vehicle, the 2.5 with the turbo, takes 6.1 quarts of oil. So, just over six. If you only have six quarts, that 0.1 might not kill the engine. I'm just letting you know that the capacity is 6.1 and that's including the filter. If you want to, you could try using a little funnel right here.
The only problem with the funnel is you've got this in here. So, I'm going to try without the funnel and just hope that I don't make too big of a mess on top of this engine. Wish me luck. We're going to use 10W-30 for this application. I'm just going to pour it right into the fill. Just wait for that to fully run out. All right, now that we've got our six quarts of oil in this, we'll take our cap, just get it on there. We'll dispose of these properly and we'll continue.
So we'll just start it up. There we are. Let it run for a second here. All right, let's go check that oil level. Grab this oil dipstick. I'm just going to pull it straight up, wipe it right off. Show you what we're dealing with here. You've got your etch lines there or your hatches. You can see there's a bottom line there, a top line there, and a whole bunch of X's in between. As long as your oil is anywhere in between here, you're doing it right. Up closer to the top line would be best. Anything above the top line is the worst. Okay. I would rather have it maybe a skoch below that minimum line there. Then even a little bit above the maximum.
So, let's check it real quick. There we are. Can see it's just below the maximum. I would say that that's perfect. If you wanted to, you can add that 0.1 that's missing, but if you do end up putting in a little bit too much and you go over the full, you're going to need to climb back underneath there and drain a little bit out. Otherwise, your oil will get aerated and you can cause issues to the oil pump, and of course, engine damage. So, that said, we'll put this back in here. We'll make sure all of our caps and covers are tight. Anything that we might have loosened up. And if it looks good, we'll close the hood and down the road, we go.
Thanks for watching. Visit 1AAuto.com for quality auto parts shipped to your door. The place for DIY auto repair. And if you enjoyed this video, please click the subscribe button.


