Hi, I'm Mike from 1A Auto. We've been selling auto parts for over 30 years.
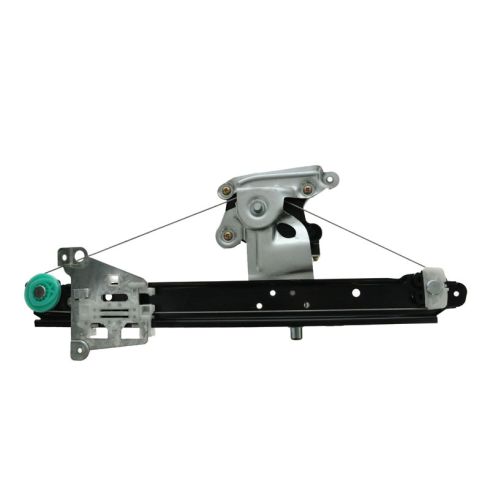
Hey, everyone. Sue here from 1A Auto, and today on our '03 Volvo V70, I'm going to show you how to install a window regulator in the back passenger door. If you need this part or any other part for your car, click on the link below and head on over to 1A Auto dot com. These clips are a pushpin, you just push in the center. That's the first stage, and then you can just pop it out. That's what it looks like. To reinstall it you push that pin in, out all the way like that. Then you can put it in and flatten it out.
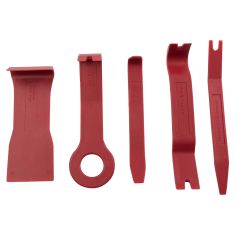
So, we're going to take all the pins all the way around that hold the panel on. There's two on the inner side of the panel, so don't forget those. There's two on the bottom. And then the two on the side. We're going to take this plastic cover off, and underneath it should be a mounting screw of some sort. I just use a pocket screwdriver, because you've got to get something real thin in there. And then I'll use the body tool to pop that out. As you can see it's a torque spit head on that mounting screw, and this was T-25. We're just going to back that right out.
Now we can just grab the panel, and we're going to raise it up off of the top window ledge, and the lock button you can push down to help. Just lift it up like that. So, to pop this cable off, there's two clips right here, one on the top, one on the bottom. We're just going to kind of spread those and pull out at the same time. And it comes right off. Then we have the connector for the main switch for the back window. Sorry, not the main switch but the back switch. See that tab right there? Push down on that. Pull that out. Now we have the panel off.
Going to take off the insulation, and it has glue from the factory. As you can see it's like a foam glue, so we're just going to peel that back. Try not to break the actual insulation. I switched over to a razor blade, trying to stop any tears, unwanted tears. We're going to take the window switch out of the back passenger door panel, and you have these little four tabs. There's one here, one there, and two on the other side. I just take a pocket screwdriver, push it aside, and try to sneak out back. Let's do the back first. That might be wiser because I can't see back there. There we go. Bingo.
So, I'm going to connect the window switch without the panel so that I can operate the window. I've got to bring it down so I can dismount where the two mounting bolts go to the glass. There are the two mounting rivets. One here, and one there. We're going to take a drill bit, and we're going to drill the center of the rivets, and that way they'll pop right out. And then we'll support the glass with some tape. That takes that off. Okay. The rivets have a little bit of metal still stuck in the regulator, so the glass should not fall down on you. So, now we can pop it out of that and raise up the glass.
Seems pretty tight, but don't let that fool you. And we're going to use some painter's tape. We have two other points of rivets that we have to drill out. We have one here, and then one down there on the bottom of the rail. This one holds the motor, so the bracket goes there. And it goes without saying the drill bit, what you want to do is the goal is to cut out the center of it, as you can see. That broke free, so I'll just take a cold chisel and snap that down. So, make sure you don't pick a drill bit that's too small because you want to cut the flat surface.
So, now I'll take my cold chisel and just tap it. Same with the bottom, see if we went all the way through. Yep. So, now I just have that 10 millimeter nut inside, 10 millimeter socket, shall I say. There we go. So, before I pry the regulator with motor out, I'm going to disconnect the electrical motor. And that's a tab right there. I'm going to use a little pocket screwdriver. Push down on that, and you pull back on the harness. Now we can grab the regulator, push that stud out, and just guide it out.
Here we have our brand new regulator with the motor mounted from 1A Auto, and here we have the manufacturer one we just took out of our '03 Volvo V70. It is the rear, driver's rear passenger door window regulator. They are identical in everything, mounting, brackets, color brackets, and the electrical outlet, same shape. If you need this part or any other part for your car, click on the link below and head on over to 1aauto.com.
I'm going to place the new regulator in the door. We have a stud on the top that's going to go through this hole right there. Let's see if we can guide it through. There we go. Now I can let it hang. I'm going to plug the electrical connector in. Just push it 'til it clicks. And I'm going to put the mounting nut on the top, just snug it so that I can hold it in place while I rivet the rest of it in. And that's a 10 millimeter socket. Just hand snug that.
Here we have a window regulator rivet gun. It's a extra large size rivet gun for the heavy duty rivets that go in some American made cars. So, it comes with everything you see here. It's got the oversize rivet gun, it has five attachments for different size diameters of rivets, and it gives you the size on the side.
It has a catch bin for the actual nail type leftovers when they pop out, instead of falling on the floor. That's a plus. Comes with a wrench. Comes with some lock bolts and nuts. So, if you need this tool or any other tools, click on the link below and head on over to 1aauto.com
So, now we're going to grab our rivet gun from 1A Auto, and I'm going to install the rivet right into the tool like that, find my mounting hole, line them up. You see that's lined up for the motor bracket. And I'm going to install the rivet. Make sure it goes right through both brackets, and then compress. When you use a rivet gun, when you open the arms again, bring it back down onto the pin, and it snaps off. And on this particular gun, it's awesome, when I open it up the danger part, the nail part that some people leave on the ground, the next thing you know you got a flat tire, goes right into this catch bin. That's nice.
So, now we're going to grab another rivet. Open the arms, load it, and go to the bottom part here. Bring my arm in here. I might have to move the bracket back and forth to line up the hole. Pushing the force into the door, I squeeze the arms. When I bring it open, push back into the door, squeeze the arms, and then hold it upright, and the pin falls in there. Now that regulator is nice and tight. I can tighten the top nut. Our switch is still mounted, so now I can put the key on. Then I'm going to lower the regulator down so that I can get my rivet gun in and rivet the glass to the regulator.
I want to get it lined up so that I know I can get my rivet gun at this pin and the one on the back also. I think that's a pretty good location right there. So, now I'm going to undo my tape and slide my window down. Now with the tape removed, I grab my glass firmly, and I'm going to slide it down. And I want it to stay straight in the runners. I don't want it to fall at an angle. You can see the old rivets are right there, and that's perfect, that's what I wanted, it lined up in that way. Now with the glass down I expose the old rivets that are still stuck in the glass. So, I'm going to take a smaller drill bit and I'm going to try to drill those rivets right out so I can reinstall the glass. There we go.
So, we got that one by drilling it to the next size up and going through the center of it, so I'm going to do the same thing to this side. Now that we've finished punching out, or drilling out the rest of the rivet that was left behind, I've got my new rivets lined up in. Straighten it out. Nice. Now with all our rivets in place, I'm going to check out the motor one more time, make sure the window goes up, sits in place, and goes down nice and smoothly. Now we're going to disconnect the switch so we can put it back in the panel.
So, you're going to make sure that you got the switch facing the correct way, and you're going to line up the mounting tabs, and push it up and then snap it right into place. I'm going to carefully guide this back through the bracket here. Get it to fall into place. It wants to fall into place naturally. It just seems to automatically stick back to that adhesive, that white foam. So, now we're going to reinstall the inner handle cable. It's got this plastic piece that just lines right up perfectly, flat, square, and just snap it in. Now we can connect the electrical connector. That's for the window switch. Okay. Going to put the latch, the lock down all the way. See if I can guide my cable back into the plastic. Put that into the whole. And you'll see that ridge line up here, put your panel right into that ridge line. Nice and firm, and then push down.
Confirm that my mounting hole lines up, and it does. And all my six pins line up. I'm going to put the pins in first. That is to make sure that rivet piece is extended out, not in. I'll show you how to do these all the way around. Guide it into place with that pin out, and then you push the pin in til it's flush. Like that. Do that to all six of them. That's the last pin, and now we're ready to install the mounting bolt. It's located in the handle. So, it's a T-25. Tighten that right up, and put the plastic protective cover on. You have two plastic guides, see how it sits? So, it goes down in that way, and snaps right into place.
Thanks for watching. Visit us at 1aauto.com for quality auto parts, fast and free shipping, and the best customer service in the industry.


