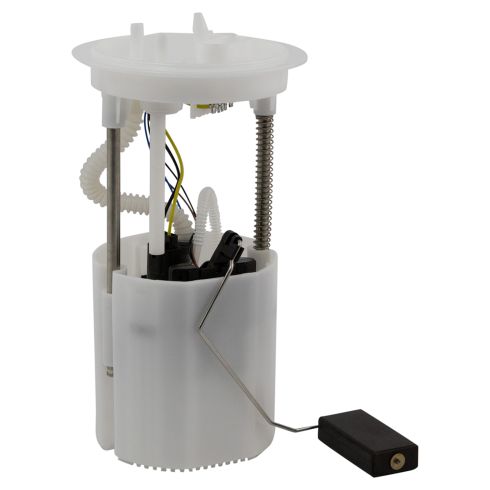
1AFPU00442-VW Audi Fuel Pump Module Assembly TRQ FPA61970

Replaces
2006 VW Jetta L4 2.0L Fuel Pump Module Assembly TRQ FPA61970

Frequently bought together
Product Reviews
Loading reviews
4.93/ 5.0
15
15 reviews
Awesome!
November 5, 2018
Great items at great prices. I shop this site for nearly every purchase I have online for my vehicles needs. Thanks you!
September 5, 2019
My part came package well. The check out process was easy online. Thanks A1 for great parts and service
2008 VW FSI gti inside gas tank fuel pump.
April 20, 2020
Fuel pump installed as per video, no problems.
Working GREAT...delivery on time.
would recommend this pump. Gas level worked PERFECT..
Great buy
April 22, 2020
This product was exactly what I needed for my VW. The video to change the part was spot on.. Ill be purchasing my parts from you guys thank you
Great replacement
October 17, 2020
Replaced this in my 2007 jetta 2.5 very easy.
My old fuel pump was making a banging sound. Once I put this in the noise was gone. Very good quality and fast shipping.
Great replacement part (2012 VW Jetta S Model)
February 26, 2021
Overall product was great and the installation was quick and easy, just need to make sure level in your fuel tank is low when you replace the old one. Also disconnect your battery and the most important step: PUT THE GASKET ON THE FUEL TANK FIRST and only after doing so you can then proceed to push the pump and lock it in place otherwise you WILL NOT be able to properly seal the fuel tank
Works as well as the OEM part
April 12, 2021
Very pleased with the product. The design seems to actually be better than the OEM part as the level sender arm is much easier to get to if/when it ever needs a clean.
Awesome
May 6, 2021
It's the best find I found for a replacement fuel pump for my Jetta. Runs well, Fit well, No problems with installation. All around best pump for the money!
I recommend 1A Auto to friends and family
August 12, 2021
Well. I have no experience in mechanics but I change fuel pump myself and the help of God n my stepfather. It took longer to remove the rear seat than changing the pump. Lol
Well its been about 2 weeks now and So Far So Good. No cold hard starts no more. Yes.
Hope it last for ever. Lol
Thank You Guys
Blessings To You All
Couldnt be happier
August 30, 2021
Ive had this fuel pump installed in my car for about 18 months. It was easy to install and it hasnt missed a beat. I have a Stage I APR tune in my car, so I wasnt sure, but I figured Id give it a shot. I saved hundredsCouldnt be happier.
Solved my GTI problem
September 8, 2021
Changing this until solved my starting problems... great price!
30min job. Seats are the challenge. Consider method to manage/dispose of fuel.
September 4, 2022
Product fits
High pitch noise from the assembly when running, even with sound dampening material/seat in place.
I would elect to try a more expensive product in the future, but noise is not enough for me to replace.
April 27, 2024
Very well made and does excellent work and since the install has made my car run a lot better and smoother then the factory's fuel pump
Fix vw gti 2007
June 9, 2024
Funciona perfectamente en mi vw gti 2007, hasta ahora el carro rueda de maravilla, fcil de usar y es exacto como se describe
Pump it Up
October 9, 2024
It seems a bit cheaper and lighter than the factory one that we replaced. But, it cost a heck of a lot less and seems to be working great, so I'm happy.
Customer Q&A
WILL THIS FIT 2.5l ?
October 12, 2018
10
The fit will depend on your year range as well as your engine size.
October 12, 2018
Emma F
Buenas noches sirve para jetta 2.5 modelo 2010 ?
March 5, 2022
10
This part will not fit your vehicle, but we may have a part that is listed to fit.
Please enter your vehicle's year make and model in the search bar at the top of the page. This will display parts guaranteed to fit your vehicle. Just be sure to verify all of the information shown in the Vehicle Fit tab before ordering.
March 7, 2022
T I
Will this pump fit 2.0 diesel?
April 30, 2024
10
Please provide your full vehicle information or VIN number to confirm product availability and fitment.
May 1, 2024
Nick R
Volkswagen is a registered trademark of Volkswagen AG. 1A Auto is not affiliated with or sponsored by Volkswagen or Volkswagen AG.
See all trademarks.


