Brought to you by 1AAuto.com, your source for quality replacement parts and the best service on the Internet.
Hi, I'm Don from 1A Auto. I hope this how-to video helps you out, and the next time you need a part for your vehicle, think of 1AAuto.com. Thanks.
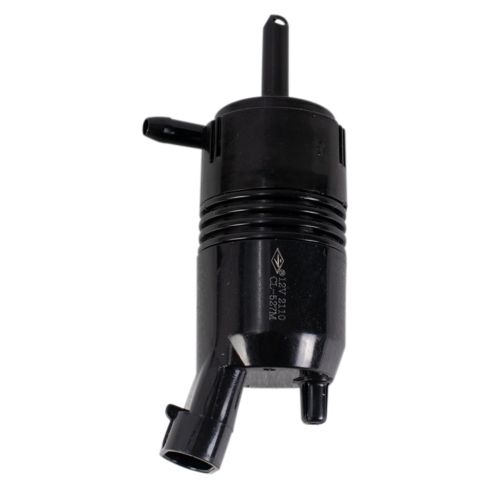
In this video, we're going to show you how to replace the front washer pump on this 2002 Chevy Suburban, and it's the same part and similar process on these Suburban's from 2000 to 2004. The items you'll need is a new front washer pump from 1AAuto.com, 10mm and 13 marginal socket and ratchet with an extension, 8mm wrench, flat blade screwdriver, and a pair of pliers.
Start off by removing this 10mm bolt, then loosen this 10mm bolt right here. Then just move this brace out of the way. Now, using your 8mm wrench, you just want to loosen up both of these connections. You start with the negative, loosen it, and then pull that off and then remove the positive cable. Now, you want to remove this 13mm bolt and pull this battery hold down up and out. We'll just fast forward as Don removes that bolt. The hold down will just pull right up and out. Now, lift your battery out. Now, remove these seven 10mm bolts in the battery tray. We'll fast forward as Don does this. Now, lift the battery tray up and out.
Next, remove these four clips from inside your inner fender. For the smaller clips, you want to just pry out the center and the bottom will pull out. You can either use a flat blade screwdriver to pry out the center and then use pliers to pull it out the rest of the way, or you can use wire cutters and just feed them underneath it and just pull them out with those just make sure not to cut the clips. For the larger ones, you just pry them out. We'll just fast forward as Don removes those other three clips. Now, lift up on this tab and pull the inner fender free. Then just tuck the inner fender back behind the wheel.
Pull the hoses free from the side of the washer bottle, and then just remove this 10mm bolt. We'll fast forward as Don does that. Then remove this 10mm bolt down behind the inner fender. Now, if there's washer fluid inside your washer bottle, you want to just make sure you have a drip pan underneath it and then pull the washer pumps up and out. Then disconnect your washer level sensor. To do this, you just pull up on the tab and disconnect the harness and then push the washer bottle down and out.
Pull the hoses free from the side of the washer bottle, and then just remove this 10mm bolt. We'll fast forward as Don does that. Remove this 10mm bolt down behind the inner fender. Now, if there's washer fluid inside your washer bottle, you want to just make sure you have a drip pan underneath it. Then pull the washer pumps up and out. Disconnect your washer level sensor, and to do this you just pull up on the tab and disconnect the harness. Then push your washer bottle down and out.
Now, your front washer pump is the one with the blue harness. Lift up and disconnect the harness, and then just pry this hose off. On the left is the old washer pump; on the right is the new one from 1A Auto. You can see they're very similar, and they'll fit and work exactly the same. Take your new washer pump and push the hose into place. Then, reconnect the harness. Feed your new washer bottle back up into place. Feed your new washer bottle back into place and then take your washer pumps and push them straight back down into the washer bottle and then back until they snap in.
Now, reconnect your level sensor harness. Pull the washer bottle up into place and re-clip the hoses on the side. Then replace that 10mm bolt just tighten it up. Then replace and tighten up this lower 10mm bolt. Now, pull the inner fender back from behind the wheel and into place. We'll fast forward as Don replaces those four clips. The larger ones just push right in and the smaller ones you just push them in and then push the center in to lock them. Replace your battery tray and then replace those seven 10mm bolts. Lower your battery back into place and then put your battery hold down back into place. Just tighten that back up.
Now, reconnect your positive battery cable and tighten it up. Now, reconnect your negative battery cable and tighten that up. Put that brace back in place and then replace that 10mm bolt and tighten it up. We'll just fast forward as Don tightens up this 10mm bolt and the 10mm bolt at the other end of the brace. Now, replace your washer fluid, put your cap back on, and you're all set.
We hope this video helps you out. Brought to you by www.1AAuto.com, your source for quality replacement parts and the best service on the Internet. Please feel free to call us toll-free, 888-844-3393. We're the company that's here for you on the Internet and in person.