WARNING: This product can expose you to chemicals including Lead and Lead Compounds, which are known to the State of California to cause cancer, and birth defects or other reproductive harm. For more information, go to www.P65Warnings.ca.gov.
Lifetime Warranty
This item is backed by our limited lifetime warranty. In the event that this item should fail due to manufacturing defects during intended use, we will replace the part free of charge. This warranty covers the cost of the part only.
FREE Shipping is standard on Orders shipped to the lower 48 States (Contiguous United States). Standard shipping charges apply to Hawaii, Alaska and US Territories. Shipping is not available to Canada.
Expedited is available on checkout to the United States, excluding Alaska, Hawaii and US Territories as well as P.O. Boxes and APO/FPO/DPO addresses. Final shipping costs are available at checkout.
How to Replace Fuel Tank Filler Neck 1989-97 Ford Ranger
Created on:
Tools used
Socket Extensions
Flat Blade Screwdriver
Rust Penetrant
7mm Socket
Ratchet
Needle nose pliers
5/16 Inch Socket
1. Remove the fuel tank filler neck
Pop the gas hatch and remove the gas cap.
Remove the three 7 mm bolts.
Raise and secure the vehicle.
Pull the fuel filler neck down.
Hit the bolt with some penetrating oil.
Use your 5/16” socket to loosen the clamp and disconnect the fuel filler neck.
Use a flat blade screwdriver to break the seal to remove the hose if necessary.
2. Install the new filler neck
Apply penetrating oil to the inner tube on the new filler neck to slide it into the hose easier.
Tighten up the clamps.
Bolt the filler neck in with your 7 mm socket and ratchet and the three bolts.
Replace your gas cap and close the little door latch.
Brought to you by 1AAuto.com; your source for quality replacement parts and the best service on the internet. Hi, I'm Mike Green. I'm one of the owners of 1A Auto. I want to help you save time and money repairing and maintaining your vehicle. I'm going to use my 20+ years experience restoring and repairing cars and trucks like this to show you the correct way to install parts from 1AAuto.com. The right parts installed correctly, that's going to save you time and money. Thank you and enjoy the video.
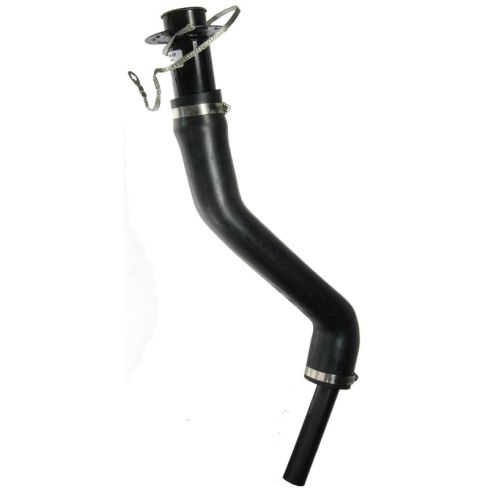
In this video we're going to replace the upper fuel filler neck on this 1996 Ranger. It's the same as any late 80s to 97 Ranger. A common- this is a common problem where the check engine light goes on and it throws the code for a loose fuel cap. Then if you look up underneath you can see that this part is rusted out. At 1A auto we do sell this part, as well as the entire filler neck that includes the rubber parts as well. If you need to replace the entire filler neck then you're going to have to remove the bed of the pickup. The tools you'll are 7mm and 5/16 inch sockets with a ratchet and extension, a flat blade screwdriver, penetrating oil and pliers. I do use a lift in the video to raise and lower the vehicle, but mostly that just to make it easier to shoot the video. You should not need a jack or anything like that.
Remove three 7mm screws. This one holds your lanyard for your gas cap. We're going to speed up here as I remove those three 7mm screws. This truck is a northern truck so everything's a little bit rusty. You can see that they actually come apart pretty easily and intact, which I was quite happy about. If you force it, there's that part of your fill tube right there. You can see this part here, another part is rusted out. That happens a lot. You can take a little penetrating oil and hope this comes apart. What I'm doing here it coating that bolt that holds the clamp together. All these are 5/16 socket. Here I'm using my screwdriver, putting it between the rubber tube and the metal part, which breaks the adhesion basically between them. After pulling down you reveal the inner tube and you have to break that clamp.
You can see here we put a clamp onto our inner tube and we put some oil, penetrating oil, around there so it will slide together easily. I'm freezing it here because something I forgot to mention is that I already have the large clamp around the outside on that upper filler neck. You put the large clamp onto the filler neck before you put in on to the small tube. I'm going to put this in and turn this so that our flap is pretty much down at the bottom there. Bring this clamp over and tighten it up. Speed it up here as I tighten it with a screwdriver and then follow it up with the 5/16 socket and ratchet. Now we'll take a little bit of penetrating oil. Spray that clamp, spray the ends of our outer tube. Let's push everything up in there so that clamp goes in. Push that in. Take our clamp here. I'm going to have it so it faces down, because when I put this up in you get the bolts started up here and then tighten up this clamp. We'll have it so we can get it snug in. I'm tightening that clamp so the clamp itself stays in place and I can still turn the neck when I go to attach it to the body of the truck.
Here I'm supporting the neck and starting one of the bolts in with my hand. Now you'll need to hold on to the neck. Reach underneath the truck and hold onto the neck. Push on that bolt with your wrench and start it. After you start that first one, don't tighten it up all the way, because you'll want to be able to move the neck around a little bit and get your other two started. I'm starting that left one and then I'll do the one that the lanyard that hold the gas cap on last. Once I have them all started; after I have them all started in most of the way then I tighten them up. You don't have them tight, too tight, just firm enough to hold it in place. You don't want to over tighten them and possibly strip anything. Now from underneath reach up in there and make sure you tighten that large clamp on the outer hose.
We hope this helps you out. Brought to by www.1AAuto.com, your source for quality replacement parts and the best service on the internet. Please feel free to call us toll free 888-844-3393. We're the company that's here for you on the internet and in person.
FNA64875
In Stock
Product Reviews
Loading reviews
4.50/ 5.04
4 reviews
5 Stars
4 Stars
3 Stars
2 Stars
1 Star
3
0
1
0
0
Filler neck
william
November 15, 2017
Excellent service and part can't beat it part fit and went on without a hitcj
Not for 94 Ranger Splash as it say's it fits.
Aaron
August 1, 2021
Did not fit nicely like an OEM part. Outer hose was too small in diameter to attach too my 94 ranger splash gas tank. By the time I discovered it, It was too late and I was dedicated to getting it on. I had to lube the inside with a little dish soap then fight and swear until I got it on.
German
April 4, 2022
The item Mach what I need (correct part)??
Michael
February 22, 2024
Looks like original a great quality part
Customer Q&A
WILL IT WORK FOR A 2000 RANGER XCAB 6 FT BED FLARESIDE ?November 16, 2021
Tony C
Customer service
877-844-3393
Monday - Friday 8:00am - 9:30pm ET Saturday - Sunday 8:00am - 4:30pm ET
Ford is a registered trademark of Ford Motor Company. 1A Auto is not affiliated with or sponsored by Ford or Ford Motor Company.See all trademarks.
Enter Vehicle Year Make Model
Specify your vehicle's year, make and model to guarantee fit.
Year
Make
Model
Options
Drivetrain
This part doesn’t fit a . Select from parts that fit.