Hi, I'm Mike from 1A Auto. We've been selling auto parts for over 30 years. We're dedicated to delivering quality auto parts, expert customer service, fast and free shipping, all backed by our 100% satisfaction guarantee. Visit us at 1AAuto.com, your trusted source for quality auto parts.
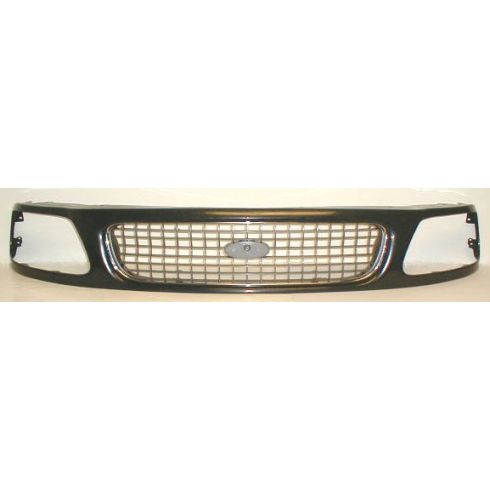
In this video, we're going to be working with 1998 Ford F150. We're going to show you how to remove and replace your vehicle's front grille. If you like this video please click subscribe. We have a ton more information on this and many other vehicles. If you need this part for your truck you can follow the link down in the description over to 1AAuto.com. Here are the items you'll need for this repair.
To remove your headlight, lift up on the tabs behind it. Now, sometimes you've got to wiggle them a little to get them to stay in place. Work your headlight out. You may be able to reach in from the back and push on it. You've got to make sure these tabs are fully disengaged.
Over time they wear out and they tend to get a little stuck. Once that's out you can unclip your headlight harness and remove it. On the inside edge of the fender is a seven millimeter screw. You'll want to remove that with a seven millimeter socket, ratchet, and extension. Once that's out, you can slide the turn signal assembly out of the grille, undo the tabs, and remove it from the vehicle.
Repeat these steps on the opposite side. Remove the tool for your spare tire crane. There are six of these plastic screw-type retainers. This one actually belongs in the back on the radiator. There are two of these. We have a few missing here, but you'll remove all of these with a Phillips-head screwdriver. Then on the back are these pop clips. Again, that one on the front actually belongs over on this side, so you remove the two of them with a trim tool or a flat-blade screwdriver by popping up on the center piece. As for the rest, with little to no pressure, you want to hold the base and spin the Phillips-head screw out. At which point, you can pop the base out of its retainer. Now simply lift up and remove this cover.
There are 10 Phillips-head screws securing the grille in. Two here, behind the turn signal, six along the top, and two more behind the other turn signal. Go ahead and remove all of these with a Phillips-head screwdriver. Under each fender, there are two plastic clips securing this wind dam.
We'll need to pop those off with a trim tool or a pair of pliers, and we'll have to get the two on the opposite side as well. Now, normally you'd need to grab the bottom of the grille and give it a good yank toward you. However, the reason you need to do that is because of a pair of clips that are broken on our grille, so we just need to bend up the plastic wind dam to get that past the bumper and we can remove our grille from the vehicle.
We'll need to pop the air dams off of both sides of the bottom of the grille. Do this by just popping the clips out with a trim tool or a screwdriver.
Reinstall the air dam onto the bottom of your new grille. The angle with the cut 45 here is going to go to the outside and there will be two clips hanging out past that. Ours is missing one, but you can see the opening there. The other four will go in and press into the bottom of your grille. We'll do the same thing on the opposite side. Our new grille comes with a new set of the lower grille clips.
We have a nice, new badge from 1A Auto. It comes with the adhesive already on the back, so what we're going to do is just line it up with the tabs on our new grille, press it on there, and it'll look just like the original piece.
Line up your grille. You have to bend that plastic air dam over to get it into place. We'll do that on both sides. Once the grille is tucked under you want to line up those little metal clips we installed on the bottom and press them into the cutout in the header panel.
Now our new grille is on the truck and you can see it looks just like our original did. We do have a different center grille. There are a few different options to choose from on these trucks. These grilles came in a few different styles. This is a little different than our original one, but the grille itself and all the chrome fits exactly the same way. These are also available in black and paint to match. You can see we have the same alignment tabs. All of the same 10 screw locations on it. We installed a nice, new OEM Ford badge on the front of our grille to make sure that it really looks just like our original piece. It brightens up the look of the front of your vehicle. It went on direct fit just like our original equipment did and really fixed up the front of our truck nice.
Reinstall all 10 of your Phillips-head screws. There are two in each side behind where the factory turn signal location is. Don't forget to reinstall the two plastic push pins on the lower air dam on both sides. We'll then do the six screws along the top.
Reinstall your upper grille cover. You've got to kind of hook it under the handle for the hood latch lock. Now, these clips tend to get a little soft after they've been on and off a few times, so usually you can just pop the bottom in and push the Phillips-head screw down without actually needing to thread it. You should have six of those in the front of the truck. Ours is missing some. You want to just kind of spread them out if you're missing a few or you can replace them. You have your two push pins that connected to the back of the radiator shroud. Just place them in and pop the heads down.
Reconnect the connector on your turn signal. I just kept that 7-millimeter screw there for safekeeping. Line it up and slide it back into place. Reinstall the 7-millimeter screw at the top with your socket and ratchet.
These little plastic ears on the back of your headlight are not only what secure it in, but they're also how you go about adjusting it. There's a long, skinny ratcheting wrench that gets onto the heads of these. Once the plastic slides into its retainers here in the header panel, then you line it up into the opening on that tab, and then push the tab down and it locks them into place.
When you pull up, that's what frees them up and that's how we got it out. To reinstall, reconnect the headlight connector, and then you just have to watch these line up into their slots in the header panel. Get the small ends through the openings. Work the ears until it seats in fully. Lock the tabs down into place.
Your adjustments will then be made, if necessary, on the heads of those bolts with the appropriate tool through the openings. Repeat these steps on the opposite side. After reinstalling your upper grille cover don't forget to lock the spare tire crane tool back into place. Close your hood and you're good to go.
Thanks for watching. Visit us at 1AAuto.com for quality auto parts, fast and free shipping, and the best customer service in the industry.