Replaces


Frequently bought together
Attention California Customers:
 WARNING: This product can expose you to chemicals including Lead and Lead Compounds, which are known to the State of California to cause cancer, and birth defects or other reproductive harm. For more information, go to www.P65Warnings.ca.gov.
Lifetime Warranty
This item is backed by our limited lifetime warranty. In the event that this item should fail due to manufacturing defects during intended use, we will replace the part free of charge. This warranty covers the cost of the part only.
FREE Shipping is standard on Orders shipped to the lower 48 States (Contiguous United States). Standard shipping charges apply to Hawaii, Alaska and US Territories. Shipping is not available to Canada.
Expedited is available on checkout to the United States, excluding Alaska, Hawaii and US Territories as well as P.O. Boxes and APO/FPO/DPO addresses. Final shipping costs are available at checkout.

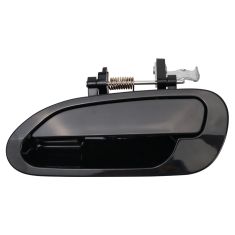
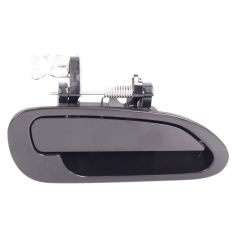
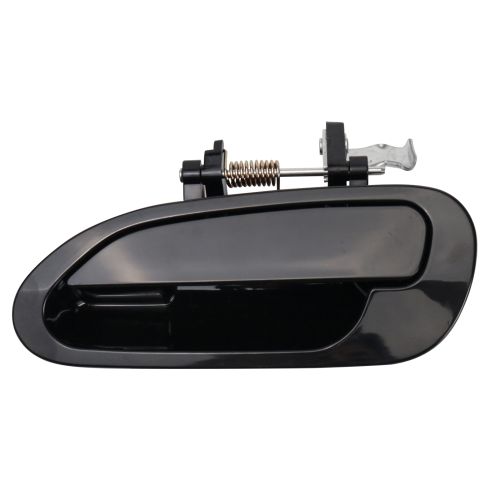
How to Replace Exterior Door Handle 1998-2002 Honda Accord
Created on: 2011-06-15
Tools used
Brought to you by 1AAuto.com, your source for quality replacement parts and the best service on the internet. Hi, I'm Mike Green, I'm one of the owners of 1A Auto. I want to help you save time and money repairing and maintaining your vehicle. I'm going to use my 20 plus years experience restoring and repairing cars and trucks like this to show the correct way to install parts from 1AAuto.com. The right parts, installed correctly; that's going to save you time and money. Thank you and enjoy the video.
In this video we're going to go over removing and putting the rear door handle back on, on this 2000 Honda Accord, same as any 98' to 02' four-door. Tools you'll need are a regular screwdriver, Phillips screwdriver and a 10 mm socket with a ratchet and extension. There's two Phillip's screws you have to remove; one in behind here. Careful with these doors, that one is broken off. Then the one right down in here, right underneath there. Once you have those screws out, take this panel, shake it back and forth a little bit. Pull it up, pull it back and out. Then your car window has a little button right here, you press that button, disconnect that. Your handle, slide it forward, pull it out. There goes my little cover. There's a clip right here, use a screwdriver or your thumb, pull that clip off, pull that rod up and your handles off.
Then basically you want to either use, you could use a screwdriver or a door panel clip tool or a putty knife. Stick it in behind here, find the pins and pull them, or you can just grab hold of your door panel and give a good quick tug. Some of the clips fell out, but that's all right. Then your door panel comes up and off. Then your currency light right back here, twist it clockwise, take it off. What you heard after I pulled the door panel was just one of these clips came out, they just go right into the door panel, clip in like that. You want to take a few things apart just five screws, the door lock actuator here. We'll speed it up here as we take out the two screws that hold that door lock actuator, and then the three screws that hold that white u-shaped, I guess routing panel. You pull that, you just push it back in and twist it and pull that out.
Now you're going to want a screwdriver bit like this, and there are three screws on the edge of your door that hold this lock in. You might be able to use a regular screwdriver, turn it hard, and tap it with a hammer; that can sometimes help but this is the right tool. Just fast forward through removing those three screws the rest of the way. Now you can take your, there's a little rubber around it here, around your child lock. Now you can just slide that forward. Now there are two 10 mm bolts, one right back in there, reach it through there. Then one right in here, you can reach it right through the square hole there. I'll just fast forward as I use my 10 mm socket with a ratchet extension to remove those two bolts. Once those bolts are out, there's a metal bracket that comes out. Then your handle just comes out on the other side.
Reinstalling the handle is a little bit tricky. I'm going to put the handle down on the ground here, then I've got one of my bolts in my socket with the extension. What I'm going to do is take that metal bracket, put it into place, and then I'm going to put my bolt through like that. Now I'm going to take my handle, put it up in, and slowly just work that bolt in until we fill it start going. What I'm doing now is I'm firmly pushing in on my door handle. Make sure you're pushing in the bottom of the door handle, bring that bracket up into place, and I'm putting my front bolt through and starting it into its hole; once you feel you have it started. Make sure your door handle is nice and flush here. Tighten this one up hand-tight. Tighten this one up hand tight. Then with my ratchet, nice and firm. Now reach in and work my lock mechanism back up into place. Start with the three screws. We'll speed it up here as I start those three screws in, then just use your regular screwdriver to tighten them preliminarily. Then use my bit with ratchet and tighten them out.
Take you through everything else in swift speed, put the grommet back on your little child lock. Put the plastic, I don't even know what you call that, brace back in, and start in the three screws and tighten them up. Make sure all the ear lock rods are in place correctly and locked into the clips. Then put the two screws back into, still tightening up that brace. Now put the screws back into your door lock mechanism and get that in place. Then you can put your water shield back into place. Door panel back on, go ahead and plug your courtesy light back in. Make sure that's coming right up through. Put your panel up on there, make sure you got your lock coming through against the window and down. Now you just want to check around the parameter and make sure that your pins are lining up. I'm just looking at them in the front and then I turn my attention towards the back; make sure the pins are lined up. Then you just tap the panel in with your back of your hand. Connect the power window switch. We'll fast forward through putting those screws back in. Make sure you replace the little trim covers and you're all set.
We hope this helps you out. Brought to you by www.1AAuto.com, your source for quality replacement parts and the best service on the internet. Please feel free to call us toll free, 888-844-3393. We're the company that's here for you on the internet and in person.