Replaces
This part doesn’t fit a . Select from parts that fit.
Frequently bought together
Part Details
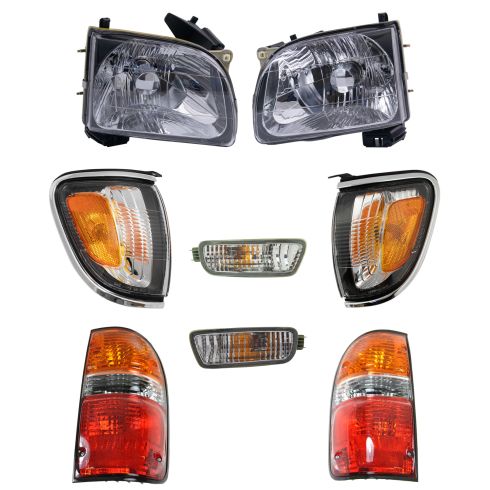
Complete Repair in One Purchase - Stop searching for parts individually and complete your repair with a customized kit or set from DIY Solutions.
High-Quality Parts from Trusted Brands - DIY Solutions' kits and sets are selected from the best automotive brands and include hard-to-find and even obsolete parts you may need for your vehicle.
Guaranteed Fit - DIY Solutions ensures its selected parts are quality-tested to guarantee fit and function.
Assemblies may include halogen or incandescent test bulbs that should be replaced before installation.
Features and Benefits
Item Condition:
New
Attention California Customers:
 WARNING: This product can expose you to chemicals including Chromium (Hexavalent Compounds), which is known to the State of California to cause cancer, and birth defects or other reproductive harm. For more information, go to www.P65Warnings.ca.gov
Lifetime Warranty
This item is backed by our limited lifetime warranty. In the event that this item should fail due to manufacturing defects during intended use, we will replace the part free of charge. This warranty covers the cost of the part only.


Created on:
Tools used
Brought to you by 1AAuto.com your source for quality replacement parts and the best service on the internet.
In this video we are going to show you headlights serving and replacement on this 2002 Toyota Tacoma. We are going to show you both if you just want to replace the headlight bulb as well as if you want to replace the whole assembly. A lot of times on these trucks they become clouded, cloudy and dull and scratched. Also they can get broken. Tools you will need are; a Phillips screw driver, a long flat blade screw driver and a 10 mm socket with a ratchet extension.
If you are just looking to change the headlight bulb, come in behind the head light assembly. You can pull your connection off by pulling back and then remove this boot and there is a wire retainer here push in, bring it up and out and now well I can take the headlight out. Okay new headlight, you want to put it back in with one of the tabs up, so that it can lean beyond the retainer here. You kind of pull back on the retainer, twist a little bit, push the retainer back down in, like that, put this boot right back on. Plug your harness back in. The same thing over here a little bit tighter with the battery there though. Now with your hood open, there is a Phillips screw right here on top, then remove that. Once that's removed you pull your light, you kind of pull this up, pull your parking light forward and then reach in behind and just twist counterclockwise on the socket. You want to repeat removing that side marker from the other side of the vehicle as well.
Now below the headlight just reach in and pull firmly. These clips, you actually, these two came apart you just reach down in and at the tab right here you press on that tab and that releases each clip. Release those ones first and then there are three down below so you need a long screw driver it will wand way down in here. Pull from the bottom here and reach way down to here, touch that tab, pull one in the middle and press it down and pull. The third rubber here that's already let go and there's your grill off. Now to remove your headlights there's two nuts on the side here and then a bolt right here. I'll just fast forward as I remove those two 10 mm nuts and the bolt.
Take out, pull this over to the side and pull it over to the side and out and disconnect your bulb and there's your light out. Take this new light from 1A Auto and just going to cut a little bit of the wrap off the edges. They are just going to plug in exactly the same. Okay, I'm going to just speed up here again as I put those two nuts on and then the bolt and then tighten them up with my 10 mm socket ratchet and extension. You going to tighten them up snug but don't over tighten them.
For installation, it's pretty simple. Make sure it goes in underneath and push that side in, push the opposite side in. Then make sure your tabs line up here because the lower ones go in. Give it a good extra push and make sure it is locked in. Light in, there are two tabs; there's one up here and one down here that goes into the grill. Make sure that lower one goes in. Make sure this goes underneath. Then make sure that one's going in, push it in, walk it right in. Make sure you can see the hole in the headlight and put your screw in and you repeat this from the other side you are all set.
We hope this helps you out brought to you by www.1AAuto.com- Your source for quality replacement parts and the best service on the internet. Please feel free to call us Toll free 888-844-3393 we are the company that's here for you on the internet and in person.
Tools used
Tools used
Tools used
Brought to you by 1AAuto.com, your source for quality replacement parts and the best service on the Internet.
Hi, I'm Mike from 1A Auto. I hope this how-to video helps you out, and next time you need parts for your vehicle, think of 1AAuto.com. Thanks.
In this video, we're going to show you how to replace marker on this 2002 Tacoma. You may want to do this if you have a bulb out or if you have cracked up your original light, or maybe your light is faded and dull and you want to put a nice new one on. The only tool you'll need is a Phillips screwdriver.
With your hood open, there's a Phillips screw right here on top. You remove that. Once that's removed you pull your light. You pull this up. Pull your parking light forward and then reach in behind and just twist counterclockwise on the socket. This bulb pulls right out.
Here's a new light from 1A Auto. See, it's nice and clear. If you got a broken one, it plugs right in. There's a tab here that goes in here. There is also a tab at the bottom that goes into the grille right here. Just make sure it's in at the bottom. This has to go under the fender up here. Make sure that tab goes in. Push it in nice and firm. Then make sure this all lines up and you can see the hole that's in the headlight. Screw started. Bring everything together. Then tighten it up.
We hope this video helps you out. Brought to you by www.1AAuto.com, your source for quality replacement parts and the best service on the Internet. Please feel free to call us toll-free, 888-844-3393. We're the company that's here for you on the Internet and in person.
Tools used
Brought to you by 1AAuto.com, your source for quality replacement parts and the best service on the Internet.
Hi, I'm Mike from 1A Auto. I hope this how-to video helps you out, and next time you need parts for your vehicle, think of 1AAuto.com. Thanks.
In this video, we're going to show you how to replace the front bumper-mounted signal light on this 2002 Toyota Tacoma. It's a pretty easy process. The only thing you'll need is a flat blade screwdriver.
For this light, just use a screwdriver, and you just want to pry it right out. It comes out.
Once you pull it out you can just twist counterclockwise. This bulb pulls straight out and back in.
Here's your old light. See the new light from 1A Auto nice and clear.
Put it in, twist, and then it just installs like the original.
We hope this video helps you out. Brought to you by www.1AAuto.com, your source for quality replacement parts and the best service on the Internet. Please feel free to call us toll-free, 888-844-3393. We're the company that's here for you on the Internet and in person.
Tools used
Tools used
Brought to you by 1AAuto.com, your source for quality replacement parts and the best service on the internet.
In this video we're going to show you how to replace a taillight on this 2002 Toyota Tacoma. You might want to replace it if you've backed into something or something like that. The only tools you'll need are a Phillips screwdriver and a flat-blade screwdriver.
There's four Phillips screws recessed into the light. I'm just going to speed it up as I remove those four screws. Once you remove the screws, behind here, there's a little tab right here, press it down and disconnect. Use a flat-blade screwdriver. There's little clips in here. Push down on the top of the clip and push it out, and up on the bottom of the clip. Push it out. There's another one right here.
New light from 1A Auto comes with those clips already installed, so plug it in here. Guide both of those clips right in. So you've got the clips on the inside part. Now you just guide those screws for the outside in where they're suppose to go. Tighten them up and you've got a nice taillight installed.
We hope this helps you out, brought to you by www.1AAuto.com, your source for quality replacement parts and the best service on the internet. Please feel free to call us toll-free 888-844-3393. We're the company that's here for you on the internet and in person.