Hi, I'm Mike from 1A Auto. We've been selling auto parts for over 30 years.
Hey, everyone. Sue here from 1A Auto. And today, on our 07 Honda Accord, we have in the shop, we're going to show you how to remove and replace your headlight assemblies. If you need these parts or any of the parts of your car, click on the link below and head on over to 1aauto.com.
The hood release is on the driver's side, left side kick panel, down by the driver's left foot. It's clearly marked with a hood on it. Pull the cable. The safety latch, release latch, is right here in the center, right above the H symbol. Then you have your hood rod. It goes right into the indicator. You see the arrow pointing down to that square. Prop it in there.
We're going to release the body clips on the shroud area on the front of the nose of the engine, and I have these little pliers that have pinchers on them and they go on each side and you can pull that body clip right out. You're going to remove all of them.
Last body clip and now we have two Phillips plastic body style clips. I just use a small pocket screwdriver and just turn it slowly. The threads on these, because they're plastic on plastic, it just really is ... There's no method to it.
Now, we can grab our cover. Lift it up.
So I raised and supported my vehicle so I could get underneath and take down the splash guard on the front here, where it attaches to the front plastic bumper.
Same procedure as up on top with these clips.
Now, there's supposed to be some metal bolts for these tins, but the car has gone through some ages of salt and sand, so they're all broken off.
I lowered the vehicle, mid range for me so that I can grab a Phillips screwdriver and you'll see the actual Phillips head right here attaching that fender well.
I take this out and repeat the process on the other side.
So if you follow the fender line over into the metal fender, the plastic bumper, right in here, there are three body clips that just slide the plastic and lock it in. So you're going to grab in your fender well and give it a good pull. See the indents. And then you're going to fall around to the other side. Do the same thing.
Then we have two bolts right here in the same spot on the other side, passenger side, 10 millimeter socket. Now, we're going to take those off.
So now, we have the two bolts out. We should be able to grab this plastic fender well and just pull it right out.
Whenever you're removing a front bumper, this styrofoam bumper cover is factory and they usually just use masking tape, as you can see. That's straight from the factory. Weather haws worn our tape here. So I'm just going to quickly tape this so it's sturdy again, and it's easier for us to work with.
Before we install the new one, I'm going to give you a quick visual on the mounting brackets. So there's one here, which we already took off. That's part of the bumper. Then there's this extended ear right here, which would be this bolt, and then there's one on the side, which would be this bolt right here. So we're going to remove three bolts total and then give it a good pull and we'll pull the tabs out.
Ten millimeter socket. I'm going to undo the top one here first. Set that aside. I'll put it right there. Then you can follow your light around and on the side bumper here, under this middle bracket, is the last mounting bolt. We are going to transfer this metal bracket over to reuse it.
So if you follow the bracket around, you'll see that there's two mounting screws in here. We'll have to release those also, 10 millimeter socket.
Now, with all the bolts removed, we're safe to pull it. Just give it a little tug. I'm just going to manipulate it around the fender.
There we go. There's our harness. So we're going to disconnect the, this would be side-marker lamp, blinker also, I do believe Then, we'll have the low beam and the high beam.
See right here. The actual harness is attached with just a body style clip. We can get a little pair of needle nose pliers and you can just pinch those ears and pull the harness right out. So I'll just put my needle nose pliers right in there, pinch those two little side plastic ears, and that harness comes right out.
Now, we have our old lamp here and we're going to take this metal bracket off and transferred over to the new lamp assembly, 10 millimeter socket again. And it just simply slides out.
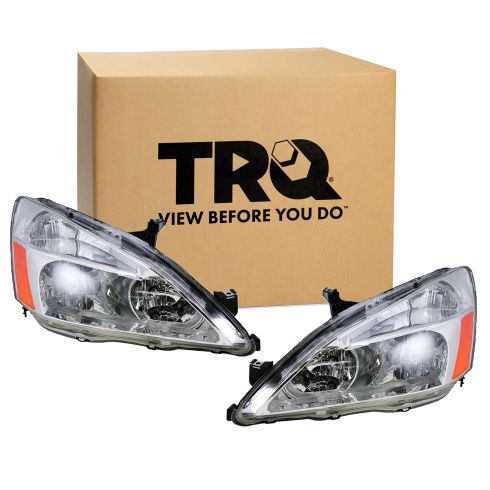
Here, we have our brand new headlight assembly for our 0700 Accord, and here, we have the factory one we took out. You can see how badly weathered it is. You can refinish these, but that only is a temporary fix. So for the money put into the cleaning, I would strongly recommend putting it into a whole new headlight assembly, smarter and easier way to go. The one from 1A Auto comes with all the bulbs in the back. This particular model comes with the low beam, I mean the high beam and the low beam and the side blinker, marker light, all the body clips, and the headlight adjustment. Comes wrapped in this clear cellophane for protection. Make sure you take that off after assembly. If you need this part or any other part for your car, click on the link below and head on over to 1aauto.com.
So the bracket sits just like that and you can see the two tabs right here. These two tabs and that bolt hole will line up with these two. They'll probably line up better once it's in the car, and all you have to do over here, is basically, set that down inside there. Make sure that lines up. Flip it over and we're going to install that bolt right here.
I'm just holding the tabs down here to line it up right.
All right, let's install it in the car.
So I brought my headlight over, and I attached to my harness by putting it back in that little clip hole, and now, I've got the old bulb connectors and I'm going to reconnect them. You've got a little tab here on the blinker light. Push in on that tab, and pull it out. To reconnect it, you're going to line it up and just push it in until you hear it click. Then we have our low beam here. Same thing. Push down on this tab and pull out on the headlight. You're going to line it up with the new headlight bulb. Push it in until we hit the click. Last one is the high beam. Same kind of clip. It's a different color, so you know that it's the high beam. It's a blue connector. Push down and pull out that bulb. It's always a good thing too, whenever you're doing headlight bulbs or any electrical sockets, to look at the contacts and make sure there's none burnt and no broken wiring. And then I'll line it up, push in until it clicks.
So in order to change the turn signal, marker light bulb, you're going to grab that extended gray harness and turn counter clockwise. It pops right out, and it's an 1157NA, amber bulb. You have your low and your higher notch. You can see inside that plastic, there's a low and a high notch, so you will line them up in that manner. Turn the bulb. Twist it in. Line your little four key ways up. You have a large one and three small ones. Get them in and turn it clockwise.
Now, on this new headlight assembly, it comes with the low and high beam. It does not come with the blinker marker light bulb, so you're going to need to replace it with an 1157NA bulb, if your bulb is burnt out.
Now, we're going to install our headlamp assembly. I've got the metal bracket on, so I'm just going to push it up like that to get that ear underneath the metal fender. I like to get my harness up in the area. Line it up in the area over here. We have the plastic body. I just give it a little tap in place. Make sure it looks good up here. And now, I'm going to install one of these top bolts so it can hold it in place. This is the side one, and then you have the two ones in the front here that go on the bracket. I always like to start everything by hand and if you look at these bolts, one's a little bit longer than the other. That was on the top. The shorter one was on the bottom.
A little keynote, while I put all the bolts back in. To line it up and make it tight before I tightened everything, I did reinstall this bolt. Now, this was a bolt that the front bumper cover is on top of it, mounts on top of this. So I'm going to take this back off now. Now, that the headlight is secured in place and all the bolts are lined up, I can take this back off and I'll install this when the bumper cover goes back.
Now, I'm all set and ready to pull off the Saran wrap for the transport of the headlight.
So now, we're going to install the front bumper cover. Get a good handle on it. Bring that right in. I'm going to line up the top first. You see these tabs right here? That tab goes right inside that tab on that metal bumper, right on both sides. Get ne side then come over and do the other side. Line everything up. Just give it a good push.
Make sure you put your fender skirt up inside before you push the final tab in. This side went in nice and smooth.
Before I put any plastic clips in or the Phillips heads on the fender well, I'm going to put in the actual mounting bolts up here. Line this all up and get it nice and secure before I do that. This side's lined up. Put my 10 millimeter sockets head bolt in. Just snugging it and I'm going to go to the other side and see what is going on. See if I can get this to line up. There we go. Now, I'm ready to snug these down.
Raise it up, put the two skirt screws in, and then bring it all the way up. I'm going to take the mounting Phillips screw, bring it right in there. Snug that down. Repeat the process on the other side. So now, this fender skirt goes up underneath the front bumper cover, so there's enough flexibility in it that you can just pry it down. Push it up into place. Now, we'll take our plastic inserts and put them into place.
Now, if yours is in better contact than this one, you will have once again, three 10 millimeter head bolts on each fender well in that side and on this side and the rest are plastic pins, push-in pins. These ones were missing or broken.
Okay. Now, we're going to bring it down. Put our top radiator cover on. Last piece we're going to install that upper cover and you guide the hood latch in. Pretty simple. And then the cover has this little tab right here. See the plastic cutoff? You're just going to manipulate it, bend it, put it right inside the fender well. We have all our plastic push tabs. Just go around. Line them all up and push it into place. Last two are these, the little top screws, the plastic screws, and then I just take the plastic screw, line it up, push it down.
Ready to go. Let's close the hood.
This is a basic tutorial on how to aim the headlights on your vehicle. Find the axis of your headlights. This is usually indicated with a small dot or the headlight bulb size on the lens. If not, it's the actual center point of your headlight bulb. Transfer this mark to a vertical wall with a preferably dark color that'll allow you to back up 25 feet. Pull up and find the center line of your vehicle, as well as the center line of your headlight axis. Mark the wall with the height of the headlights and a straight line going across at that axis height. Back your vehicle up 25 feet from the wall to the front edge of your vehicle's headlights.
Turn your headlights on and locate the adjusting screw, usually on the backside of your headlights. You'll want to rotate this until the passenger hotspot or focus of the beam is approximately two inches below the line and the driver's side is four inches below the line. We change the heights on each side so you can still get a good beam to the offside of the road on the passenger side and have the driver's side low enough to not blind oncoming traffic.
Thanks for watching. Visit us at 1aauto.com for quality auto parts, fast and free shipping, and the best customer service in the industry.